Inter-warehouse transfer list

Learn how to list, search and manage inter-warehouse transfer documents in Logzi.

Feature overview

This module lets you review and manage Inter-warehouse transfer documents. An inter-warehouse transfer document records products moving from one site (or location code) to another. The list view gives you access to every transfer you have created in one place: you can search among them and start the most important actions directly from here — create a new document, open, close, delete, send email and create a task.

  • Clear overview list: documents are shown in a paginated table by document number, date and status, with links to the related Expense and Income documents at the end of each row.
  • Quick actions: open, close, delete, clone or email the selected document with a single click, without having to enter its detail page.
  • Preview panel: the items of the selected document (with source and destination site and location code) and its related documents can be checked instantly below the list, without leaving the list.
  • Two ways to create a transfer: from the main menu you can record a simple (New) or a group (New group) transfer — the difference is explained at the end of step 1.

The possible statuses of an Inter-warehouse transfer document are: Draft, Closed, Cancellation, Cancelled — the meaning and restrictions of each status are explained in the Frequently asked questions section.

Step by step

1. Viewing the list and the actions available for a document

Clicking the Main menu / Stock management / Inter-warehouse transfer / List menu item shows every transfer created so far. Above the table, the Actions tab gives you the following buttons for the selected document (click a row first, because without a selection most buttons are inactive):

  • New: creates a new transfer on a blank form — see the New and New group comparison below for details.
  • Open: opens the detail page of the selected document to view or edit its items and header data. Group transfers also open on the same standard detail page.
  • Close: closes the document — only available for documents in Draft status. Clicking the arrow next to the button lets you combine closing with printing (Close and print) or downloading (Close and download), so the paper or file version of the document is immediately at hand.
  • Delete: deletes the document — possible for documents in Draft and Closed status. The Delete and copy option in the arrow menu next to the button also creates a copy next to the deletion, so use it when you entered a closed document with incorrect data and need to record it again.
  • Send email: sends the selected document by email — only available for documents in Closed status (or beyond).

Right-clicking a row gives you the same quick actions from a context menu (New, Open, Close, Delete), plus the Cloning option: it creates a new transfer based on the data of the selected one, so recurring transfers (for example the same replenishment to the same site every week) are faster to record than starting from scratch.
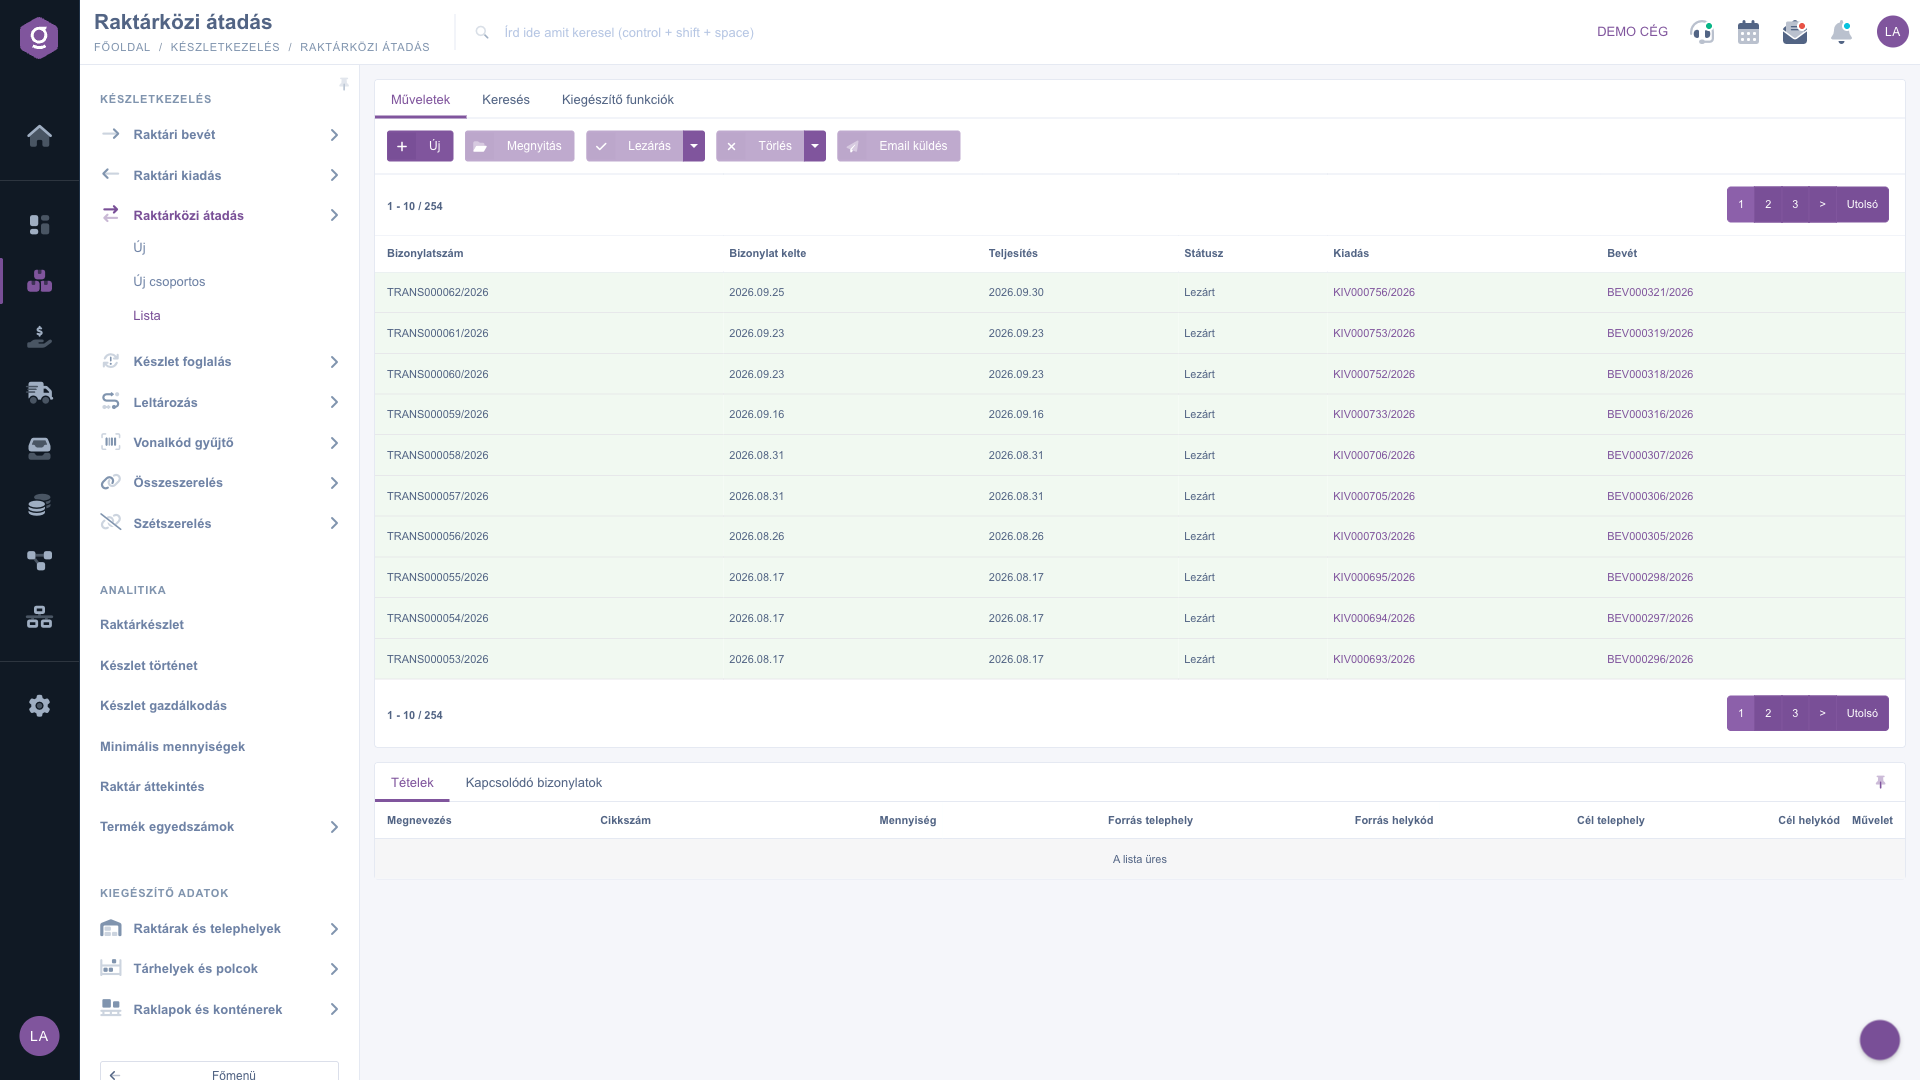
Inter-warehouse transfer list – Actions tab (Műveletek)

2. New and New group — which one to choose?

You can create a new transfer in two ways. The Main menu / Stock management / Inter-warehouse transfer / New menu item (and the New button of the list) opens the standard detail page, while the Main menu / Stock management / Inter-warehouse transfer / New group menu item opens the group entry form. Group entry can only be started from the menu; the New button of the list always opens the standard detail page.

  • New: choose it if source and destination may differ from item to item — here you can set the Source site and Destination site as well as the location codes (Source location code, Destination location code) for each item separately. This is the precise mode that can be fine-tuned per item.
  • New group: choose it if many products have to be moved from the same site to the same other site. You select the source and destination site once in the header for all items, and for the items you only need the Name, the Item number and the Quantity. After saving, the document opens on the standard detail page, where you can edit it further.

In the list, transfers created in either way are not shown separately: they appear in the same table with the same columns.

3. Searching among documents

Clicking the Search tab above the table reveals the filtering options. The most commonly used fields are shown right away: Document number and Status (you can select several statuses at once). Clicking Expand opens further, more detailed filters: Document date and Performance date by date range, Employee, Item number, Project, Job number, Department number and Internal comment. Use the Search button to apply the selected conditions.
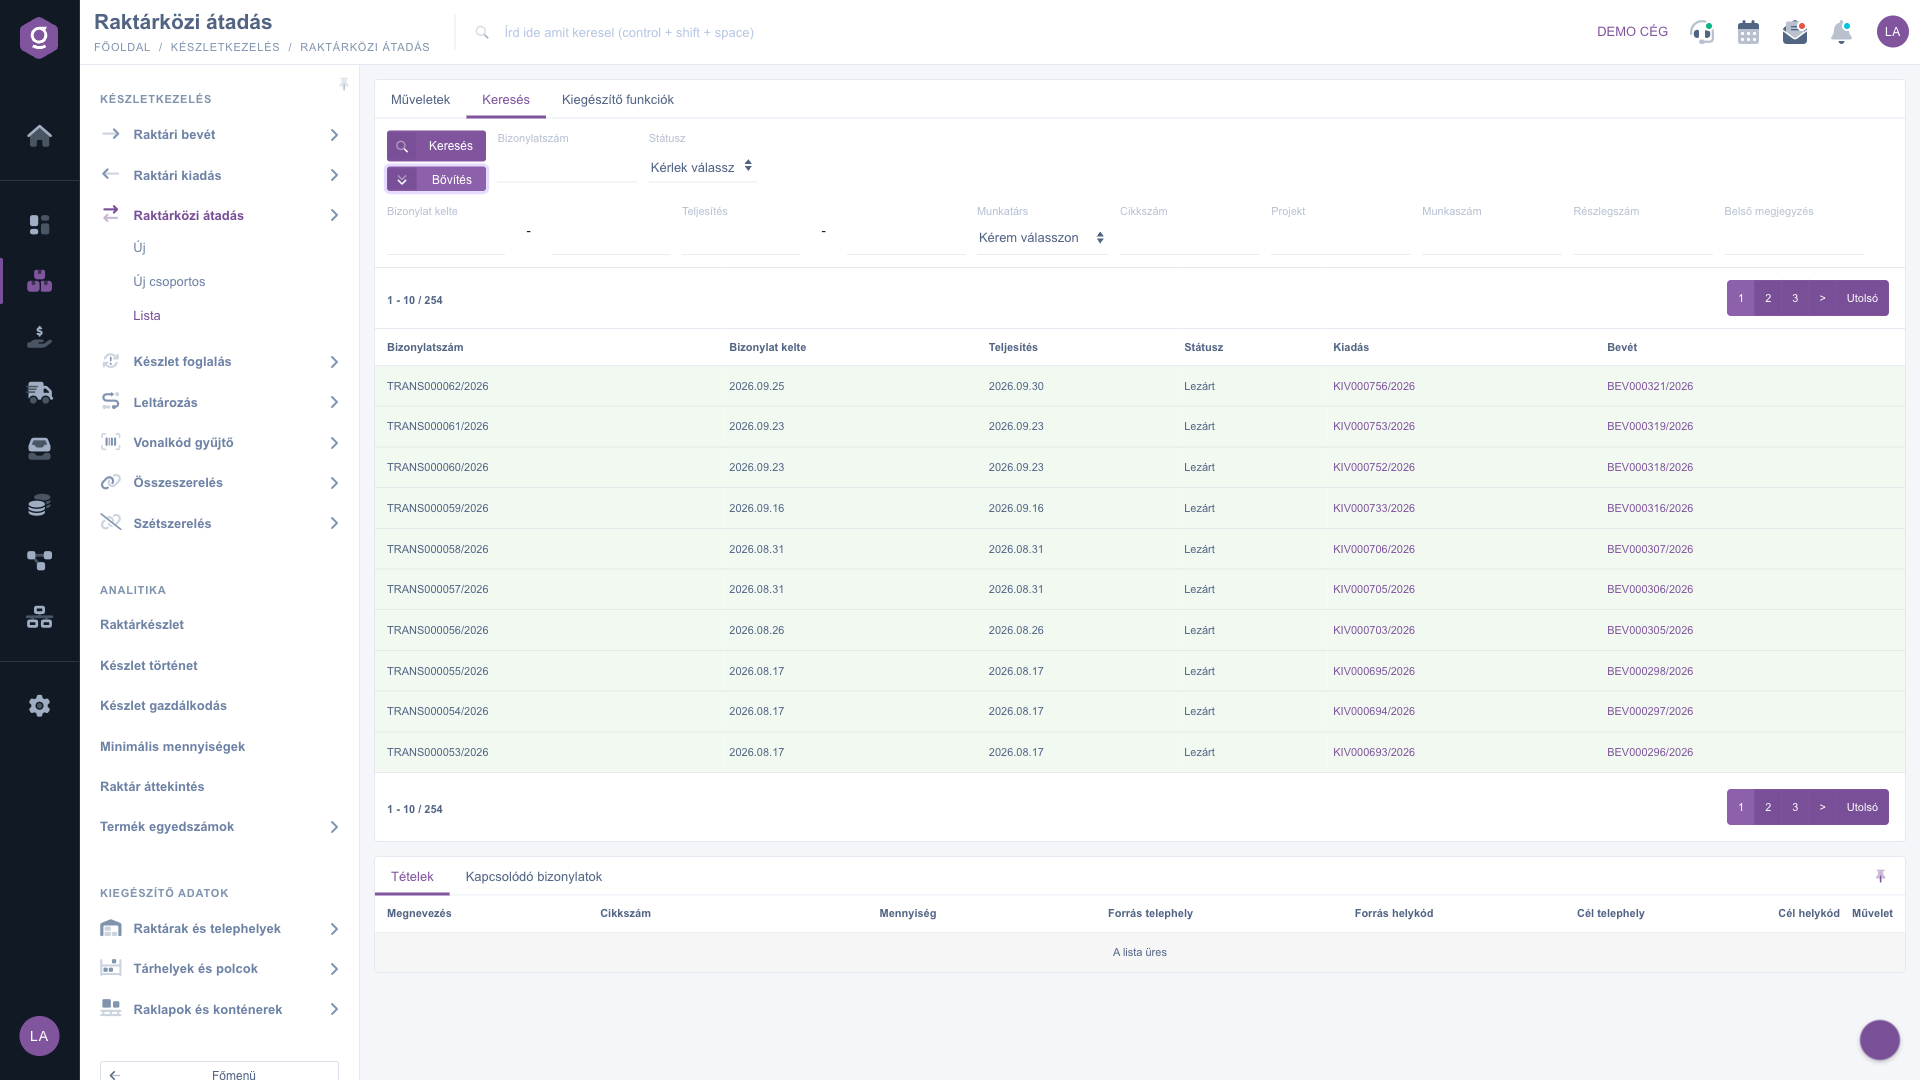
Inter-warehouse transfer list – Search tab (Keresés)

4. The preview panel

The panel shown below the list lets you quickly check the details of a selected document without having to open it. The panel contains two tabs:

  • Items: the transferred products with Name, Item number, Quantity, Source site, Source location code, Destination site and Destination location code. Below the items you see the total of the quantities. If you hover over an item, the available, physical, reserved and incoming stock of the product is shown; clicking the icon in the Action column opens the analytics of the product.
  • Related documents: other documents linked to the document; they can be opened with the icon at the end of the row.

The panel can be pinned (fixed to a set size) using the icon in its top-right corner, and its size can be adjusted by dragging the divider line at the top of the panel.
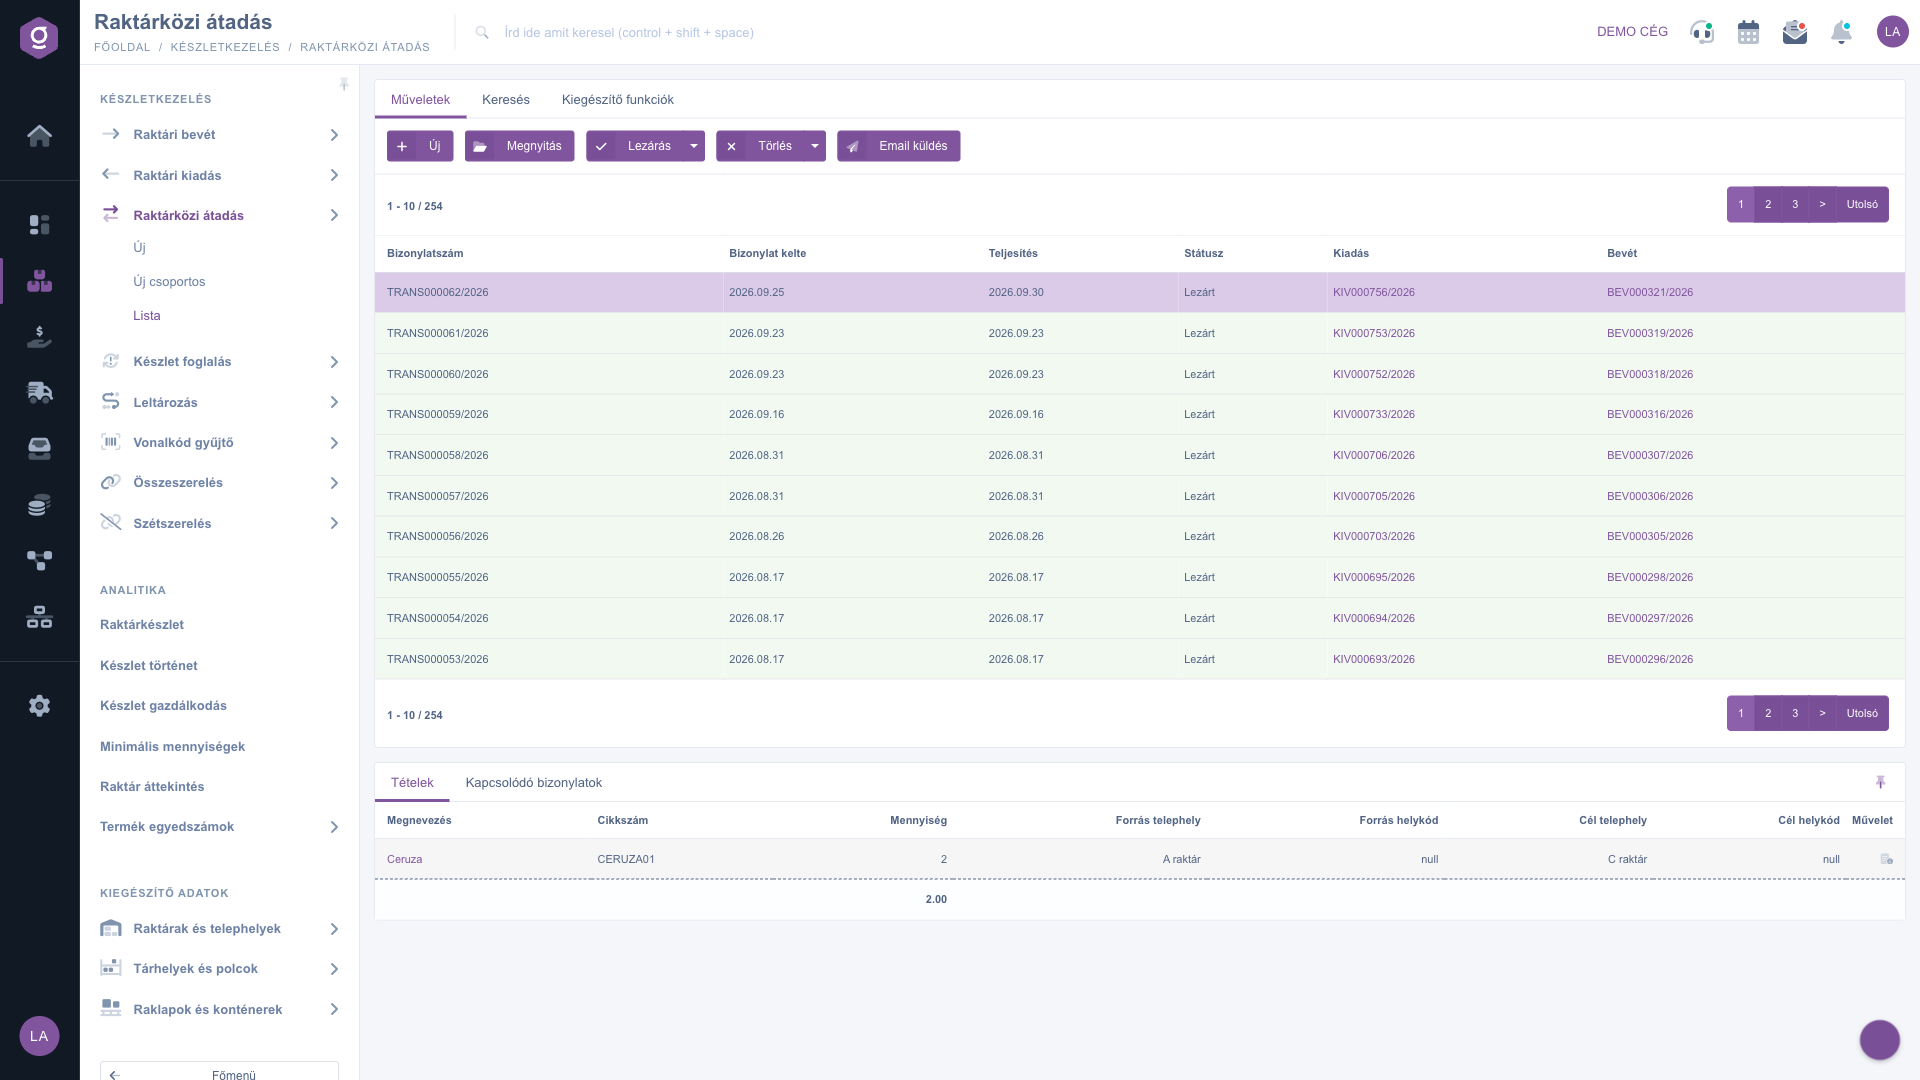
Inter-warehouse transfer list – preview panel, Items tab (Tételek)

5. Additional functions

On the Additional functions tab, the New task button lets you create a task related to the selected document — for example a reminder to check the received goods at the destination site.

Tip


If you entered a closed transfer with incorrect data, do not start over: select the row and choose Delete and copy from the arrow next to the Delete button — the document is deleted and the copy can be edited again together with its items. And if you have to move the same set of items every week, use the Cloning option of the right-click menu, or the New group entry, where you only have to select the sites once.

You can read about editing the items and header data of a transfer in detail in the Inter-warehouse transfer document and Inter-warehouse group transfer document guides.
The Expense and Income links shown in the list point to warehouse issue and warehouse receipt documents. If you would like to understand them better, see the Warehouse issue list and Warehouse receipt list guides.

Field descriptions

The table columns and their meaning:

Field / Element Required Description
Document number The unique identifier of the inter-warehouse transfer document.
Document date The date the document was created.
Performance date The date the transfer was performed.
Status The current state of the document (Draft, Closed, Cancellation, Cancelled).
Expense A link to the warehouse issue document related to the transfer, if it already exists. Clicking the document number opens the issue in a new tab.
Income A link to the warehouse receipt document related to the transfer, if it already exists. Clicking the document number opens the receipt in a new tab.

The Expense and Income columns are empty if the document has no such related document yet.

The columns of the Items tab of the preview panel and their meaning:

Field / Column Required Description
Name The name of the transferred product. If the product master data is available, clicking the name opens the product page.
Item number The unique item number of the product, by which it can be identified in the master data.
Quantity The transferred quantity in the unit of the product. The footer below the items shows the total of the quantities.
Source site The site the goods leave.
Source location code The code of the storage location within the source site — may be empty if the item has no location code.
Destination site The site the goods are moved to.
Destination location code The code of the storage location within the destination site — may be empty if the item has no location code.
Action Opens the analytics of the product. It is only active for stockable products; for a non-stockable item a grey icon is shown.

The columns of the Related documents tab of the preview panel and their meaning:

Field / Column Required Description
Document number The identifier of the related document.
Document date The date the related document was created.
Document type The kind of the related document (for example warehouse issue or receipt).
Issuing employee The name of the colleague who issued the related document.
Action Opens the related document with the icon at the end of the row.

Frequently asked questions

Only a Draft document can be closed, and only a Draft or Closed document can be deleted — Cancellation and Cancelled documents can neither be closed nor deleted. If the buttons are grey, check that a row is selected in the table. If the action stops with an error message, read the message and check the items of the document (sites, location codes, quantity), then try again.

Send email is only available for documents in Closed status (or beyond), because a draft can still change. Close the document first — even with the Close and download option if you need the file as well — and select the row in the table.

A link appears in these columns only if the transfer already has a related warehouse issue or warehouse receipt document. While the transfer is in Draft status there is usually no related document, so the two columns are empty. You can also see the related documents on the Related documents tab of the preview panel; you can read about how these document types work in the Warehouse issue list and Warehouse receipt list guides.

With New you enter the source and destination site and location code item by item, while with New group you select the two sites once in the header and only have to list the products. After saving, both are the same kind of inter-warehouse transfer document, so they are not distinguished in the list, and Open opens the standard detail page for both. The details of each mode are described in the Inter-warehouse transfer document and Inter-warehouse group transfer document guides.

A Draft is an open document that can still be edited; a Closed document is finalized. Cancellation and Cancelled documents remain in the list, but they can no longer be closed or deleted, so if a change is needed, create a new transfer instead (for example with the Cloning option). You can filter by these statuses with the Status field of the Search tab.

The Inter-warehouse transfer module only appears under Main menu / Stock management if it is assigned to your user. If you cannot see it, ask the system administrator to check the module assignment in your user settings.

Need personalized help?

Don't want to spend hours searching for a solution? Choose the most efficient way: book a personalized, 45-minute online training session dedicated entirely to you. Whether it's a walkthrough of the basics or a detailed setup of a specific module, our expert colleague will guide you through the whole process, step by step.

Don't waste your time - ask for help!
Our goal is to get you using our system as quickly and efficiently as possible. Whether you're completely new to us or stuck on a specific setting, don't hesitate to ask for help!

Logzi warehouse management software

Get in touch with us

Interested in our software? Feel free to write to us!

Need help?

If you can't find the answer and need assistance

Create your account now,
pay later!

Try it free for 3 days, no risk, no obligation!
