RMA sheet

Learn how to create an RMA (return, withdrawal, warranty) in Logzi and take it through inspection and the follow-up documents.

Function overview

On the RMA sheet you create and manage a single customer case of return, withdrawal or warranty / defective goods. Here you record which partner returns which products, for what reason and in the hope of what solution, and on the same sheet you take the case through the process: status change, receiving, inspection, and finally, based on the decisions, starting the credit invoice, replacement, repair or scrapping.

  • Three ways to start: from an empty form (the New menu item), from an order or invoice via the Document management menu, or from a request submitted through the customer portal — for the latter the system also sends an internal notification.
  • Link to the source document: if you start from an order or invoice, the partner, the currency and the returnable items (with the quantity not yet returned) are filled in automatically, and the system does not allow recording more than the returnable quantity.
  • Automatic deadline: the handling deadline is 14 days for the Withdrawal / Return type and 30 days for the Warranty / Defect type, counted from creation.
  • Item-level data: for each item you can enter the reason, the requested resolution and the description of the fault; after the inspection, the received and accepted quantity, the decision and the disposition of the product are also shown here.
  • Full tracking: on the Status changes tab every status change can be found with date, comment and colleague.

The RMA types are: Undelivered parcel, Withdrawal / Return, Warranty / Defect — Undelivered parcel cannot be chosen for a new RMA. The RMA statuses are: Requested, Accepted, awaiting parcel, Rejected, Received, Under inspection, Inspected, Closed, Withdrawn. The general state of the document (Draft, Closed, Cancellation, Cancelled) is independent of these: a new RMA automatically becomes a Closed document on the first save, and from then on the process is carried by the RMA status; a deleted RMA is Cancelled. The restrictions of each state are described in the Frequently asked questions section.

Step by step

The screenshots were taken from the Hungarian demo interface; button and field names appear according to your own language setting.

1. Creating a new RMA from an empty form

Click Main menu / Sales / RMA / New to open the empty RMA sheet. Use it when the return cannot be clearly tied to an earlier order or invoice (e.g. an old purchase, a manually recorded case). At the top of the sheet are the Actions, Additional functions and View and layout tabs, below them the header fields, and at the bottom the items and the further tabs. Until you save, the Document number, the Rma status and the Deadline are empty — the system fills them in.
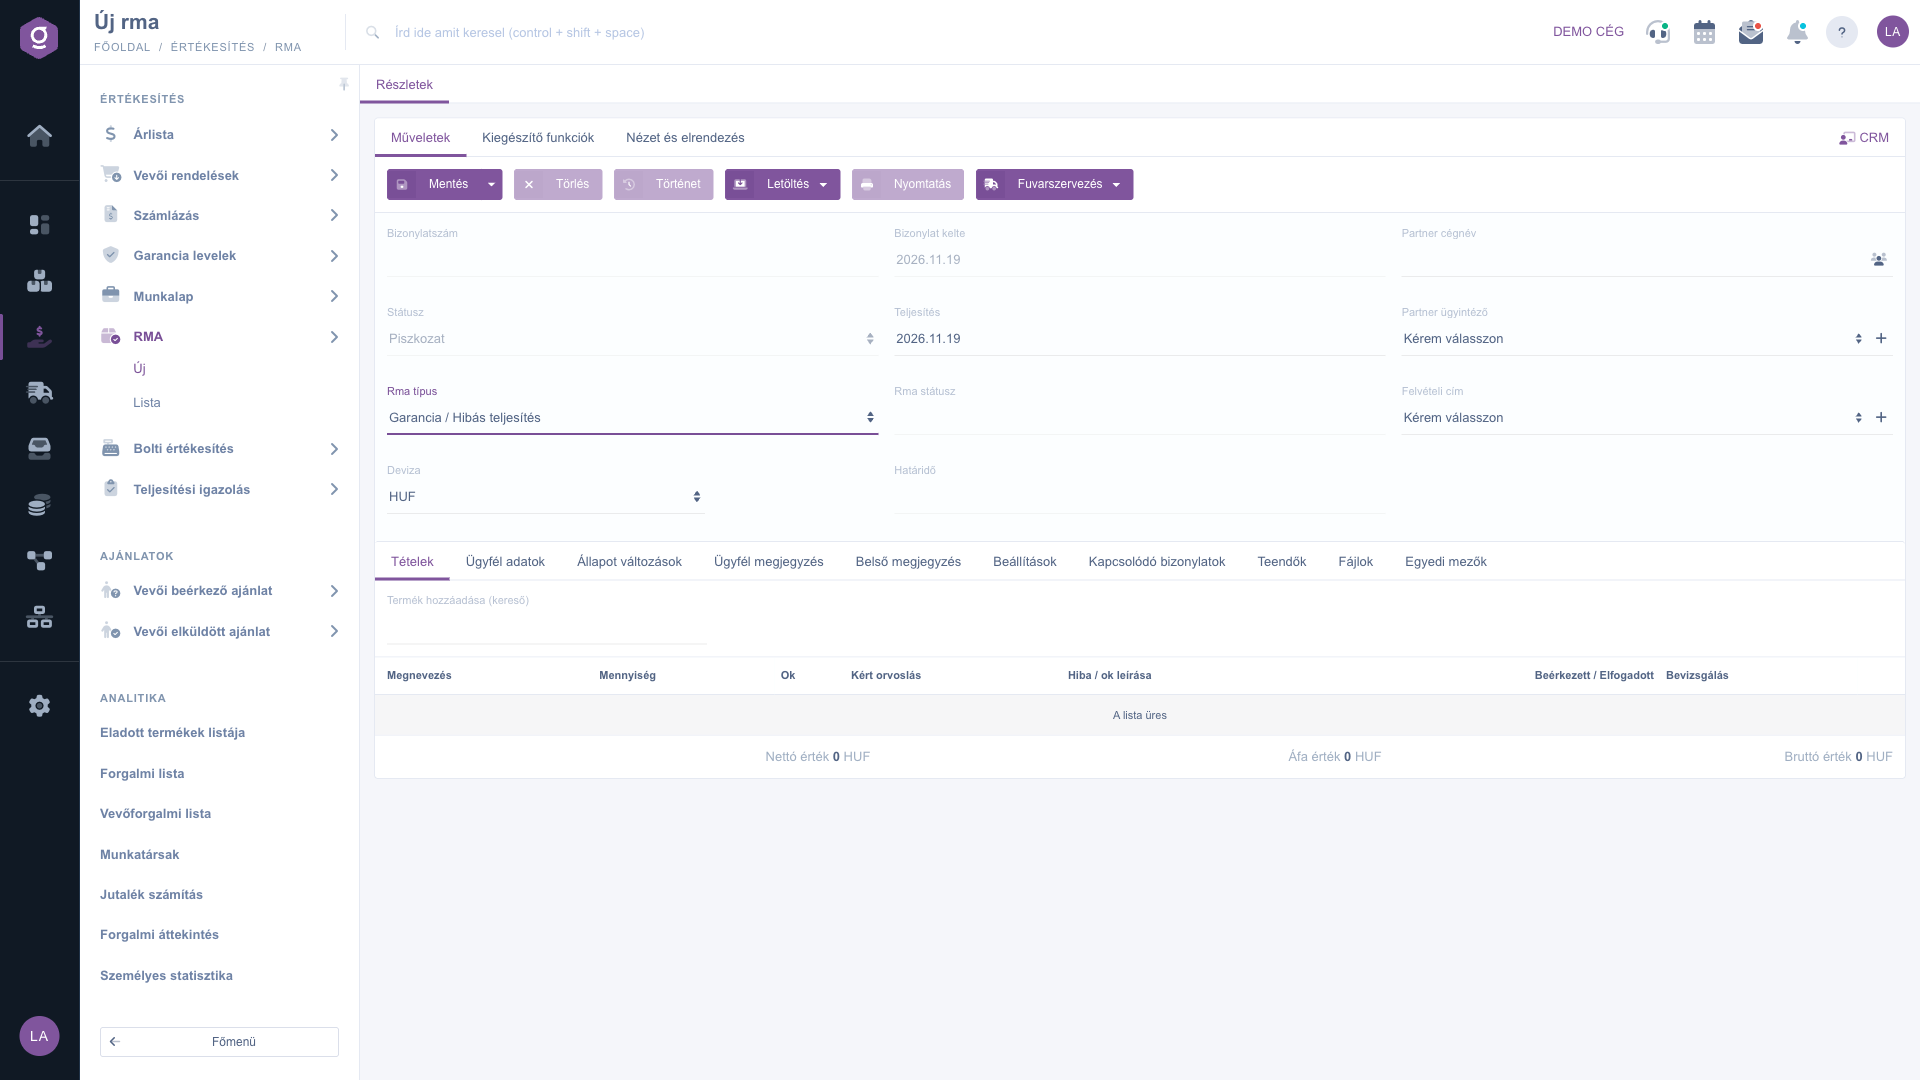
RMA sheet – new, empty RMA

2. Starting an RMA from an order or invoice

This is the most convenient way, because the system takes the data over from the source document. Open the order or the invoice (or select it in the list), choose the Document management menu, then the RMA - Withdrawal / Return or the RMA - Warranty / Defect item. The system opens a new RMA sheet on which the Partner company name, the Partner contact person, the Currency, the Source document and all items that can still be returned, with their returnable quantity, are pre-filled. An order, an invoice, an advance invoice, a manual invoice or a proforma invoice can be the source document — but you can start an RMA only from a closed one.

  • RMA - Withdrawal / Return: choose it when the customer returns the product without giving a reason, using the statutory right of withdrawal (14-day deadline).
  • RMA - Warranty / Defect: choose it when the product is faulty or not the one ordered and the customer asks for repair, replacement or refund (30-day deadline).
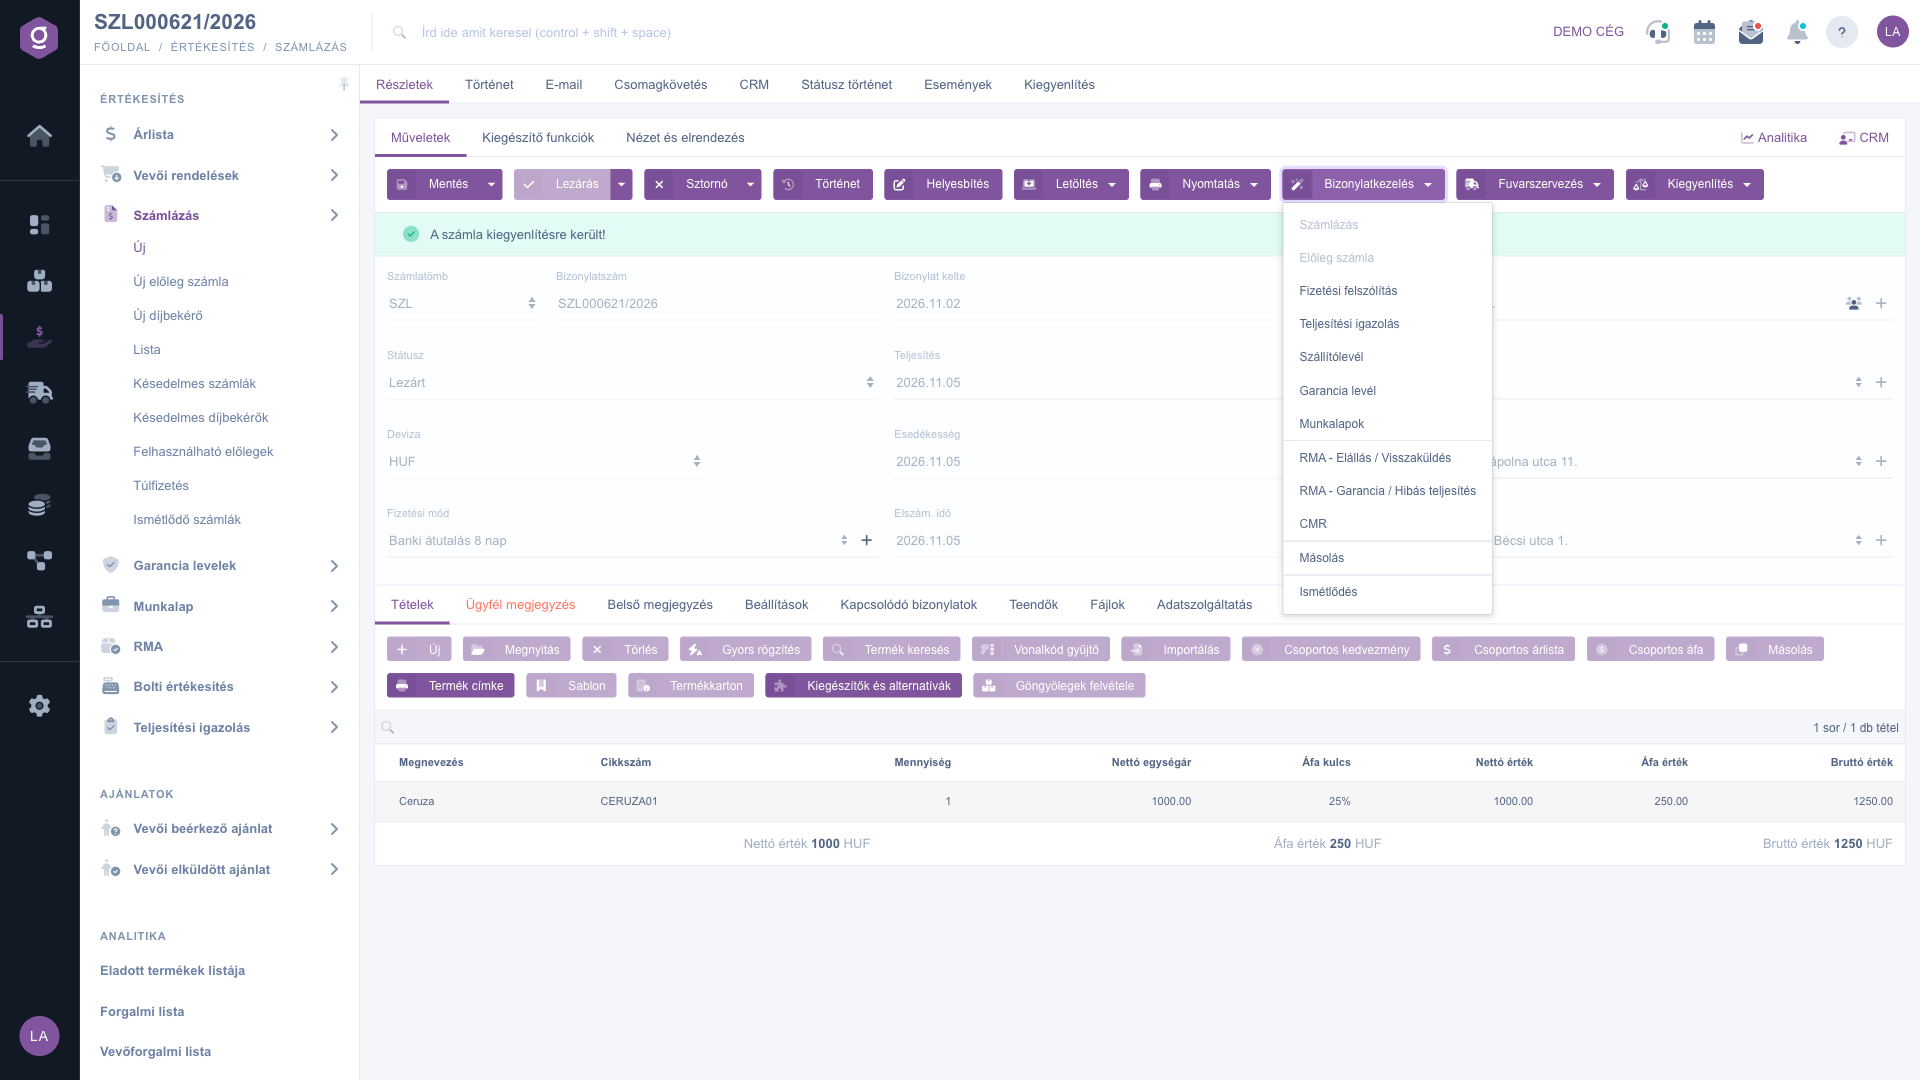
Invoice sheet – the RMA start items in the Document management menu
Invoice sheet – the RMA start items in the Document management menu (Hungarian: Bizonylatkezelés)

3. Filling in the header

First choose the Rma type, then enter the Partner company name: type a company name or tax number and pick from the results. The icon next to the name opens the partner sheet, and the + button next to Partner contact person and Pickup address lets you create a missing contact or address on the spot. Check the Currency and the Performance date, and that the right Rma return address is selected on the Settings tab — this is where you expect the parcel to arrive.

4. Recording the items

On the Items tab you collect what the customer is returning. There are two ways to add an item:

  • Items from source document: visible only if the RMA has a source document. The button opens a window listing the items of the source with the Quantity and the still Returnable quantity; enter in the Quantity to return column how much the customer sends back, then Save. Use it when only part of the items is returned, or when another item has to be added later.
  • Add product (search): start typing the product name or item number and pick the result. Use it when there is no source document, or when the returned product is not on it.

For each item you can fill in the Reason (e.g. Malfunction, Damaged product, Changed my mind), the Requested resolution (e.g. Refund, Replacement, Repair) and the Description of the fault. The red × button at the end of the row deletes the row. The Received / Accepted and Inspection columns are not filled in by you: the system fills them in after receiving and inspection (the inspection result as labels, with the real cause of the fault and the comment next to it).
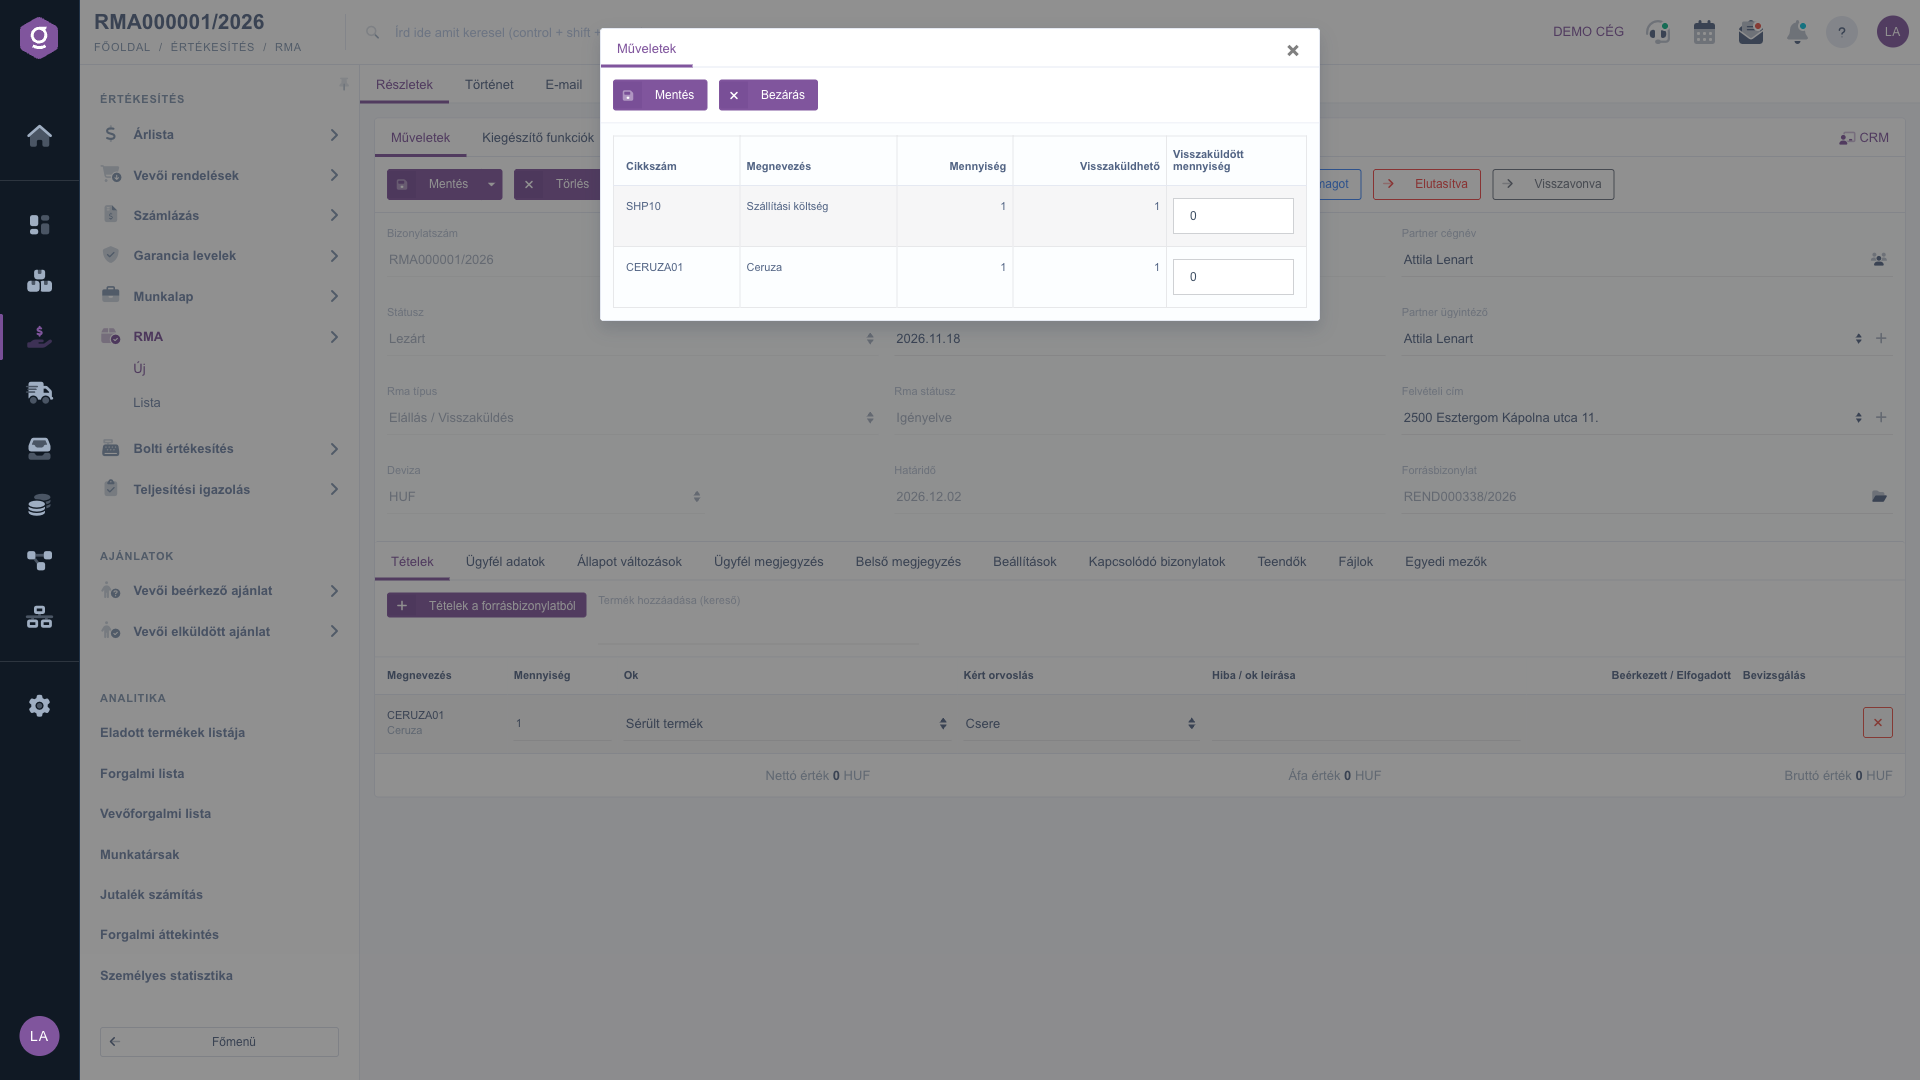
RMA sheet – Items from source document window

5. Customer data and comments

On the Customer data tab you can record in the Customer comment field what the customer wrote about the claim, as well as the Bank account for the refund and the Account holder name if the money has to be returned by transfer. These are later used by the Finance task (pay out refund). For a rejected RMA the Rejection reason is also shown here. On the Customer comment and Internal comment tabs you can write formatted text and choose a saved text template from the drop-down list. The Customer comment is meant for the customer, the Internal comment is an internal note of your team.
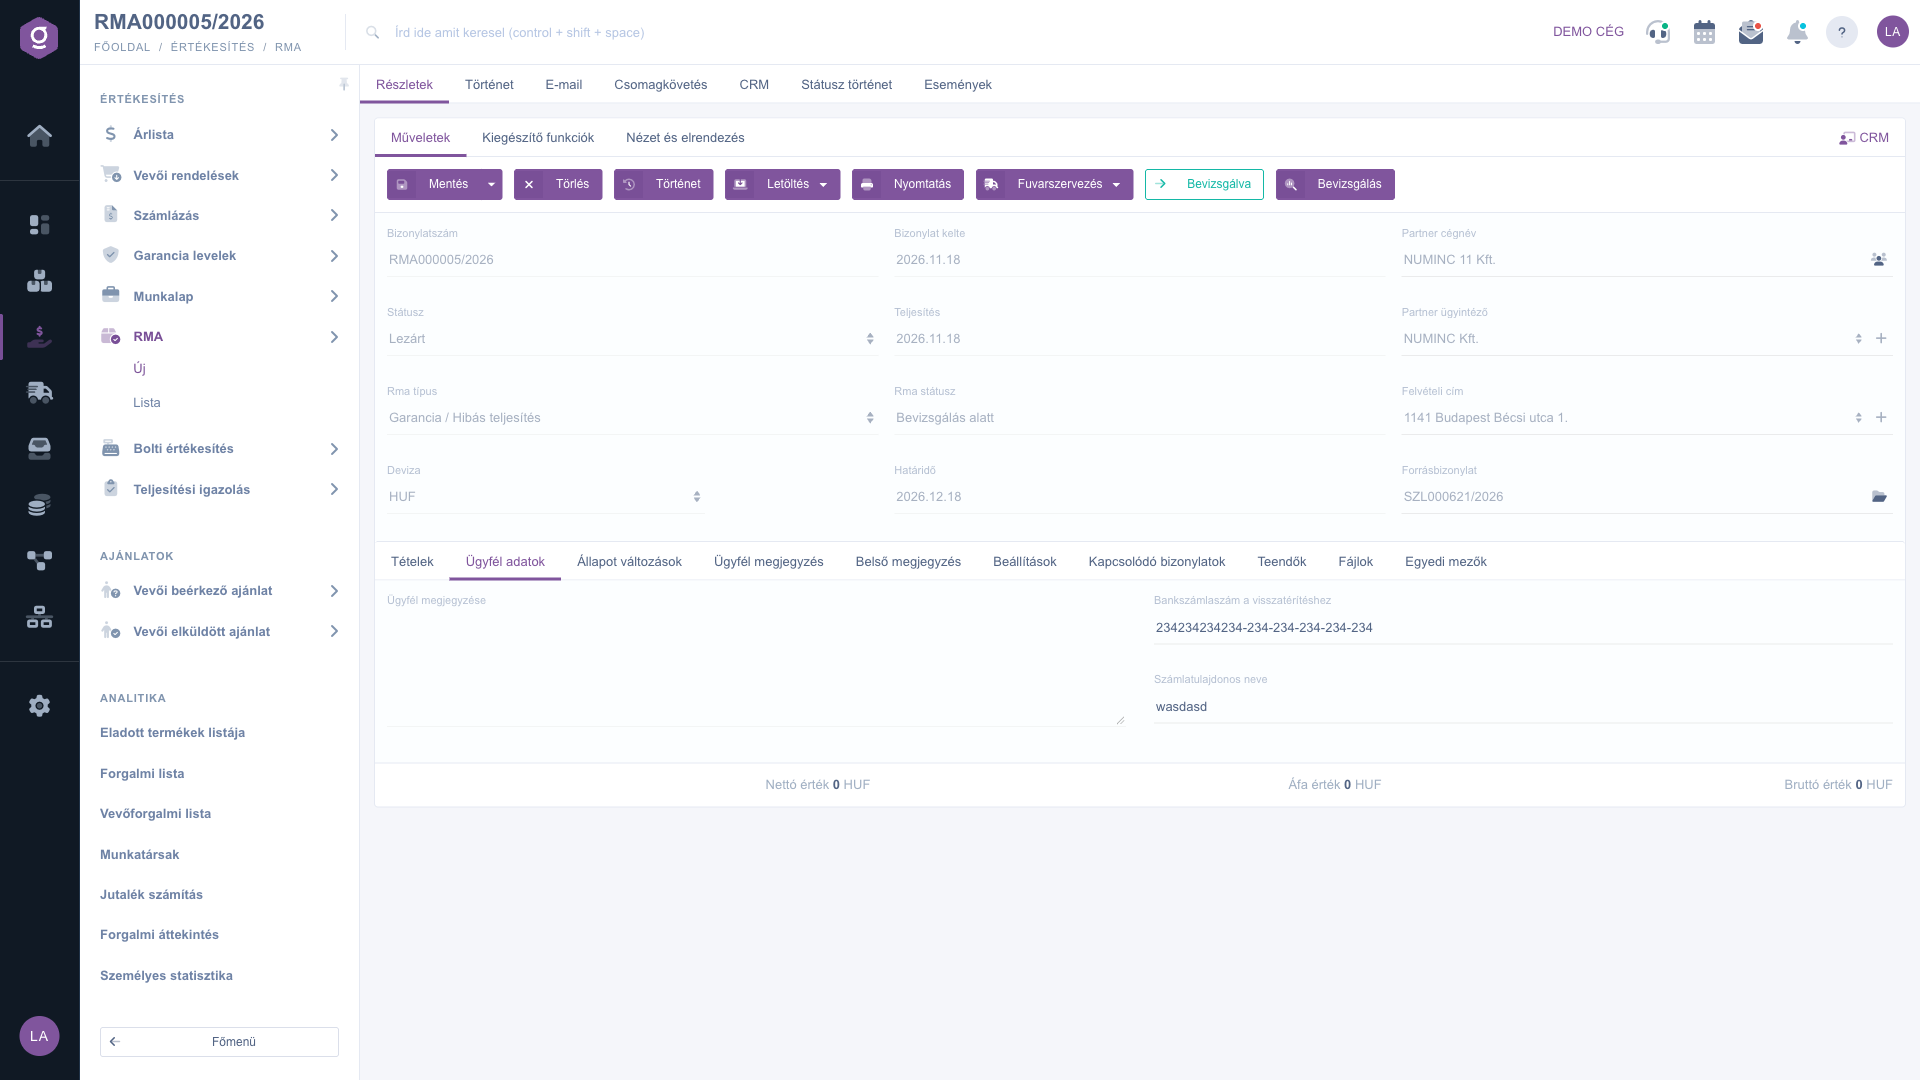
RMA sheet – Customer data tab
RMA sheet – Customer data tab (Hungarian: Ügyfél adatok)

6. Saving

From the arrow next to the Save button you can choose Save or Save and close; for a new RMA the system creates a closed document in both cases, assigns the Document number (e.g. RMA000005/2026), sets the Requested status and calculates the Deadline. Saving requires: Rma type, Partner company name, Currency, Performance date, Rma return address and at least one item. The Rma type can no longer be changed after saving.

7. Taking the RMA forward: statuses, inspection, documents

After saving, on the Actions tab, at the end of the button row, the next statuses available from the current RMA status appear as colored buttons (e.g. Accepted, awaiting parcel, Rejected, Withdrawn for the Requested status). Click a button and the RMA moves on; for Rejected you have to enter the Rejection reason, and Received opens the receiving window where you enter the quantities actually received (the received goods are then booked into stock at the return goods location). The data can be edited up to the Accepted, awaiting parcel status; after that the fields of the header and the items are grayed out, and only the internal comment and the inspection can be changed.
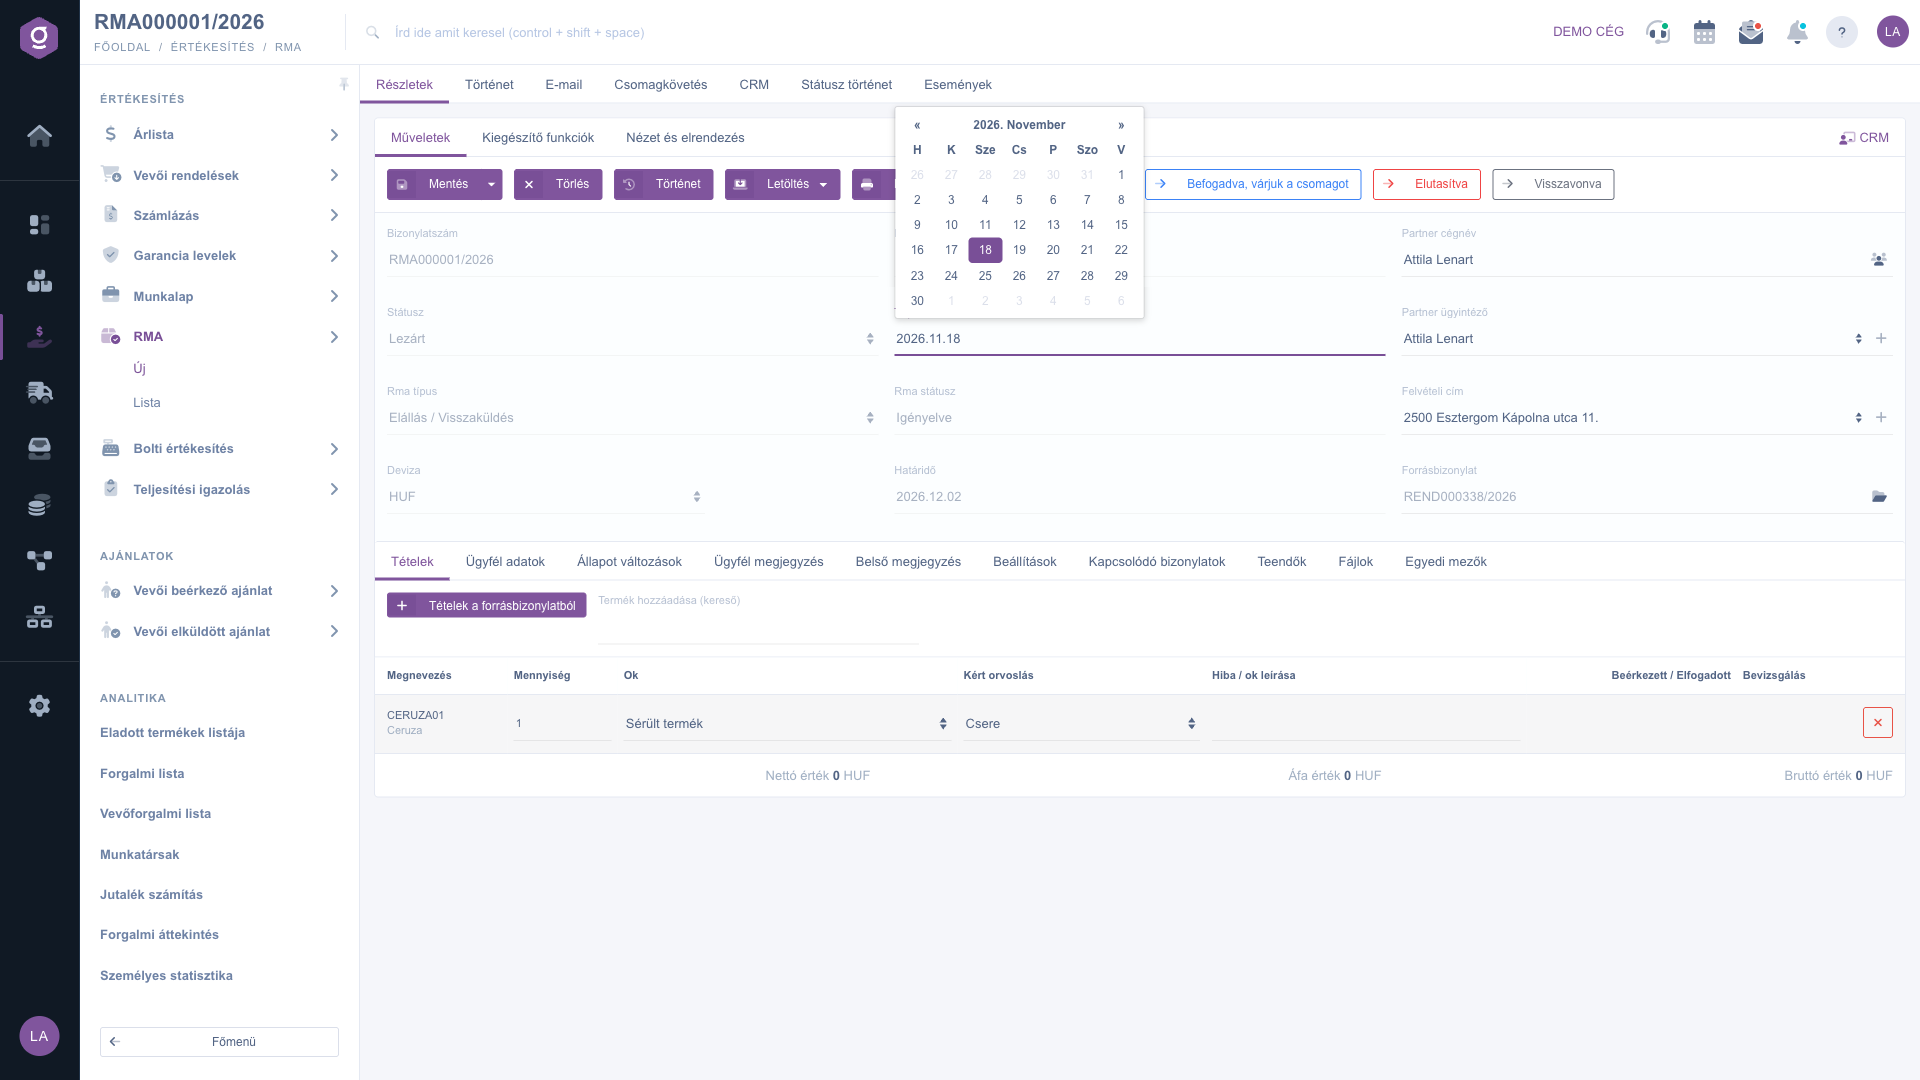
RMA sheet – an RMA in Requested status with the buttons of the next statuses

If the RMA is in Received, Under inspection or Inspected status, the Inspection button appears. Here you record, item by item, the received and accepted quantity, the condition of the product, the real cause of the fault, the resolution and the disposition — for the Inspected status the Real cause of the fault and the Resolution are mandatory for every item. The result is immediately visible in the item row.
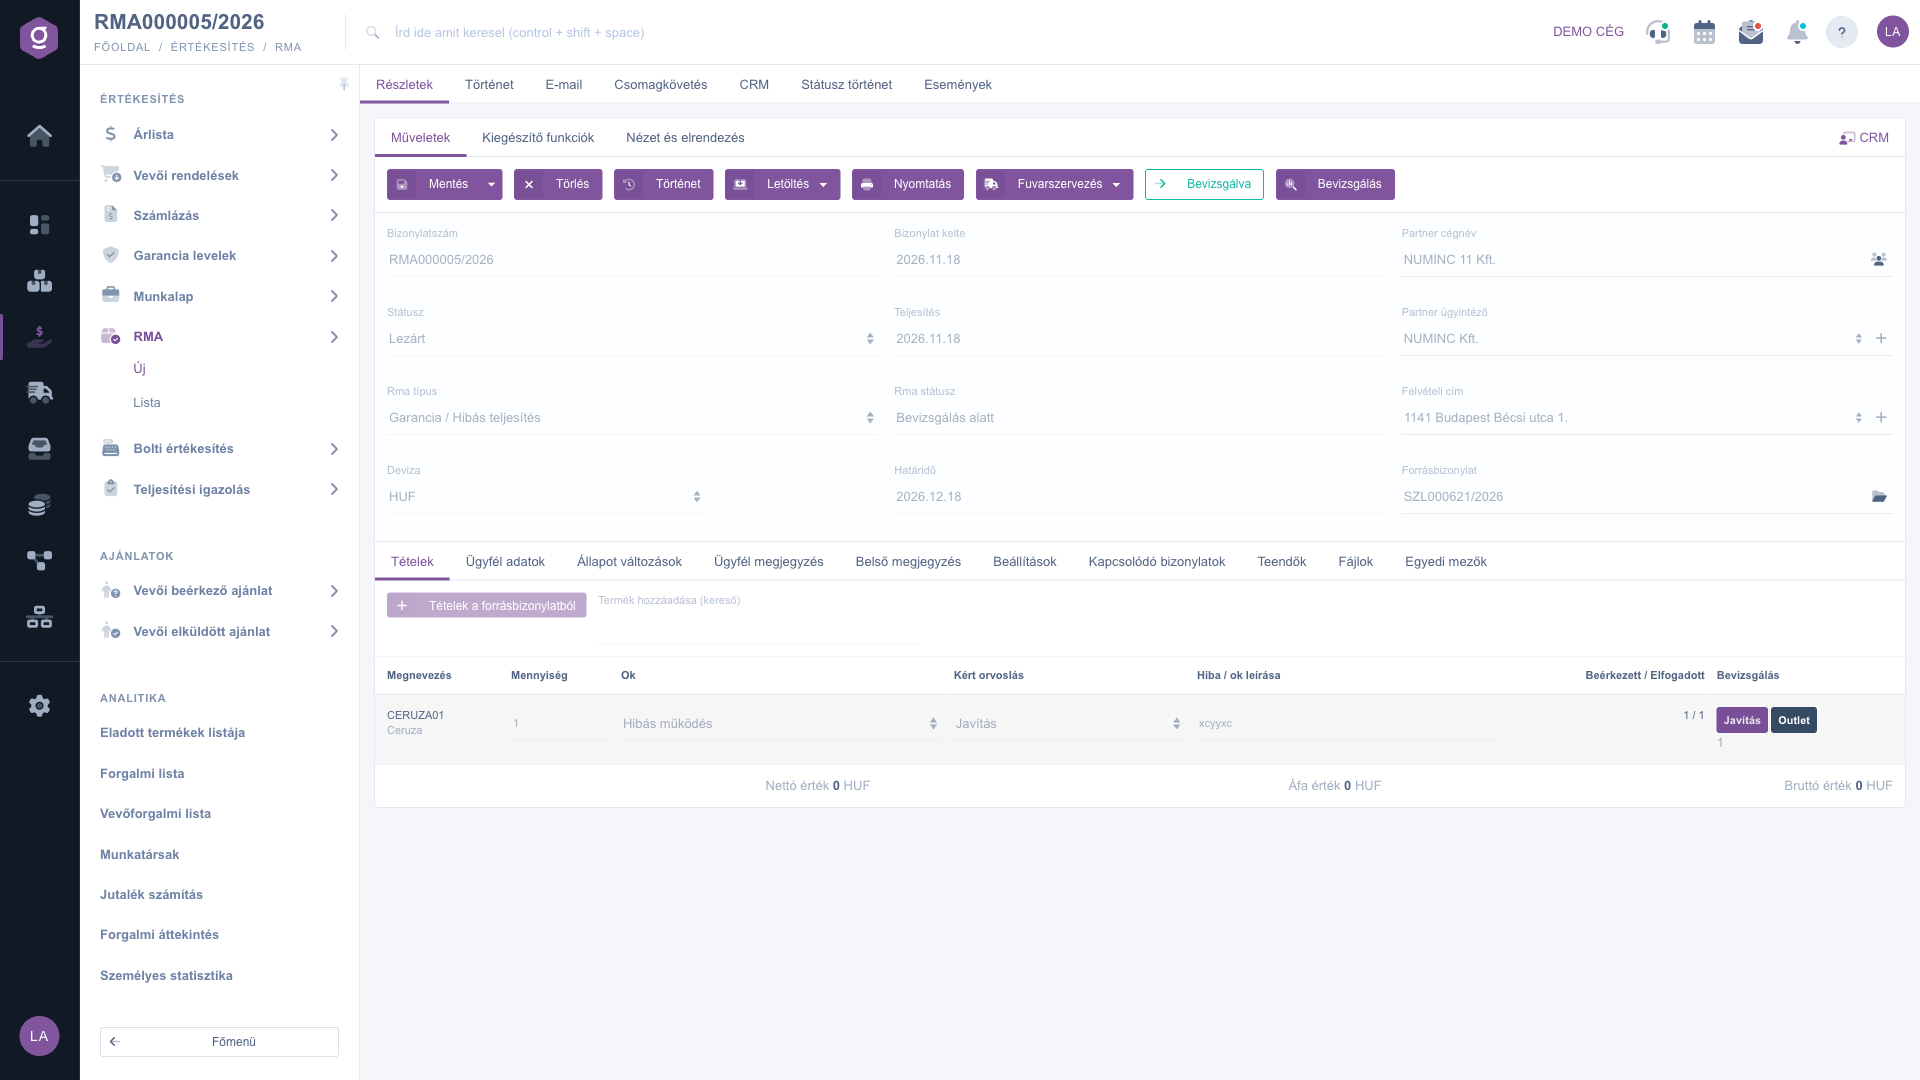
RMA sheet – an RMA under inspection, with the inspection result on the item row

In the Inspected or Closed status, the Document management menu starts the related documents based on the inspection decisions:

  • Credit (correcting) invoice: for a refund or price reduction, a credit invoice based on the source invoice (it opens as a draft).
  • Finance task (pay out refund): a task for finance with the amount to be refunded and the given bank account number.
  • Replacement order (0): a new customer order at 0 value for the items to be replaced.
  • Worksheet (repair): a worksheet for the items to be repaired.
  • Supplier order (return to supplier): a supplier order for the items to be forwarded to the supplier.
  • Stock issue (scrap): issuing the items to be scrapped from stock.
  • Cash register document and Bank document: if you pay the refund in cash from the till or by transfer from the bank account, you can start the matching document from here with the items to be refunded.
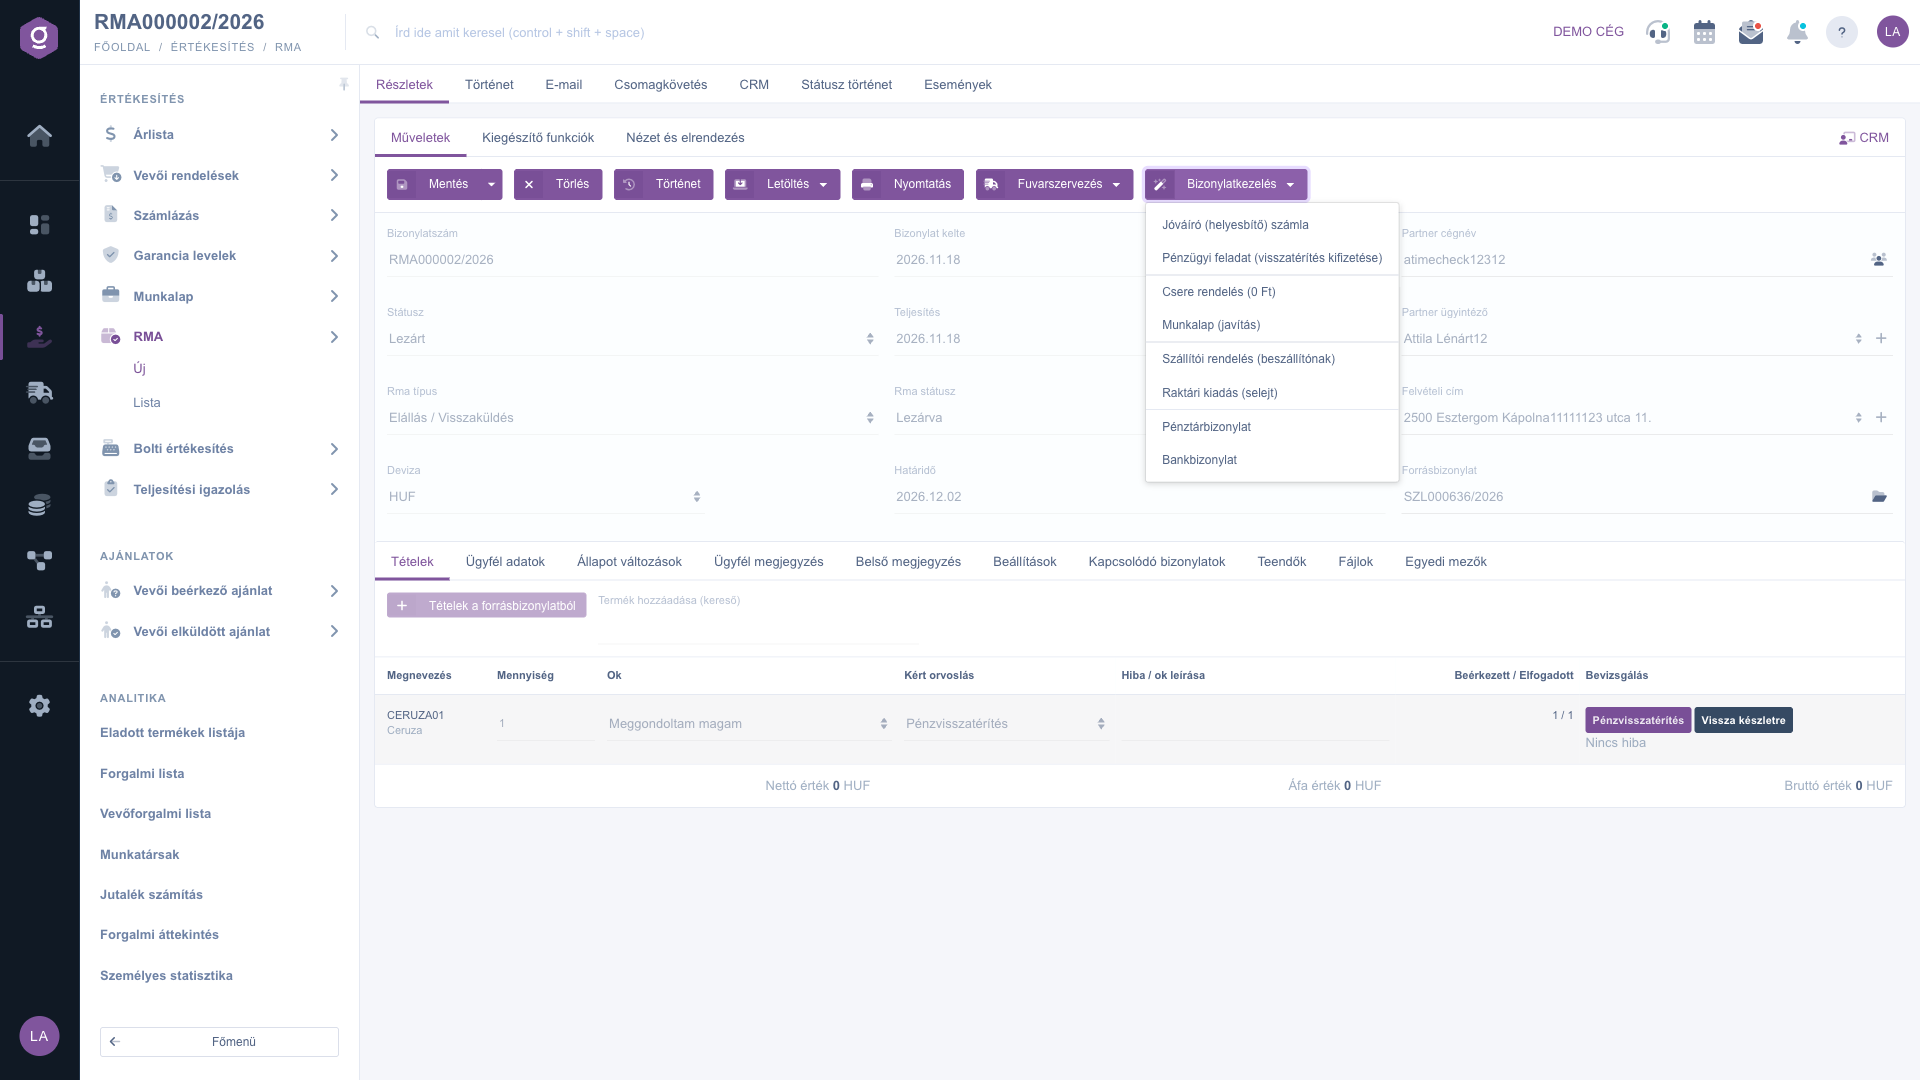
RMA sheet – Document management menu on a closed RMA
RMA sheet – Document management menu on a closed RMA (Hungarian: Bizonylatkezelés)

8. Status history and related information

The Status changes tab shows every status change by Date, Rma status, Comment and Colleague. The Related documents tab contains all documents belonging to the RMA (source invoice, goods receipt, credit invoice, etc.), the Tasks tab the tasks created for the RMA, the Files tab the attached documents (e.g. photos sent by the customer), and the Custom fields tab the custom data introduced at your company. In the top bar of the sheet the History, E-mail, Parcel tracking, CRM, Status history and Events tabs show the full background of the document; the Additional functions tab offers Sent items, New email, New partner, New task and Partner card.
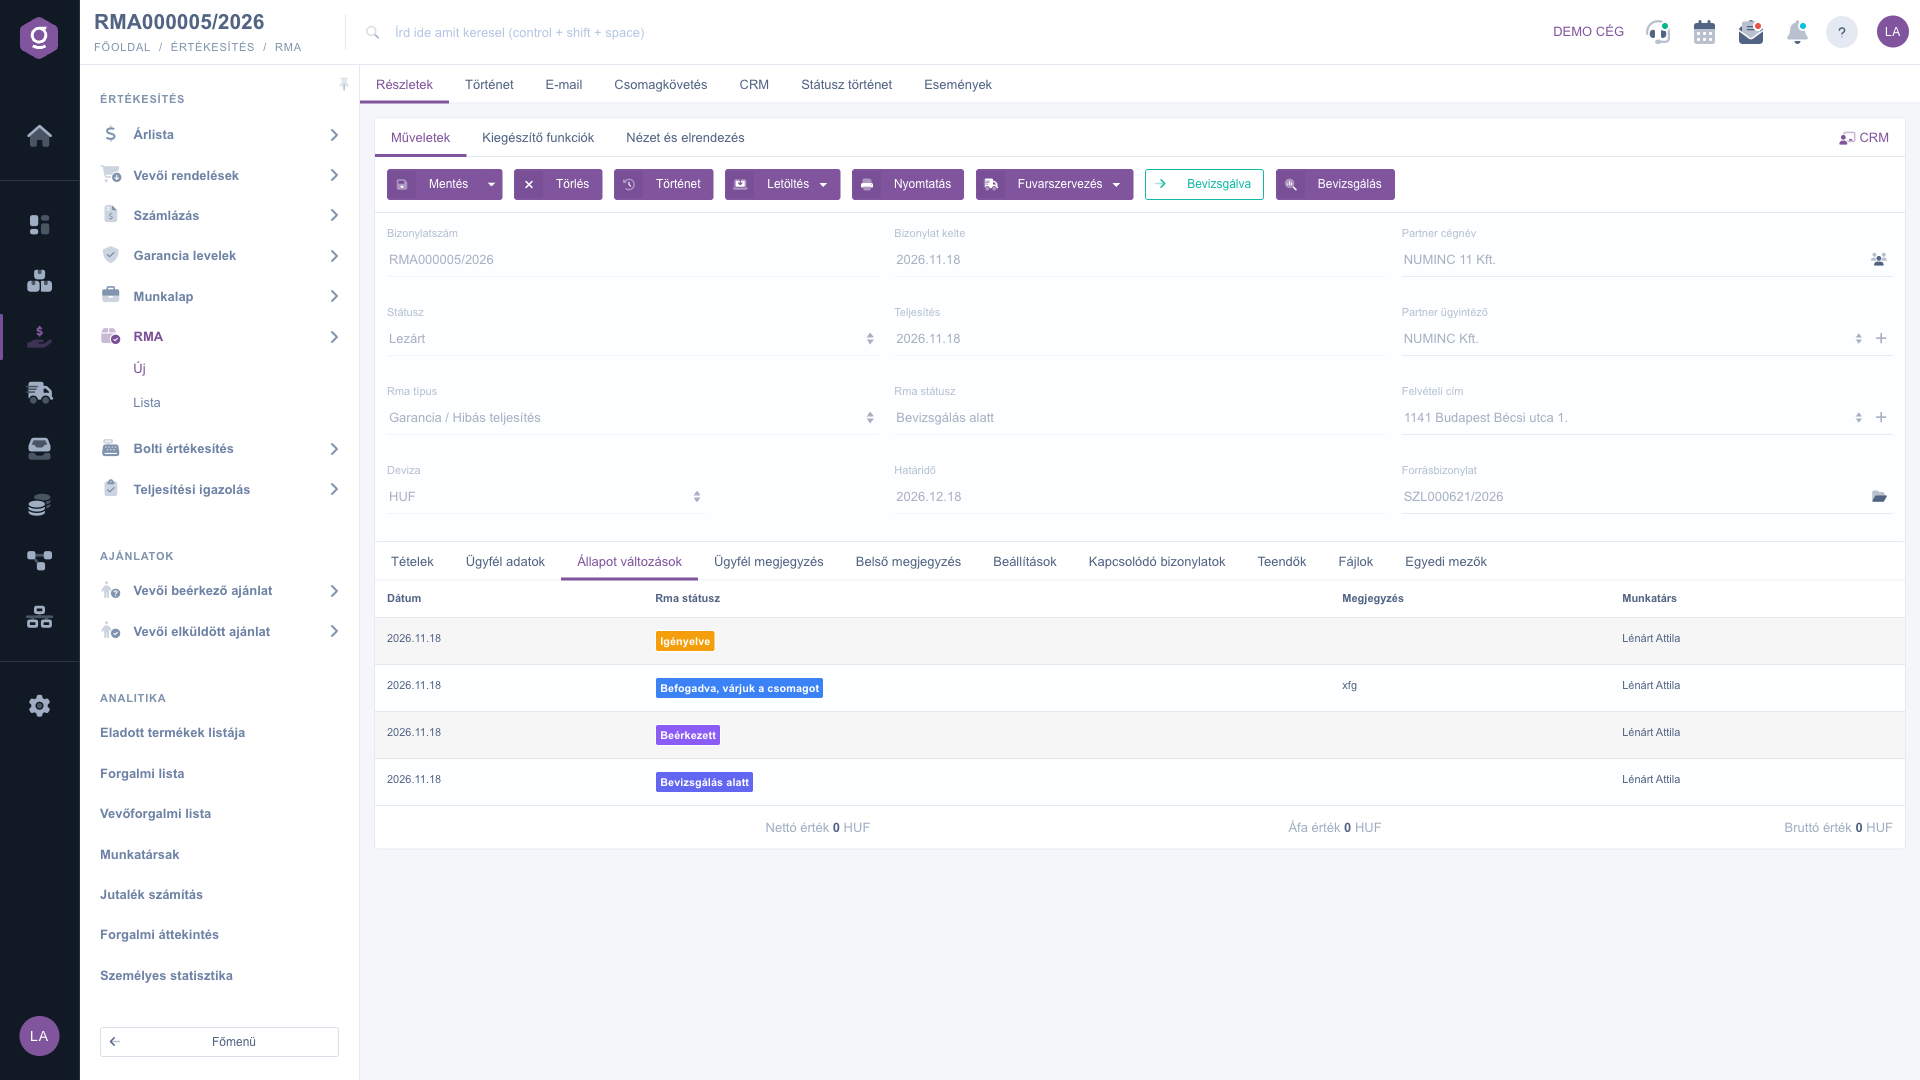
RMA sheet – Status changes tab
RMA sheet – Status changes tab (Hungarian: Állapot változások)

Tip


If the customer returns only part of an order, do not add the product by hand: start the RMA from the invoice via the Document management menu, then in the Items from source document window enter a Quantity to return only for the item that really comes back. This way the system checks that you cannot take back more than you sold, and the later credit invoice is linked exactly to the source invoice. It is also worth filling in the Bank account for the refund already at the request, so that finance does not have to chase the customer for it later.

You can read about reviewing and searching all RMAs created so far and quickly changing their status in the RMA list help page. Creating the source documents used to start an RMA is covered by the Invoice sheet and Customer order document guides.

Field descriptions

The header fields and their meaning:

Field / ElementRequiredDescription
Document numberThe unique identifier of the RMA (e.g. RMA000005/2026), assigned by the system on saving; not editable.
StatusThe general state of the document (Draft, Closed, Cancellation, Cancelled); not editable.
Rma typeWithdrawal / Return or Warranty / Defect (Undelivered parcel cannot be chosen for a new RMA). It cannot be changed after saving, and it determines the deadline and the possible status steps.
CurrencyThe currency of the document; taken over when started from a source document, and not changeable after saving.
Exchange rateFor a foreign currency, the exchange rate used for calculation; the system fills it in for the performance date.
Document dateThe date the RMA was created, assigned by the system.
Performance dateThe performance date; today by default.
Rma statusThe current step of the case (e.g. Requested, Under inspection); can be changed only with the status buttons.
DeadlineThe handling deadline: 14 days after creation for a withdrawal, 30 days for a warranty case; calculated by the system, not editable.
Partner company nameThe customer who started the return. While typing, it searches the partners by name or tax number.
Partner contact personThe contact on the partner side; if left empty, the system chooses the default one. Use the + button to create a new one.
Pickup addressThe partner address from which the goods to be returned are collected. If left empty, the default address is used.
Source documentThe order or invoice the RMA was started from; the folder icon next to it opens it. Not shown for an RMA without a source.

The columns of the Items tab and their meaning:

Field / ColumnRequiredDescription
NameThe item number and unit of the product; the product comes from the search or the source document.
QuantityThe quantity requested for return (fractions are allowed). For an item taken from a source document, the still Returnable quantity is shown below the field and no more can be entered.
ReasonThe reason for the return from the RMA reasons set up at your company: e.g. Malfunction, Damaged product, Missing parts, Not as ordered / described, Changed my mind, Other.
Requested resolutionWhat the customer asks for: Refund, Replacement, Repair, Store credit, Price reduction. This is only the request; you record the final decision at the inspection.
DescriptionA free-text description of the fault or the reason (up to 1000 characters).
Received / AcceptedThe quantity actually received and the quantity accepted in favor of the customer; filled in by receiving and inspection.
InspectionThe inspection result: the resolution and the disposition as labels, below them the real cause of the fault and the inspection comment.

The fields of the Customer data, Settings and Status changes tabs:

Field / ColumnRequiredDescription
Customer commentThe claim or request described by the customer in their own words.
Bank account for the refundThe account to which the refund has to be transferred (up to 50 characters).
Account holder nameThe holder of the account given for the refund (up to 150 characters).
Rejection reasonShown only for a rejected RMA, with the reason given at the status change; not editable.
Rma return addressThe address of your company where you expect the returned parcel (Settings tab).
Date, Rma status, Comment, ColleagueThe columns of the Status changes tab: when, by whom and to which status the RMA was moved, and with what comment.

Frequently asked questions

The header and the items can be edited only up to the Requested and Accepted, awaiting parcel statuses. Once the RMA is Received or further, the data is protected, because stock movement and inspection are already attached to it; then only the internal comment and the inspection can be changed. A deleted (Cancelled) RMA cannot be edited.

Check that the Partner company name is filled in (chosen from the result list), the Currency, the Performance date, the Rma return address on the Settings tab, and that there is at least one item. For an item taken from a source document the Quantity cannot be more than the returnable one — if you enter more, the system rejects the save with an error message.

The source document must be closed: if the system says the document has to be closed first, close the invoice or the order and start again from the Document management menu. If the document is already closed but you do not see the menu item, check that the RMA module is assigned to your user. You can read about creating and closing an invoice in the Invoice sheet help page.

The Undelivered parcel type belongs to consignments that have already come back undelivered (it starts in the Received status), so it cannot be chosen for a new RMA on the sheet. The Rma type cannot be changed after saving, because the deadline and the possible status steps depend on it. If you created it with the wrong type, create it again with the correct type and cancel the wrong one with the Delete button.

The buttons appear in the given phase of the process. Inspection is visible only in the Received, Under inspection or Inspected status; Document management only in the Inspected or Closed status. If the RMA is still Accepted, awaiting parcel, first move it to Received with the receiving step. In the list, the same steps are available under the Rma actions button — see the RMA list help page for details.

The Deadline is the handling deadline: 14 days from creation for the Withdrawal / Return type and 30 days for the Warranty / Defect type. The system calculates it and it cannot be changed manually. If it expires and the RMA is not yet in a final state, it appears in red in the RMA list column and can also be listed separately with the Overdue filter.

With the Delete button the RMA becomes Cancelled, and the action cannot be undone. If the customer backed out but you want to keep the RMA, do not delete it: set it to the Withdrawn status with the status buttons — this way the history of the case is preserved.

The RMA module appears under Main menu / Sales only if it is assigned to your user. If you cannot see it, ask the system administrator to check the module assignment in your user settings.

Need personalized help?

Don't want to spend hours searching for a solution? Choose the most efficient way: book a personalized, 45-minute online training session dedicated entirely to you. Whether it's a walkthrough of the basics or a detailed setup of a specific module, our expert colleague will guide you through the whole process, step by step.

Don't waste your time - ask for help!
Our goal is to get you using our system as quickly and efficiently as possible. Whether you're completely new to us or stuck on a specific setting, don't hesitate to ask for help!

Logzi warehouse management software

Get in touch with us

Interested in our software? Feel free to write to us!

Need help?

If you can't find the answer and need assistance

Create your account now,
pay later!

Try it free for 3 days, no risk, no obligation!