1. Opening a new invoice
Clicking Main menu / Sales / Invoicing / New opens a blank invoice. An advance invoice is opened by the Main menu / Sales / Invoicing / New advance invoice menu item, a proforma invoice by Main menu / Sales / Invoicing / New proforma invoice, using the same form. You can open an existing invoice from the Main menu / Sales / Invoicing / List menu item. At the top of the page you find the Actions, Additional functions and View and layout tabs, below them the invoice header, then the Items tab and the further tabs (Customer comment, Internal comment, Settings, Related documents, Tasks, Files, Data reporting, Custom fields).
The differences between the document types:
- Invoice: the usual outgoing invoice. After closing it can be cancelled, corrected or credited.
- Advance invoice: concerns an amount requested or received as an advance payment. The buttons used for adding items manually (New, Barcode collector, Delete, Cloning) cannot be used with this type; an advance invoice is usually started from the proforma invoice with the Advance invoice command of the Document management menu, in which case the data is taken over. On the final invoice, the issued advance can be accounted for with the Advance invoice usage button on the Additional functions tab.
- Proforma invoice: a payment request sent to the customer. From a closed proforma invoice, an Invoice or an Advance invoice can be created in the Document management menu.
- Manual invoice: the Document number can be entered manually. This type currently does not appear as a separate item in the main menu.
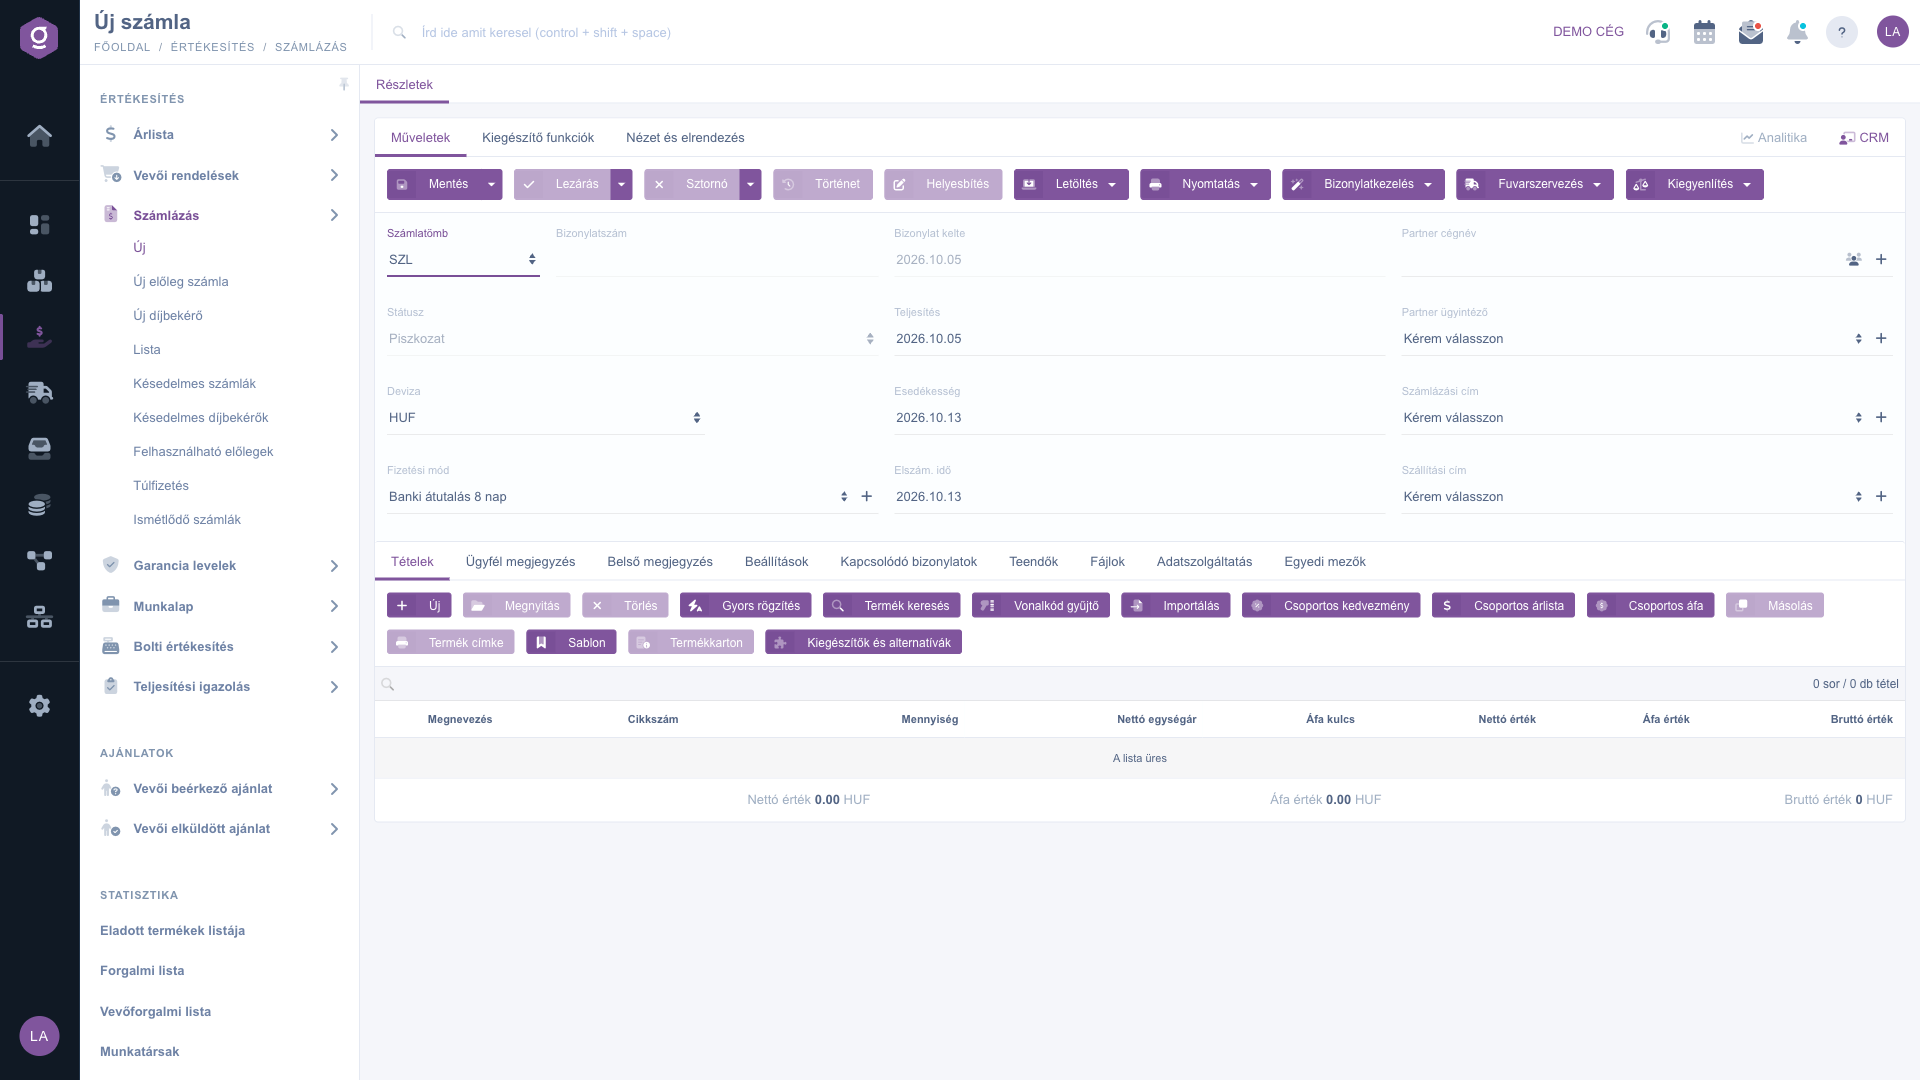
New invoice – header and Items tab
2. Filling in the header
In the header you find the following fields — a detailed description of the required and optional fields is in the Field descriptions section:
- Invoice block and Document number: the invoice block selects the numbering block the invoice gets its number from. The document number is empty before saving; the system assigns it automatically on the first save, and it can only be entered manually for a manual invoice.
- Status: the state of the invoice (Draft for a new invoice); it cannot be changed manually.
- Currency (and Exchange rate): by default the base currency of the company is shown. If you invoice in another currency, select it — the Exchange rate field then appears as well. After saving, the currency can no longer be changed.
- Payment method: a required field; the icon next to the field takes you to the payment method settings.
- Document date, Performance date, Due date and Settlement time: the document date is filled in automatically and cannot be changed; the other three dates are pre-filled depending on the payment method and can be changed from the calendar.
- Partner company name, Partner contact person, Billing address, Shipping address: select the customer, then the related contact person and the two addresses. If the partner, the contact person or the address is not yet in the system, you can add it on the spot with the icon next to the field. You can open the partner data sheet with the partner card icon next to it.
3. Adding items
You can record the content of the invoice on the Items tab, using the buttons above the item table. You can choose between several methods — pick the one that is the fastest in the given situation:
- New: the item editor window opens, where you select the product or service by item number or name, and enter the quantity and the price. Choose it when you want to record a single item in detail, with all its data.
- Quick add: a simplified item window that reopens immediately after the item is saved. It is worth using when you have to add many items in a row.
- Product search: you can search among the products and choose from the results. Choose it when you do not know the exact item number.
- Barcode collector: you can type or scan barcodes and quantities line by line into a text field, and the system adds the items from them in one go. The format of the lines is: [barcode];[quantity] — if you leave out the quantity, 1 piece is added.
- Import: bulk addition of items from an XLSX file. In the window, click the XLSX file schema link to download the expected structure of the file, then fill it in and upload it.
Further buttons above the table: Open edits the selected item, Delete removes it, Cloning duplicates it, Group discount, Group price list and Group VAT change the discount, the price list or the VAT rate of several items at once, Product label prints a label, Template loads a saved item template, Product card opens the data sheet of the selected product, and Add-ons and alternatives shows the add-on and substitute products related to the product. The buttons that apply to the selected item can only be used when an item is selected (or when the invoice is in Draft status). Below the item table you can see the Net value, VAT value and Gross value totals of the invoice.
4. Comments, settings and attachments
Besides the Items tab there are further tabs:
- Customer comment: text addressed to the customer that also appears on the printed or downloaded version of the invoice. You can also pick a saved text template from the drop-down at the top of the tab.
- Internal comment: a note visible only inside the company, which can also be loaded from a template.
- Settings: here you can set the company Billing address and Shipping address (required), the Project, Job number and Department number classification, the Sales representative, the Invoicing type (required), the Template used for printing, the Bank account number or cash register field (required), and turn the Online payment option on or off.
- Related documents: the documents this one was created from, or which were created from it.
- Tasks: the list of tasks recorded for the invoice.
- Files: management of the documents attached to the invoice.
- Custom fields: the company own, individually created extra fields for the invoice.
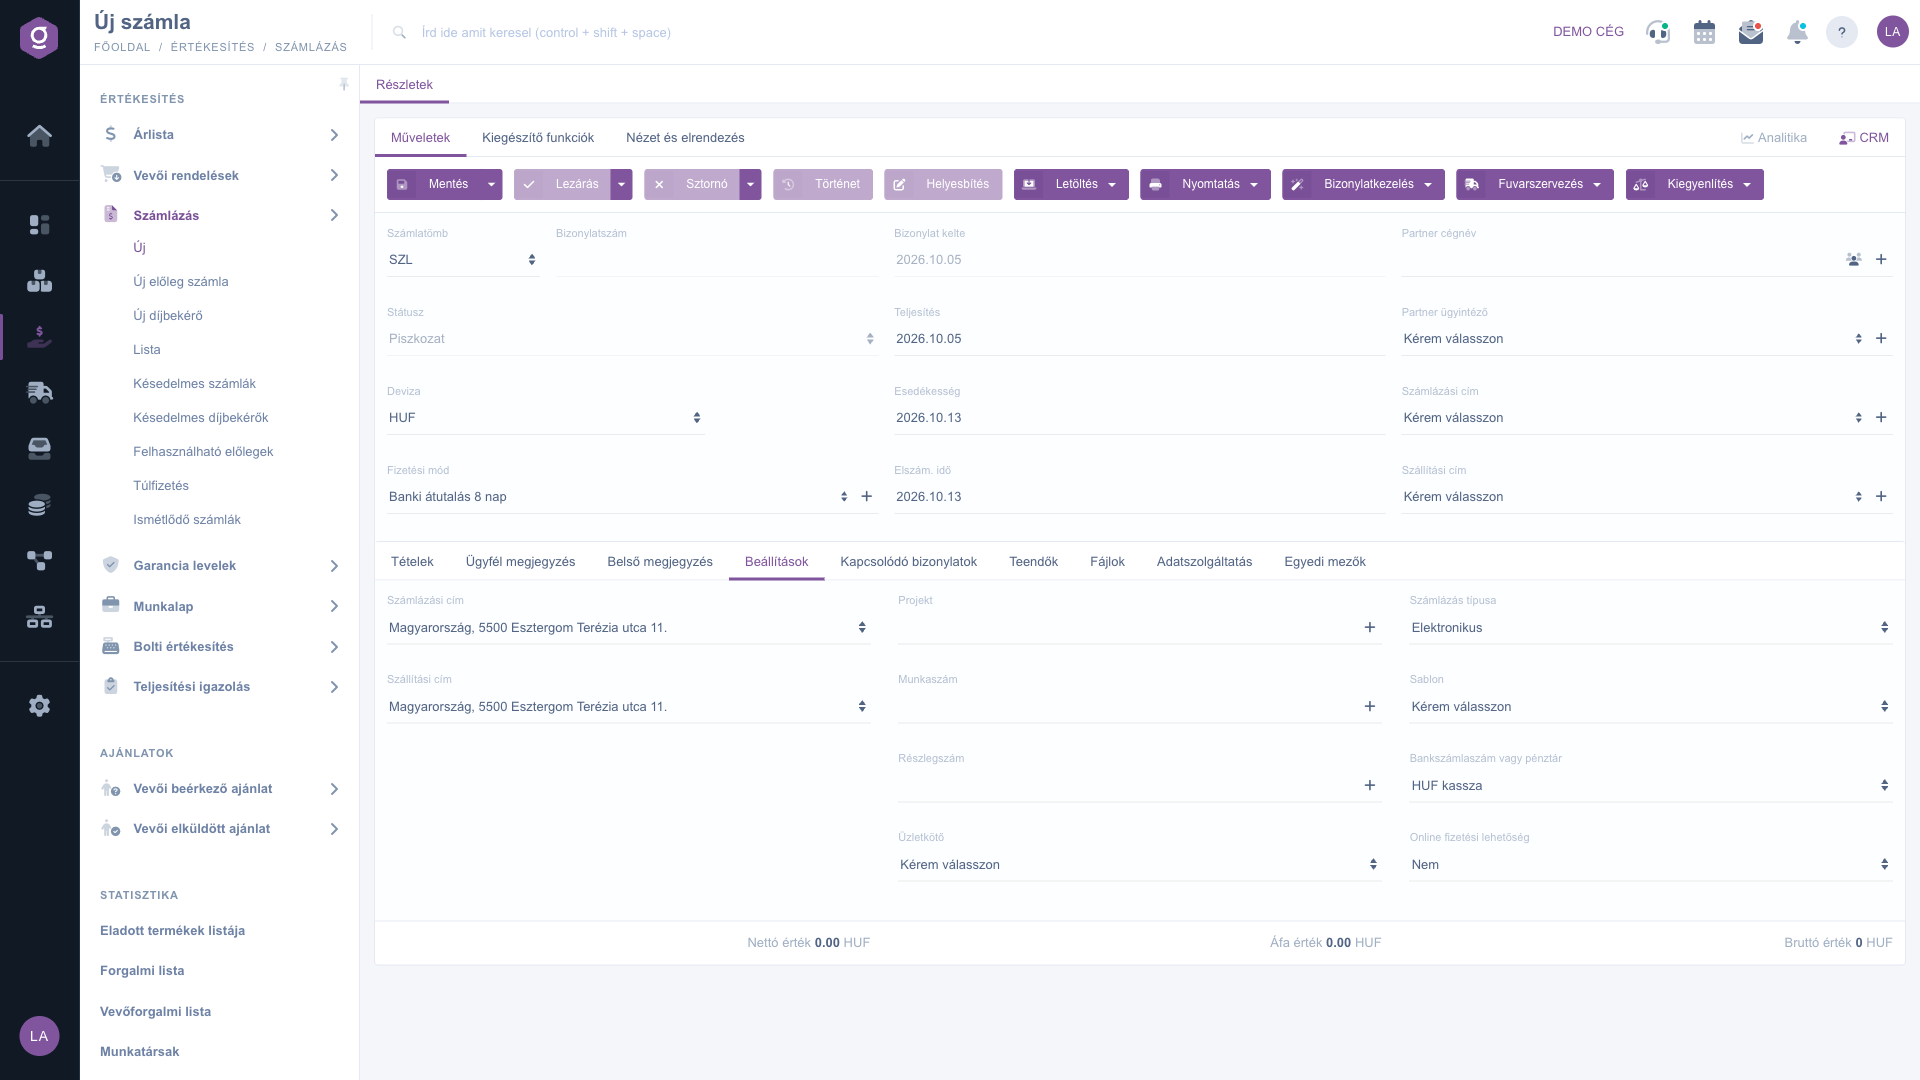
Invoice – Settings tab
5. Saving, closing, cancellation and correction
On the Actions tab you find the buttons that control the life cycle of the invoice:
- Save: the data is recorded, but the invoice stays in Draft status and can still be edited. In the drop-down menu of the button, Save and close saves and closes the invoice in one step.
- Close: finalizes the invoice — from this point the items and the header cannot be modified. It is only available for invoices in Draft status. From the drop-down menu, Close and print or Close and download immediately produces the printout after closing.
- Cancellation: available for a closed invoice. In the window that opens you can see the original invoice, you can enter the Cancellation performance date, you must fill in the Document status reason field, and you can also write a Customer comment and an Internal comment. If an order or a bank document is linked to the invoice, the related options of the window (e.g. Delete order) also appear. The Cancel and copy option of the drop-down menu also makes a copy next to the cancellation — if you issued the invoice incorrectly, you can start over in one step.
- Correction and Credit: available for a closed Invoice or Advance invoice. A correction is needed when the economic event took place, but the data on the invoice is wrong or incomplete; a credit when the economic event took place, but you reduce the original consideration afterwards (e.g. a subsequent discount, a partial return of goods). The new related invoice refers to the original invoice.
- History: shows the history related to the selected invoice.
6. Download, print, document management and settlement
- Download: the invoice can be downloaded in CSV, XLSX and PDF format, and you can also view it in a PDF preview without downloading.
- Print: printing the Document prints the whole invoice, the Product label prints the labels belonging to the items.
- Document management: you can create a new related document from the invoice — Invoicing (a new invoice from a proforma invoice or an advance invoice), Advance invoice (from a proforma invoice), Payment demand, Certificate of completion, Delivery note, Warranty letter, Worksheets, CMR — and with Cloning you can start a new one based on the data of the invoice. Most commands are only available for a closed invoice (or one in a later status).
- Transport organization: New parcel label creates a new label for the invoice, Parcel labels opens the list of the labels already recorded.
- Settlement: recording the settlement of a closed invoice — Bank document, Bank transaction or directly the Settlement command. The Cash register document option cannot be selected at the moment.
- Recurrence: if the invoice has to be issued regularly with the same content, you can start it from the list of invoices: select the closed invoice, then use the Document management / Recurrence command to set the start and the end of the recurrence, its frequency, the days of the performance date and of the payment deadline, and the comment. The configured recurring invoices are shown in the Recurring invoices list.
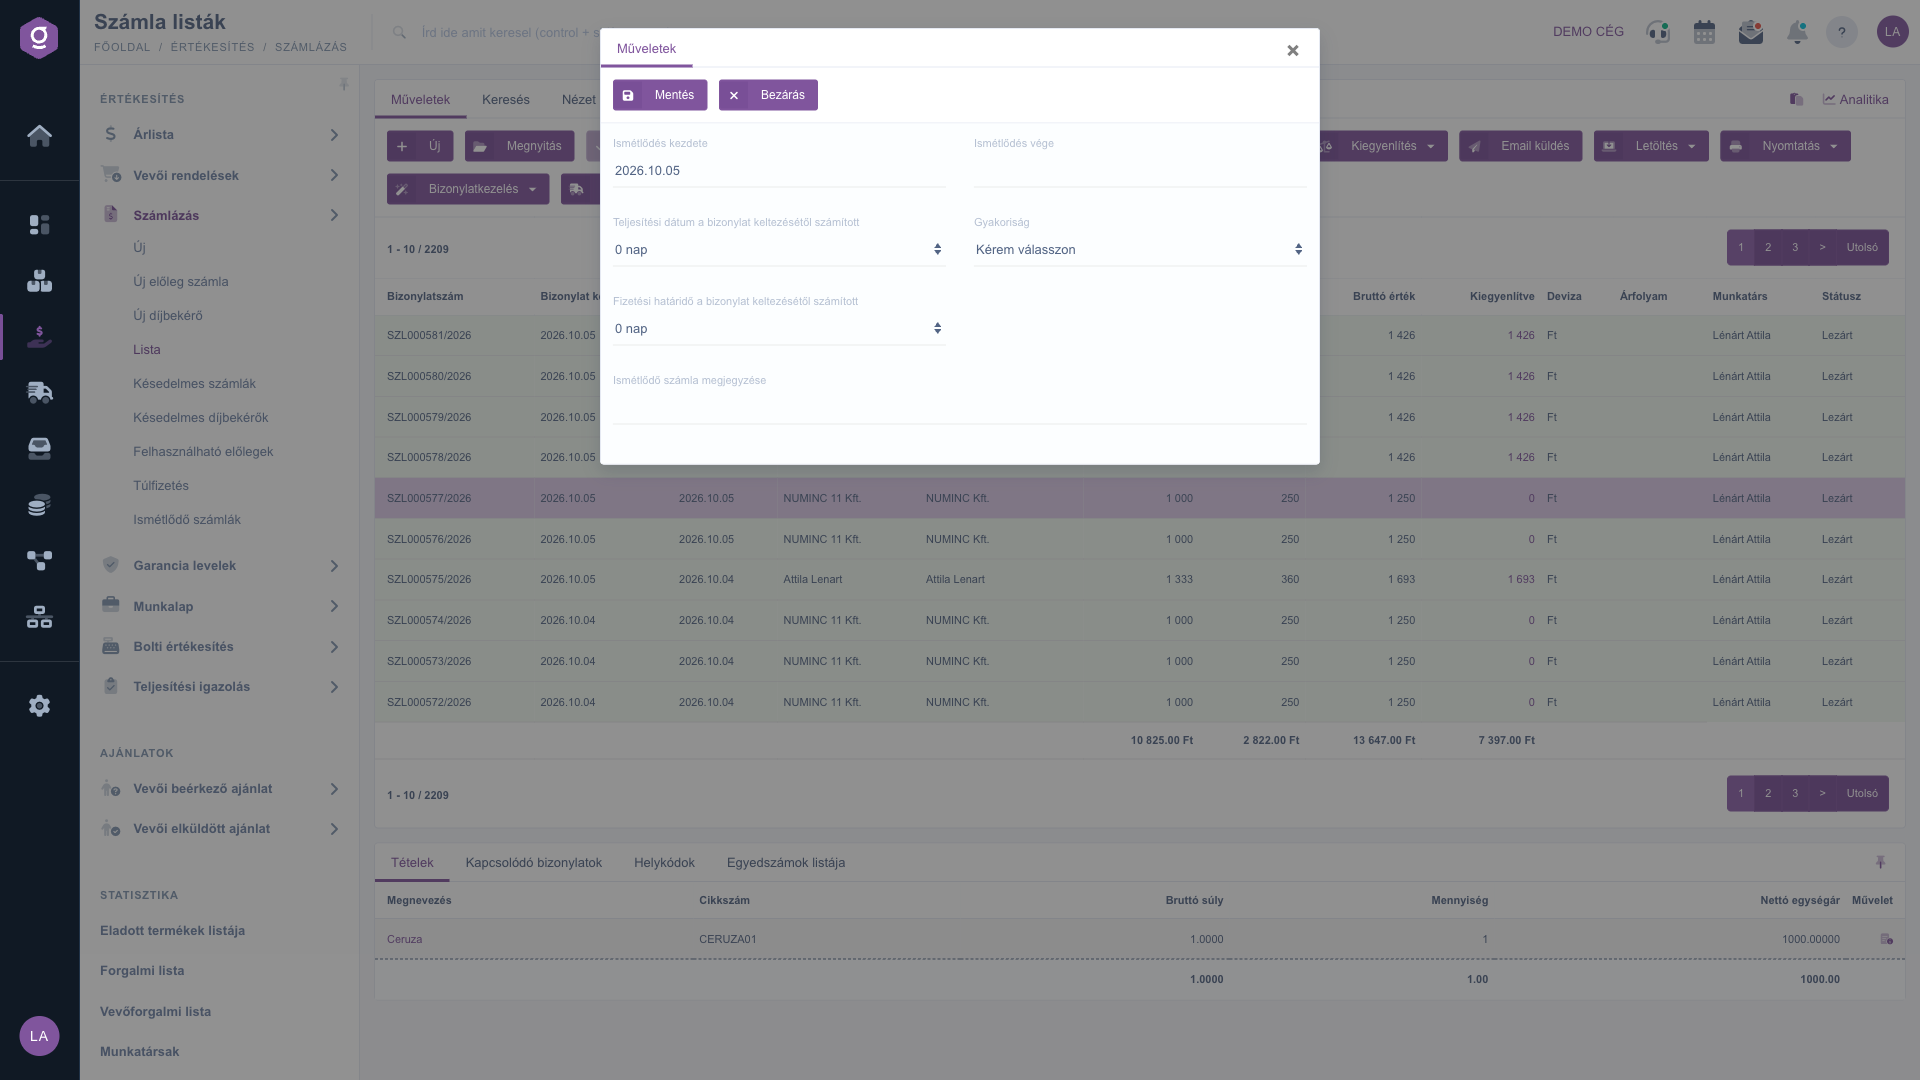
Setting up a recurrence for the invoice
For a closed invoice, a bar showing the payment status appears at the top of the page: a green bar (The invoice has been settled!), a yellow bar (The invoice has not been settled!), or a red bar if the payment deadline has passed and the invoice has not been settled.
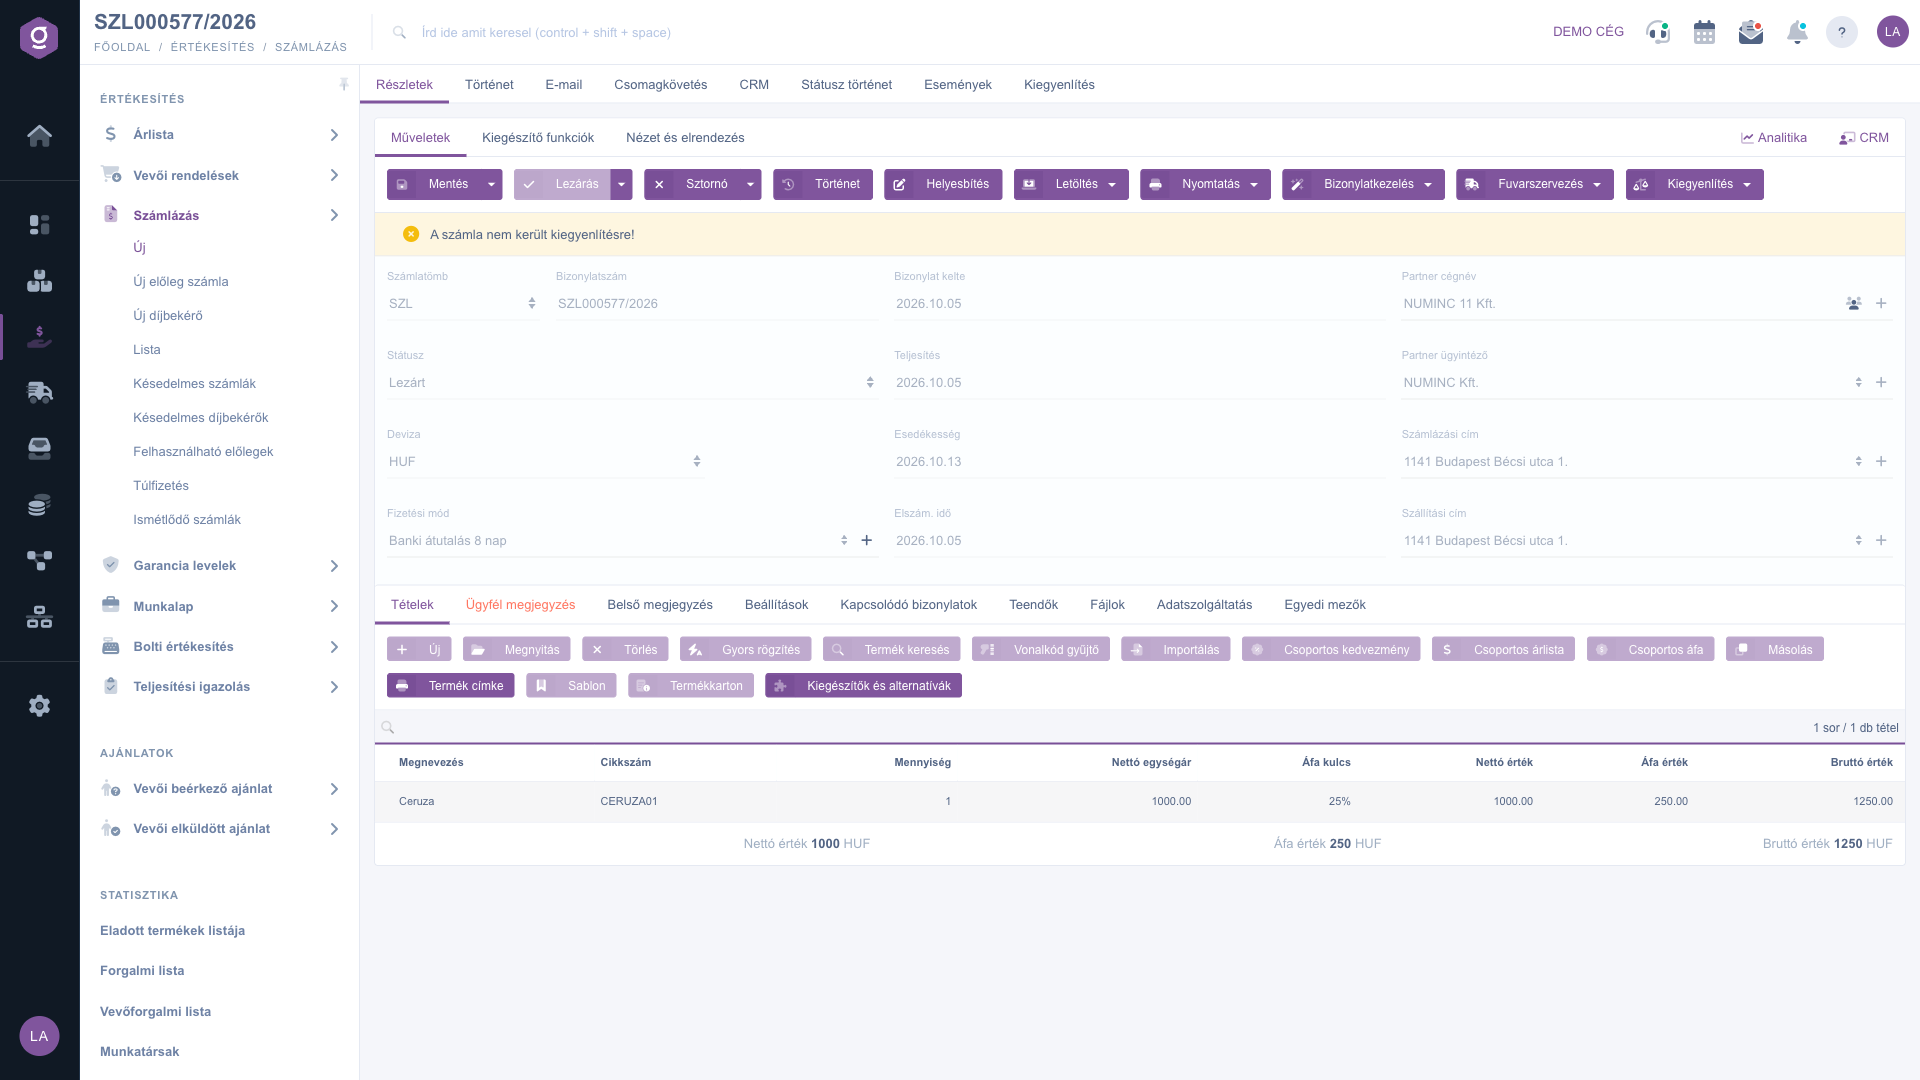
Closed invoice – payment status bar
7. NAV data reporting
Reporting the data of issued invoices is mandatory. If your access is not yet connected to the NAV system, a red warning appears at the top of the invoice, with the Set up data connection button in it. On the Data reporting tab you can see the status of the NAV Online reports (Type, Report timestamp, Last update, Status, Actions), and below it the ledger breakdown of the items (Item number, Name, Revenue ledger (Credit), VAT ledger (Credit), Customers ledger (Debit)).
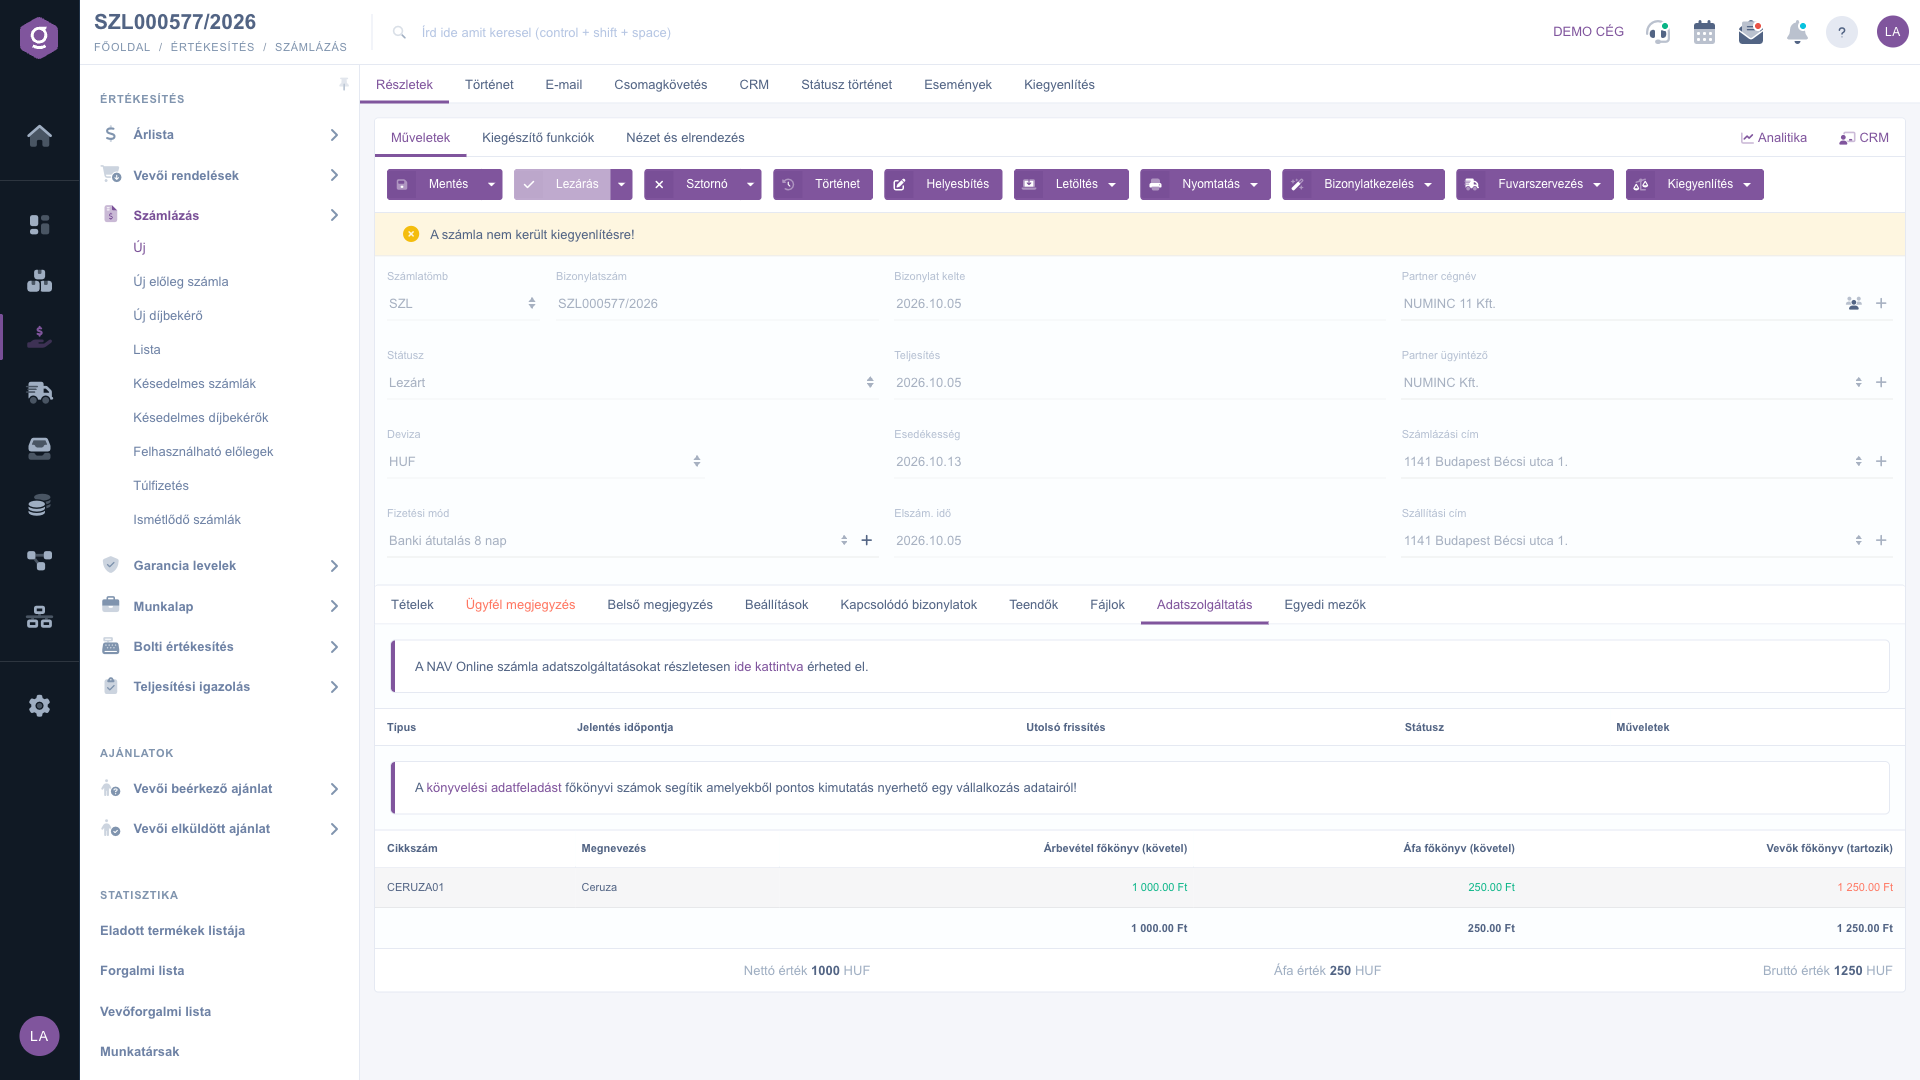
Invoice – Data reporting tab
8. Additional functions and customizing the view
The Additional functions tab offers extra options that support your daily work: viewing the Sent items, sending a New email (through the external or the built-in internal mail client), adding a New product or a New partner, creating a New task for the invoice, opening the Partner card of the partner, as well as the Delivery note usage and the Advance invoice usage, with which earlier delivery notes or issued advance invoices can be linked to the invoice.
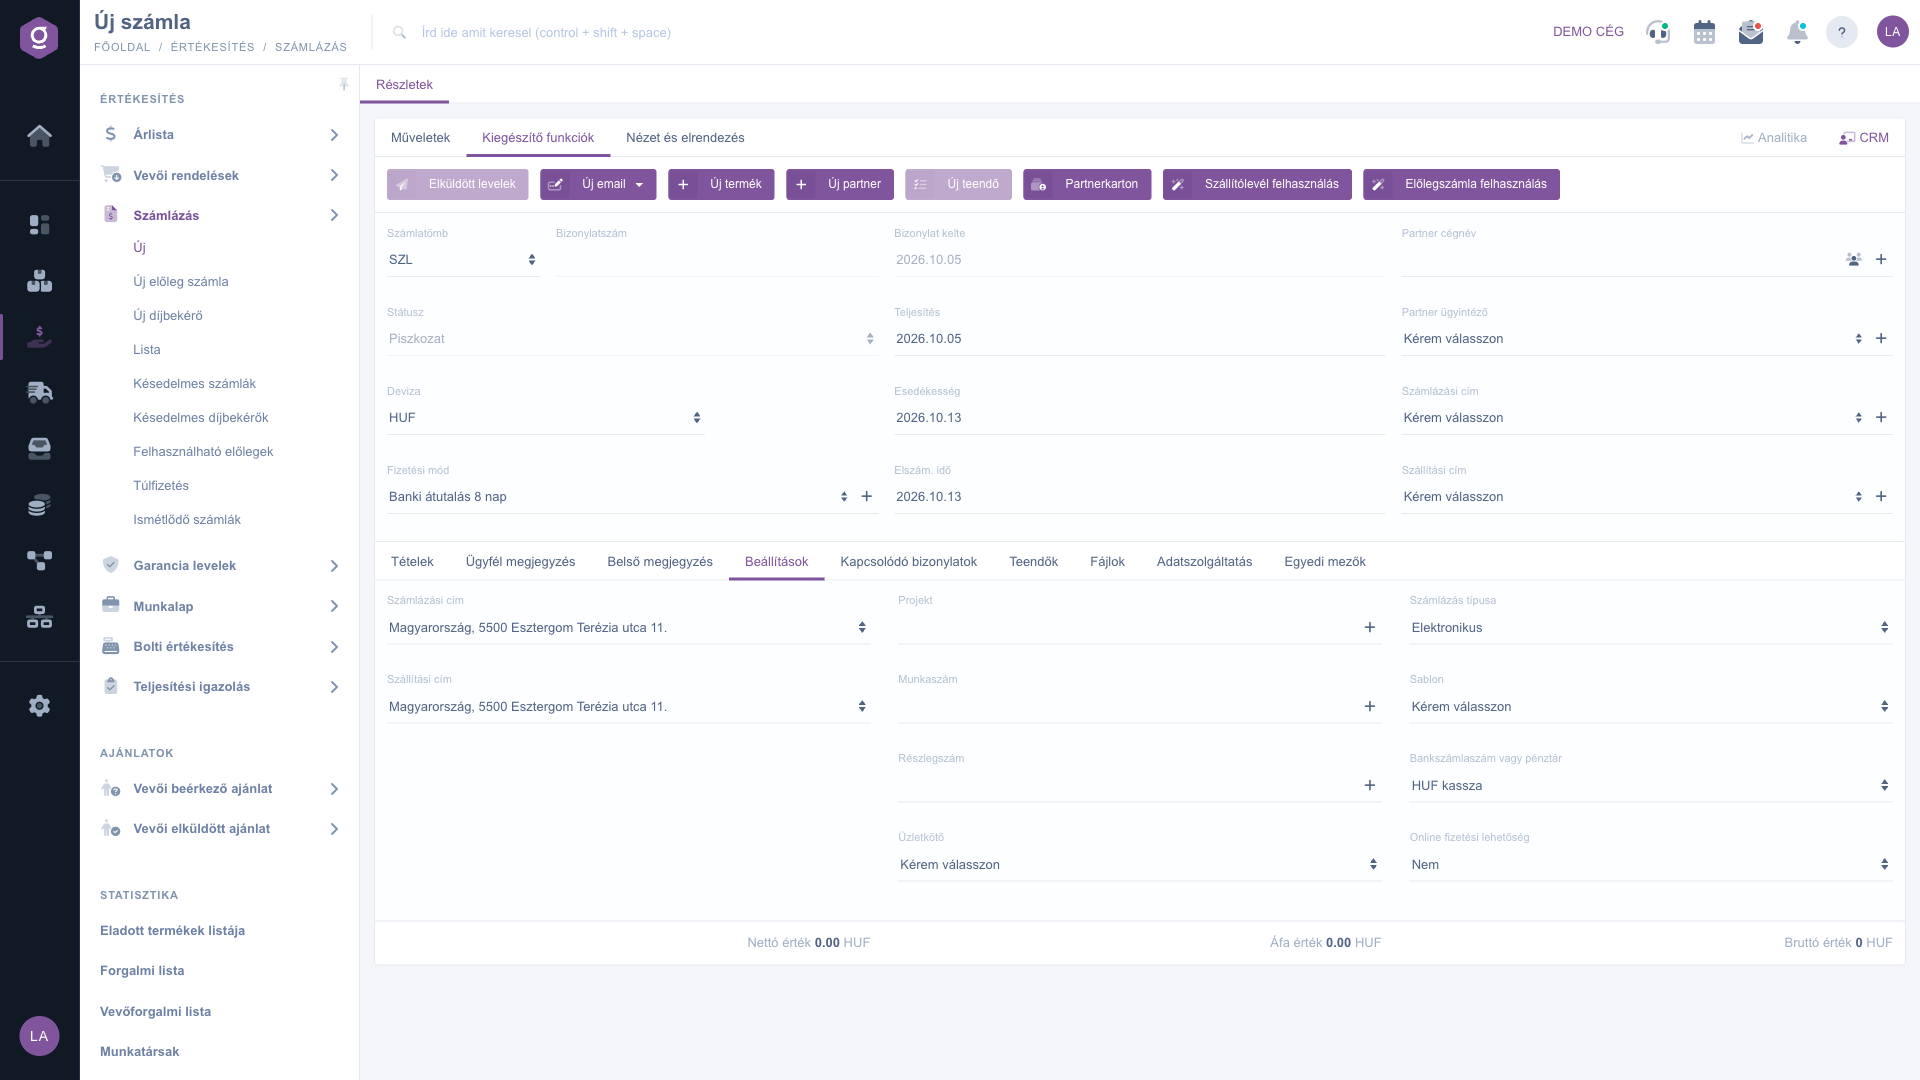
Invoice – Additional functions tab
On the View and layout tab you can customize the display of the sheet with the Interface and behavior button, and the columns shown in the item table with the Columns button. These settings are saved for your user, so they are kept the next time you log in as well.
Tip
If you often issue similar invoices to the same partner, do not enter the items again: from the earlier invoice you can create a new Draft invoice with the Document management / Cloning command, and for invoices that fall due regularly with the same content use the Recurrence function, so you do not have to issue the invoice by hand every time.
If you want to list or search the invoices already issued, or manage several invoices at once, see the
Invoice list guide. You can read about managing the invoices issued on a recurring basis in the
Recurring invoices guide.



