Warehouse and site record

Learn how to create a new warehouse or site, and how to edit its address, default settings and ledger numbers.

Feature overview

On the warehouse and site record you enter the master data of a warehouse or site: its name, address, display order, default roles and the ledger numbers that belong to it. The same record is used to create a new warehouse and to edit an existing one. You can later select the warehouses on warehouse receipt, issue, transfer and stocktaking documents.

  • Basic data: name, country, zip, city, address and sorting in one row at the top of the record.
  • Default settings tab: four Yes/No selectors that set whether the warehouse is the default one, and whether it is an external/virtual warehouse.
  • Ledger numbers tab: choose the ledger number for stock increase and for stock decrease.
  • Actions: save the record with the Save button, or delete it with the Delete button.

The record has no status (draft, closed): as soon as you save it, the warehouse is active and appears in the Warehouses and sites list and in the warehouse selection lists.

Step by step

1. Creating a new warehouse

Click Main menu / Stock management / Additional data / Warehouses and sites / New. The empty record opens, with the Save and Delete buttons on the Actions tab. Fill in the top row: the Name field, then choose the Country and enter the Zip, the City and the Address. The Sorting field is optional. The screenshots were taken in the Hungarian interface.

On the Default settings tab you see four selectors, each starting with the value No:

  • Default: Yes if this is your main warehouse, the one the system uses first.
  • Default for home delivery and preparation: Yes if you want to use this warehouse by default for home delivery and preparation tasks.
  • Default for returns: Yes if you want returned goods to be received into this warehouse by default.
  • External/virtual warehouse: Yes if the warehouse does not represent your own physical stock (for example stock held at an external provider).
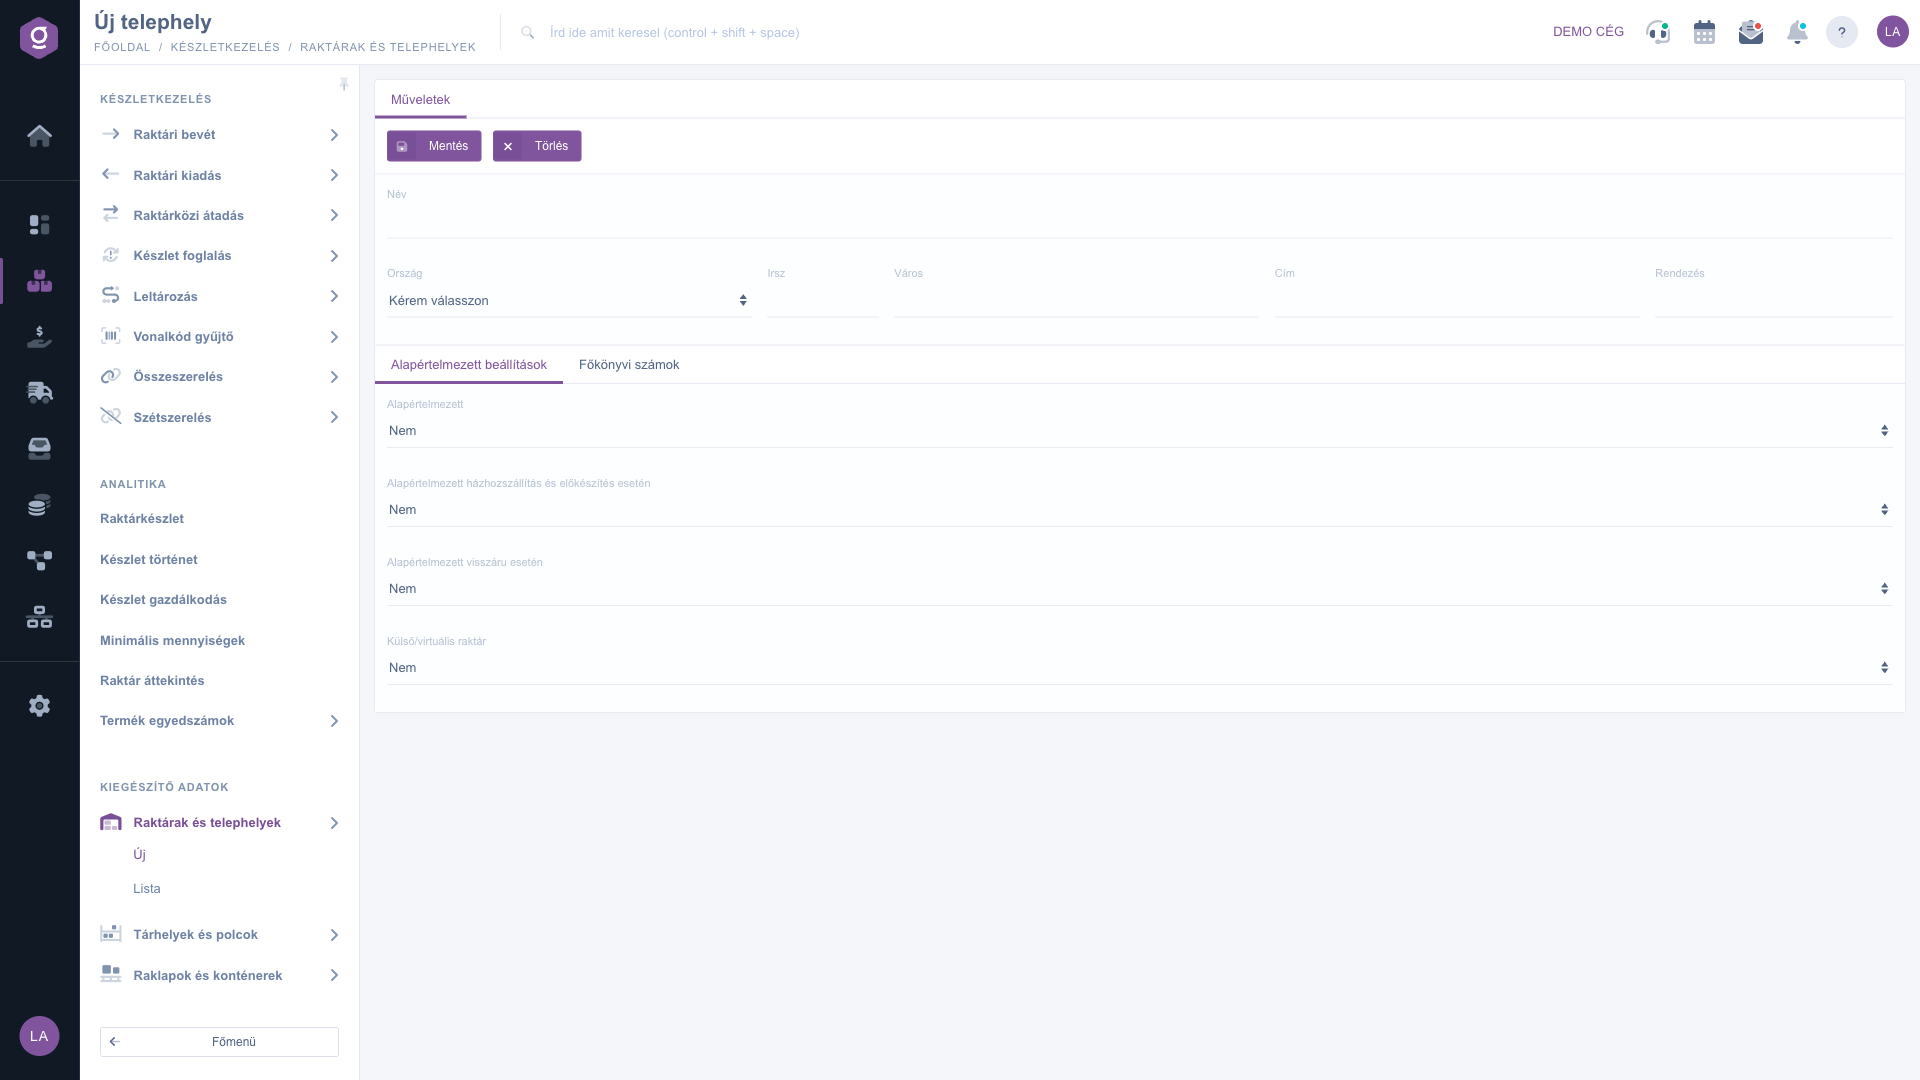
New warehouse record - Default settings tab (Alapértelmezett beállítások)

2. Entering ledger numbers

On the Ledger numbers tab you find two drop-down lists: Increase ledger number gives the ledger number for stock increase, and Decrease ledger number the one for stock decrease. The lists show the name and, in brackets, the ledger number. Both fields are optional and show Please choose by default.
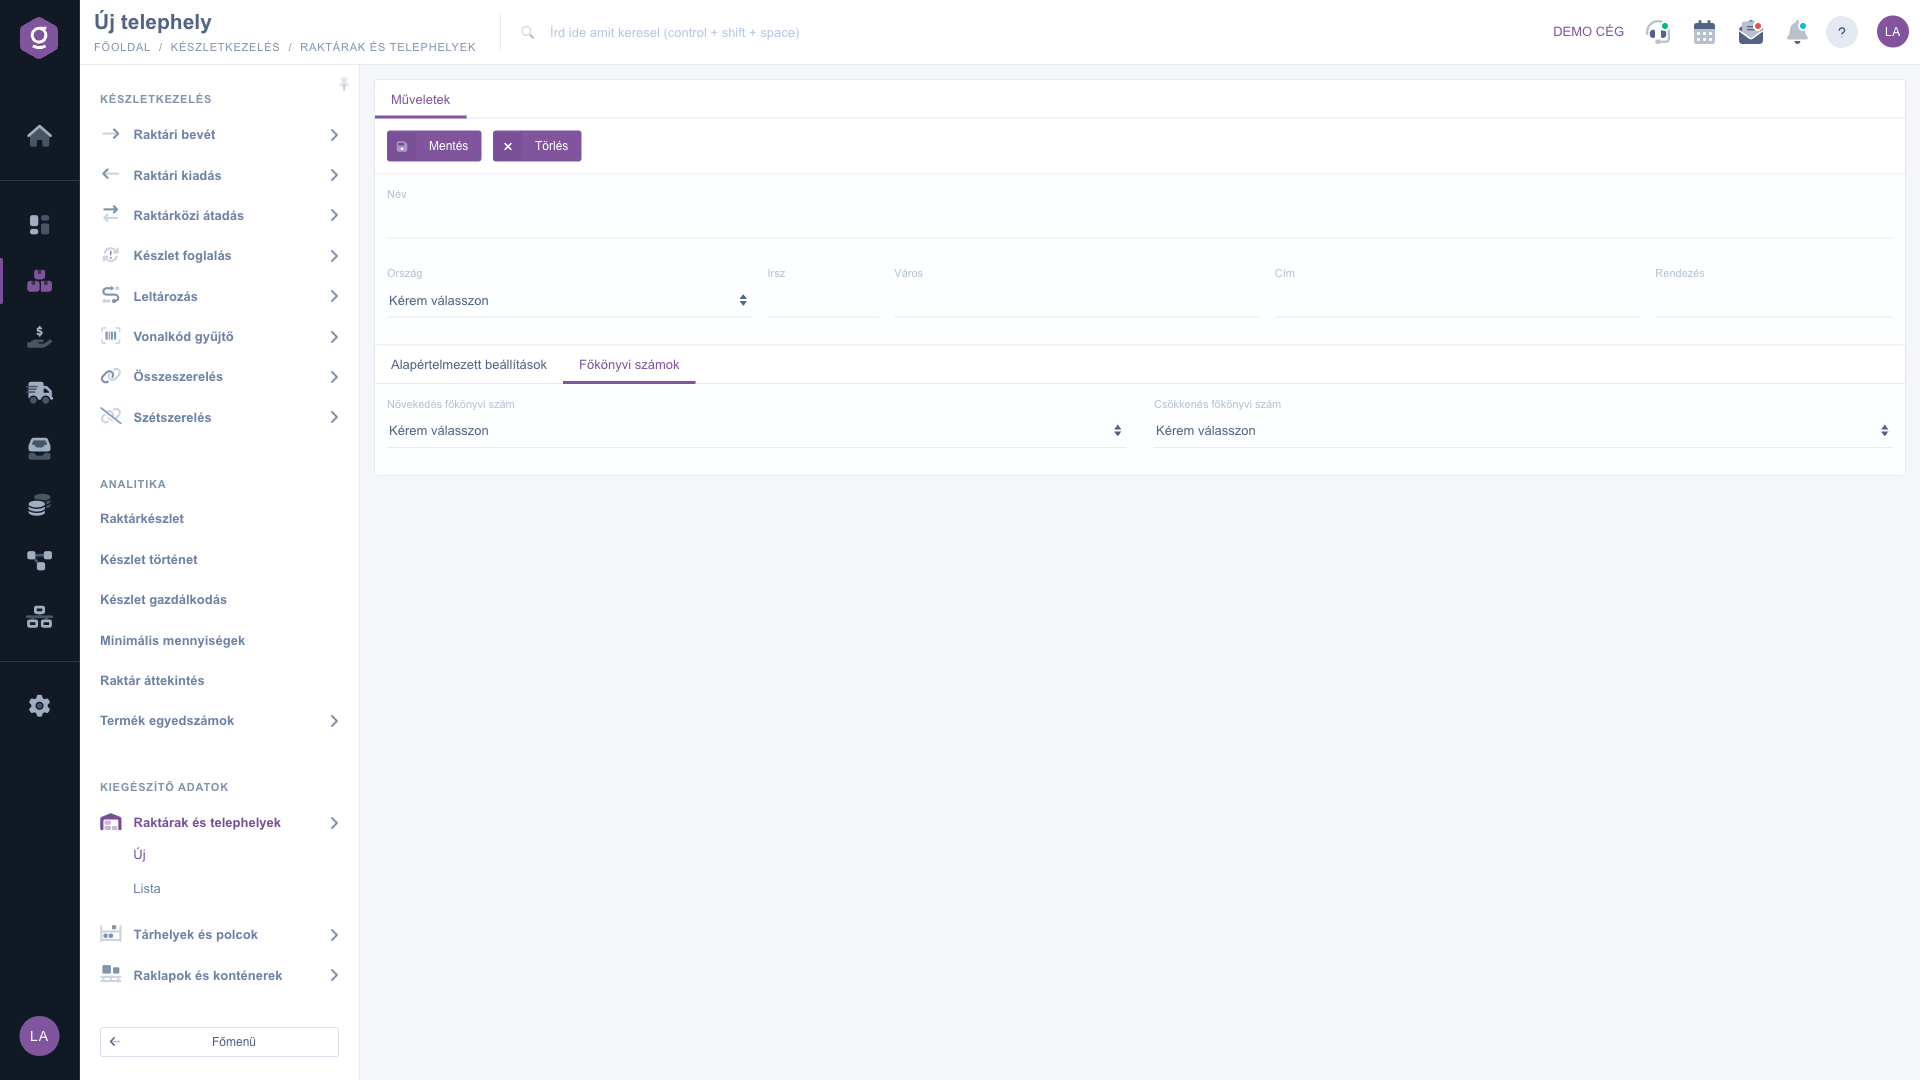
New warehouse record - Ledger numbers tab (Főkönyvi számok)

3. Saving

Click the Save button. If a required field is empty, or the text is too short, the system marks the faulty field and does not save until you correct it. After a successful save the warehouse appears in the Warehouses and sites list.

4. Editing an existing warehouse

On the Main menu / Stock management / Additional data / Warehouses and sites / List page select the row of the warehouse and click the Open button. The record opens filled in, with the name of the warehouse in the header. Change the fields you need, then click Save.
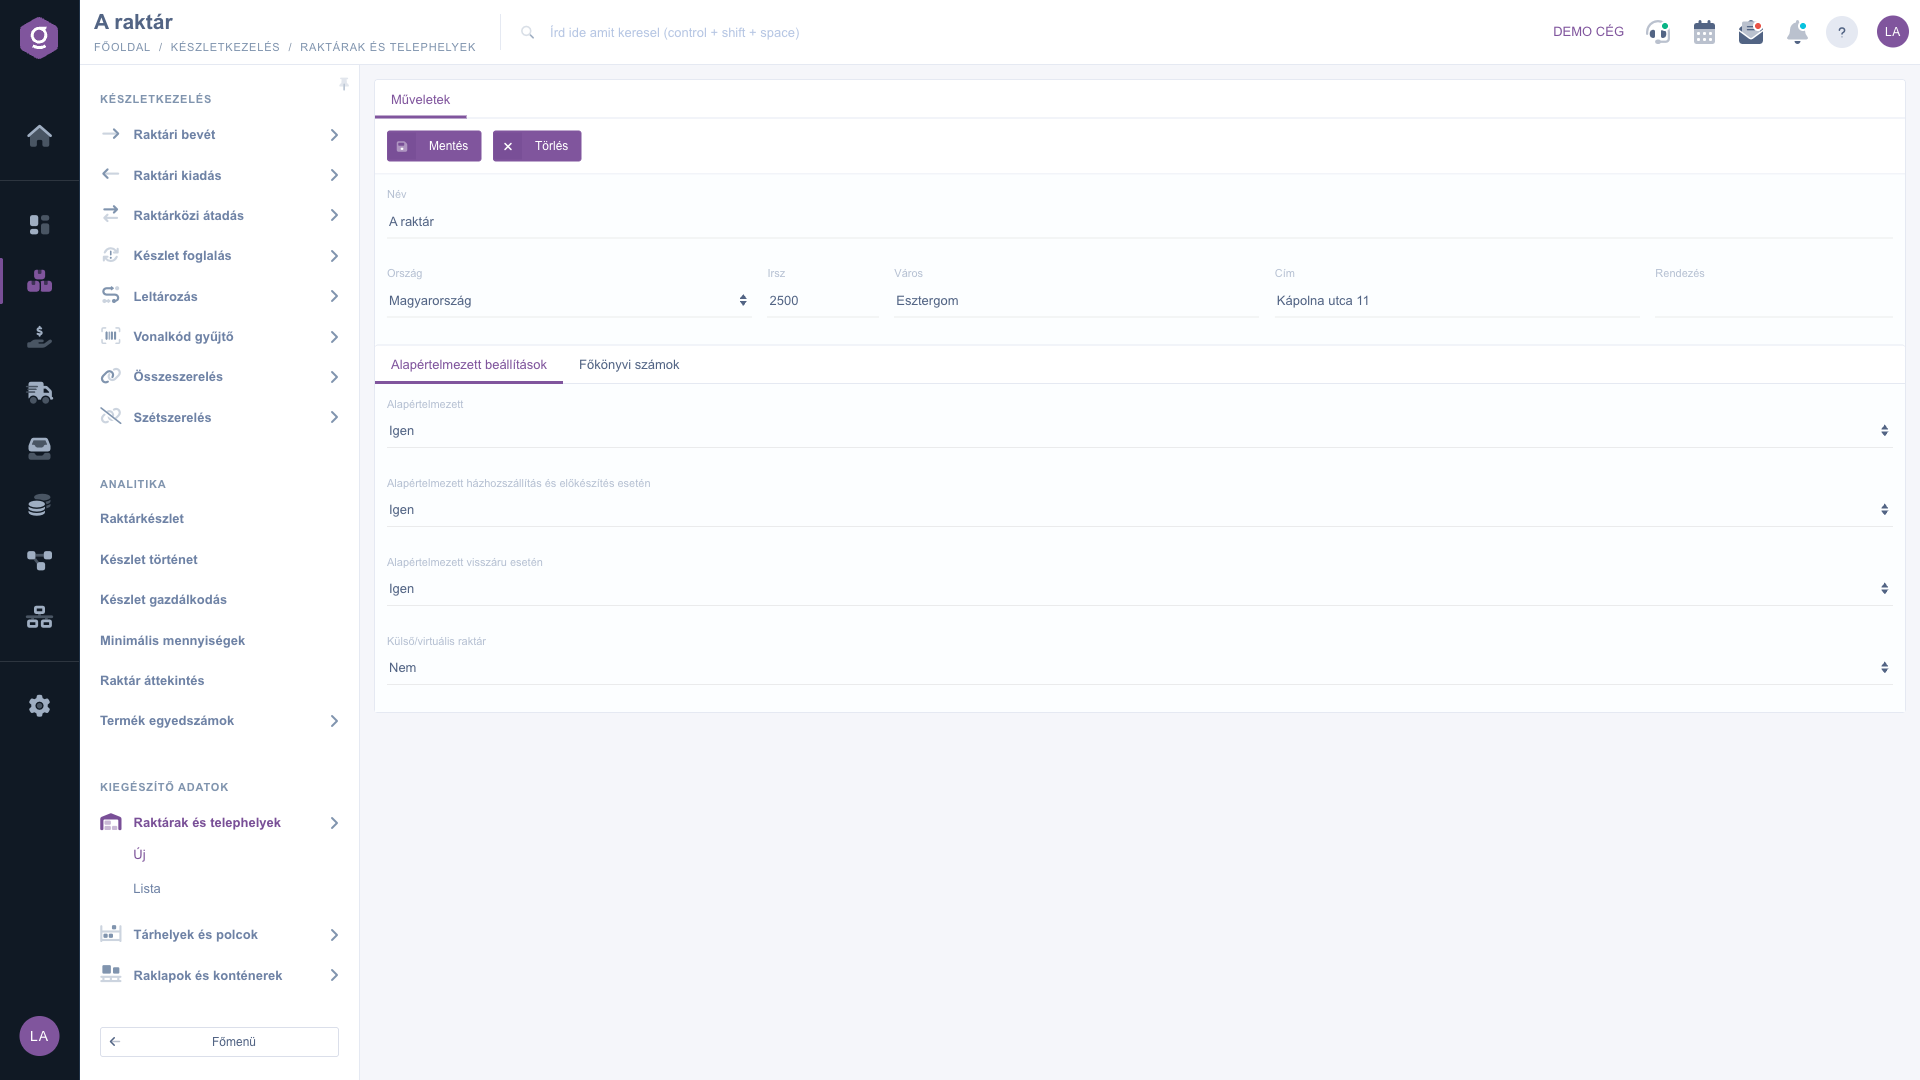
Record of an existing warehouse, filled in (A raktár)

5. Deleting a warehouse

The Delete button puts the warehouse into a deleted state and it disappears from the list. The deletion is logical (the data is not physically removed), but there is no restore option in the interface, so before deleting make sure the warehouse is no longer needed.

You can read about browsing, searching, importing and exporting warehouses in the Warehouses and sites list guide.

Tip


Mark exactly one warehouse as Default. The system does not prevent you from setting Yes on several warehouses, but then only one of them takes effect, so it is hard to tell which one is used. If a warehouse only represents external stock (for example a rented warehouse or supplier consignment stock), set the External/virtual warehouse field to Yes so that its stock does not mix with your own physical stock.


Field descriptions

The fields of the record and what they mean:

Field Required Description
Name The name of the warehouse or site, at least 2 characters. It appears on documents and in selection lists.
Country The country of the warehouse, from a drop-down list. Choose a value instead of Please choose before saving.
Zip The postal code of the warehouse, at least 2 characters.
City The town or city of the warehouse, at least 2 characters.
Address Street and house number, at least 5 characters (e.g. Kápolna utca 11).
Sorting An optional number that sets the display and traversal order of the warehouse. If you leave it empty, the Sorting column of the list is empty too.
Default Yes/No selector, No by default. Yes marks the main, default warehouse.
Default for home delivery and preparation Yes/No selector, No by default. Yes means this warehouse is the default for home delivery and preparation tasks.
Default for returns Yes/No selector, No by default. Yes means returned goods are received into this warehouse by default.
External/virtual warehouse Yes/No selector, No by default. With Yes the stock of the warehouse does not count towards the available and physical stock, and is shown separately as a virtual quantity.
Increase ledger number The ledger number for stock increase, from a drop-down list (name and ledger number).
Decrease ledger number The ledger number for stock decrease, from a drop-down list (name and ledger number).

The title of the record always reads „Új telephely” (Hungarian for „New site”) for a new warehouse, and the name of the warehouse for a saved one.

Frequently asked questions

Name, Country, Zip, City and Address are required and have a minimum length: the name, zip and city at least 2 characters, the address at least 5. Do not leave Please choose in the country field. The system marks the faulty field; correct it and save again.

The system does not check that only one warehouse has Default set to Yes, but in that case the lookup uses only one of the matches. For predictable behaviour mark a single default warehouse and leave the others on No.

The stock of a warehouse with External/virtual warehouse set to Yes does not count towards the available and physical stock, and is shown separately as a virtual quantity. This is intentional: stock held elsewhere does not mix with that of your own warehouses. If you want to include the stock of the warehouse, set the field to No.

There is no restore option in the interface. Deleting only marks the warehouse as deleted and does not move the stock in it automatically, so before deleting check that the warehouse holds no stock. If you deleted one by mistake, create the warehouse again.

The module is in the Additional data section of the Stock management menu, and it only appears if the module is available in your account. If it is missing, ask your administrator to check the access setting of the module.

Need personalized help?

Don't want to spend hours searching for a solution? Choose the most efficient way: book a personalized, 45-minute online training session dedicated entirely to you. Whether it's a walkthrough of the basics or a detailed setup of a specific module, our expert colleague will guide you through the whole process, step by step.

Don't waste your time - ask for help!
Our goal is to get you using our system as quickly and efficiently as possible. Whether you're completely new to us or stuck on a specific setting, don't hesitate to ask for help!

Logzi warehouse management software

Get in touch with us

Interested in our software? Feel free to write to us!

Need help?

If you can't find the answer and need assistance

Create your account now,
pay later!

Try it free for 3 days, no risk, no obligation!
