Storage locations and shelves stock map

See on the warehouse floor plan which location code holds how much stock: colored utilization, product search, movement activity, errors, and shortcuts to the location details.

Function overview

The Stock map shows on the warehouse floor plan how much stock each location code (storage location, shelf) holds. You do not have to browse lists: at a glance you see where there is free space, what is full, and where the data contains errors. You draw the floor plan on the Floor plan designer page; this page is for viewing only and never changes the stock.

  • Layers: you can color the same floor plan by different criteria: utilization, product location, movement activity, age of last movement, errors, default locations, route order.
  • Search: you can search for a location code or a product (item number, name, barcode); the map jumps to the result and highlights it.
  • Bay view and location card: click a rack or a bay to see the utilization and the products level by level.
  • Shortcuts: from the card you can open the products, pallets, serial numbers, the stock history and the sheet of the location code.

The states of a location code on the map: Empty, Partially full, Full, In stock, no capacity set and Negative stock. The meaning of the colors is shown in the Legend on the left.

Step by step

1. Opening the page

Click Main menu / Stock management / Storage locations and shelves / Stock map (the menu is in the Additional data section) to open the map. On the left select the Site, then click the name of the floor plan below it. If a site has no floor plan yet, the page tells you, and you can create one right away with the Floor plan designer button. The screenshots were taken from the Hungarian interface.
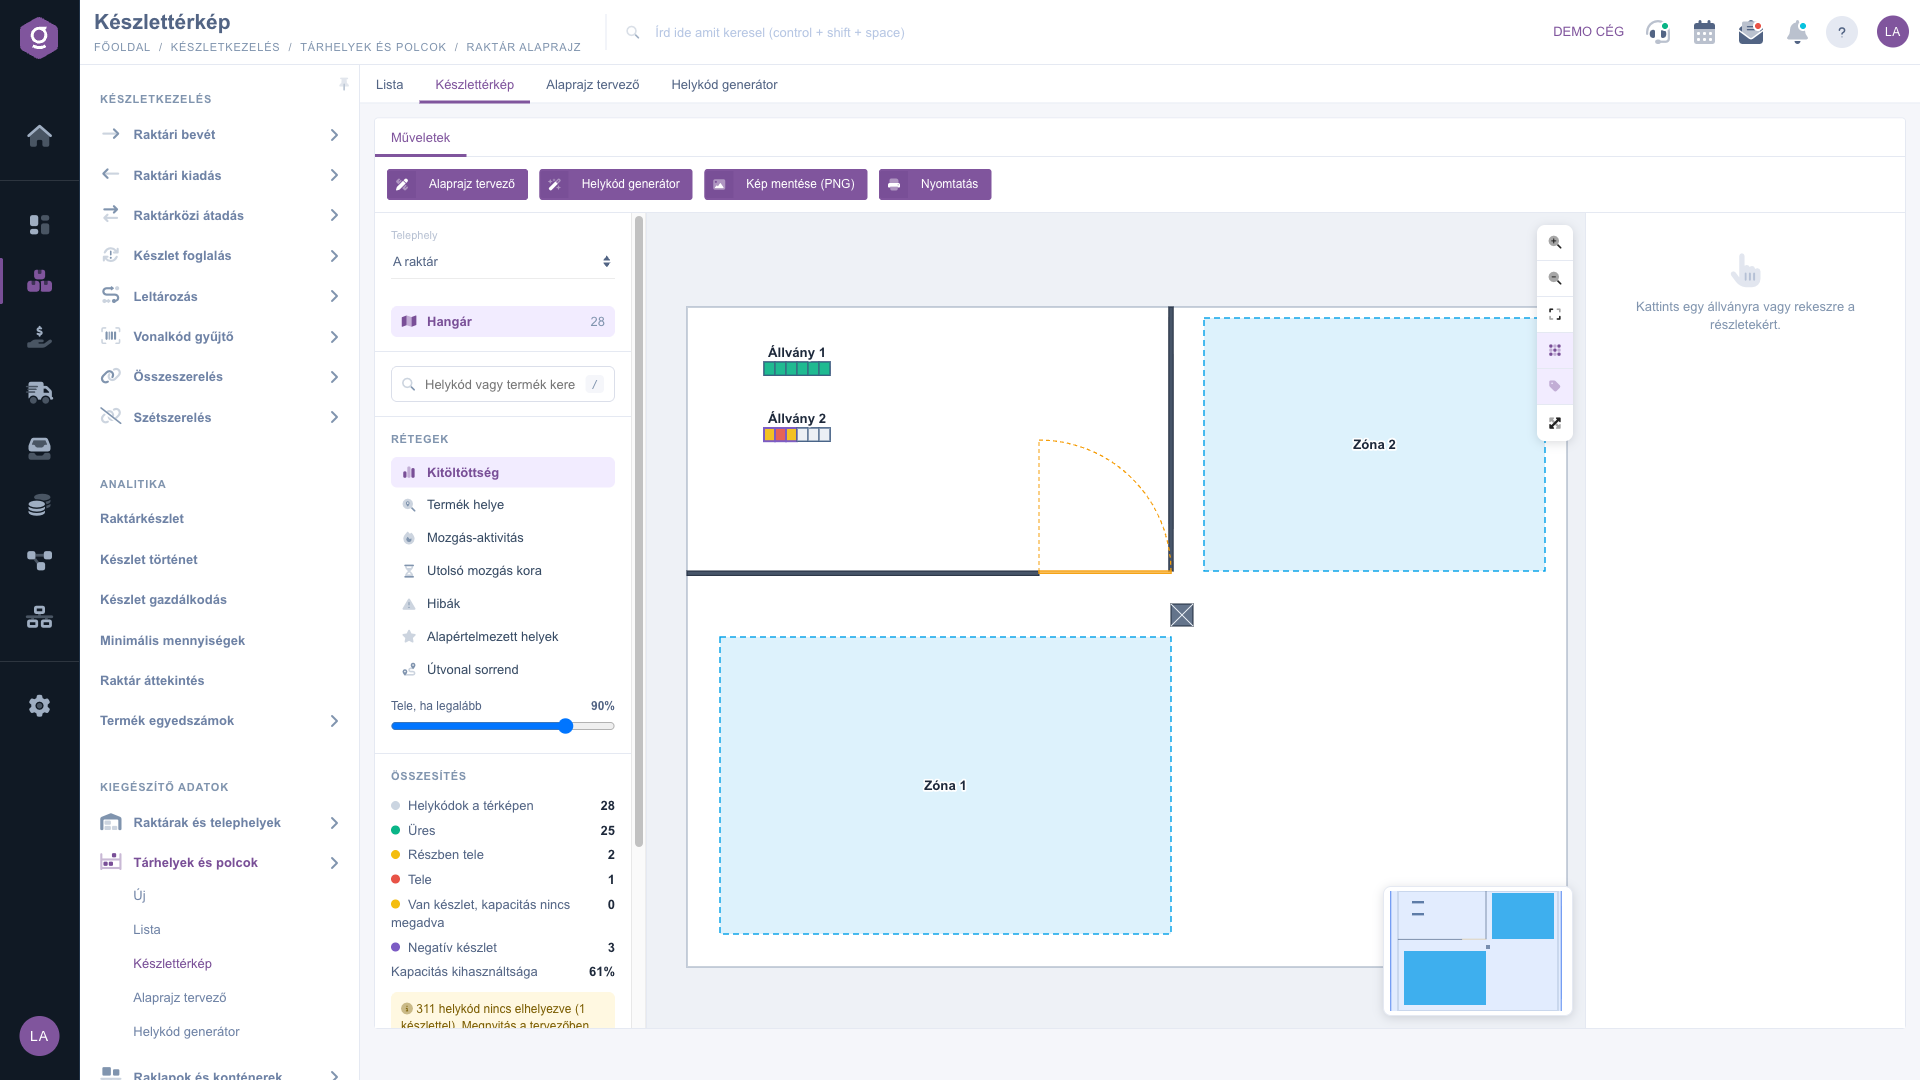
Stock map – utilization layer

2. Moving around the map

Use the mouse wheel to zoom in and out and drag with the mouse to pan (on a touch screen, pinch with two fingers). The buttons of the toolbar on the right also zoom; the Fit to view button fits the whole floor plan to the screen, the Grid and Labels buttons hide the grid and the names, and Full screen fills the screen. The small map (minimap) in the bottom right corner helps you not to get lost when zoomed in: click it to jump there. Shortcuts: / – search, F – fit, + / - – zoom, Esc – clear the selection.

3. Choosing a layer

In the Layers list on the left choose what you want to see. When to use which:

  • Utilization: the default layer showing how full the location codes are: green is empty, yellow is partially full, red is full (at least the set percentage of its capacity is used). Use it to see where more goods fit. Set the threshold with the Full from slider (default 90%). Striped yellow marks a location code that has stock but no capacity set, and a purple border marks negative stock.
  • Product location: shows where a selected product is stored (see step 4). Use it when you are looking for a product in the warehouse.
  • Movement activity: the number of stock movements per location code in the given Period (days), from yellow to red. You see the busiest (hot) places, so fast-moving products can be planned closer to dispatch.
  • Age of last movement: the time since the last stock movement on a color scale (30, 90, 180 days, older). It helps you filter out stagnant, long-unmoved stock.
  • Errors: highlights location codes with negative stock, over capacity, or a duplicated barcode. Worth reviewing before a stocktaking or data cleanup.
  • Default locations: shows the box location code designated for home delivery and the returns location code.
  • Route order: shows the walking order (distance) of the location codes as a color gradient, so you can check the picking route.

4. Searching for a location code or a product

Type the name or barcode of a location code, or the item number, name or barcode of a product into the search box (at least 2 characters). The results appear in separate Locations and Products groups. Click a location code and the map jumps there and highlights the bay with a blink. Click a product and the Product location layer switches on: on the left the list shows the location codes where the product is stored (the star marks the default location, a faded row is a location code not yet placed on the map), and on the map the quantity is shown in blue. Click a row to open another site or floor plan as well.
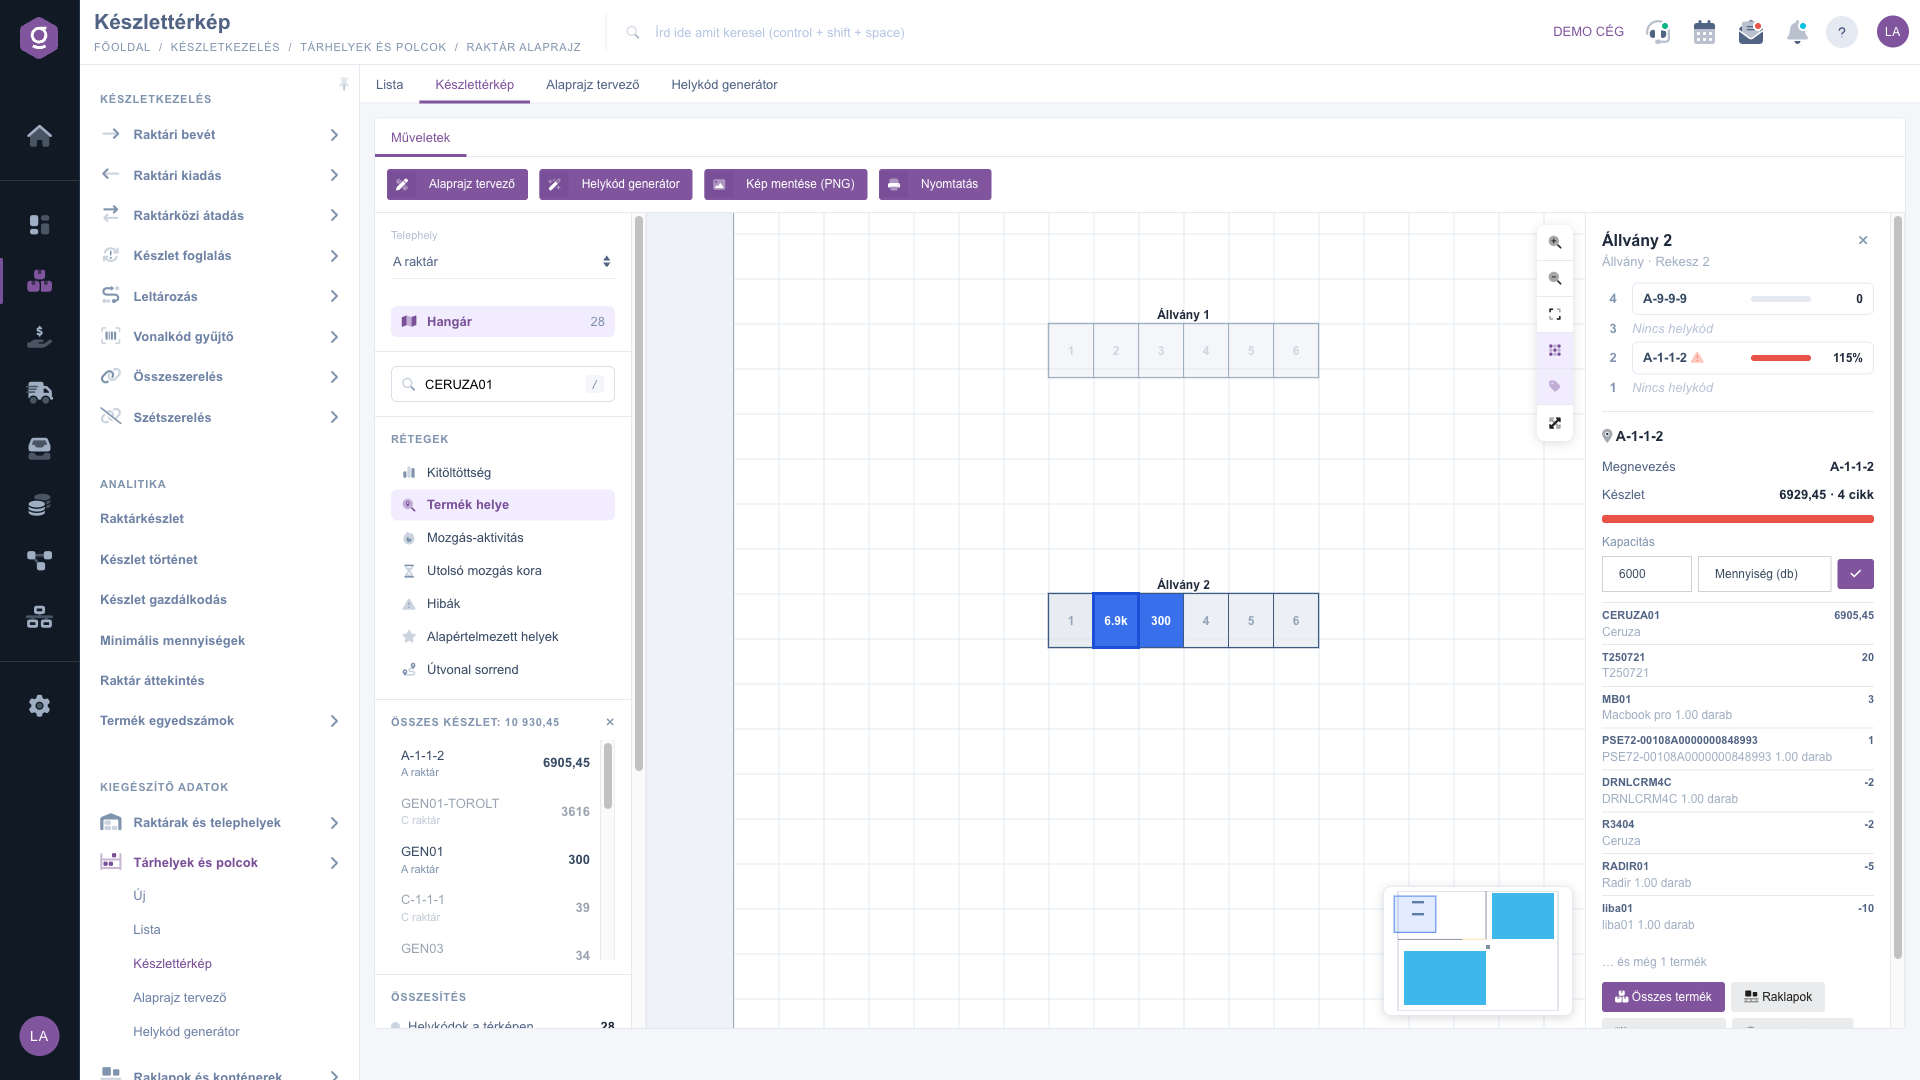
Stock map – location of a product

5. Bay view and location card

Click a rack and the panel on the right shows its data; click a bay and you see the levels of the bay (the top level is at the top), each with its location code, a utilization bar and the stock. Click a level to open the location card: the total stock, the products with quantities and the capacity. In the Capacity field you can enter or change the capacity right here (by quantity or by number of different items) and save it with the check button. If a bay has only one location code, the card opens automatically, and a double click opens the window of its products right away.

  • All products, Pallets, Serial numbers: the list of the products, pallets and serial numbers on the location code, in the same window as in the Storage locations and shelves list.
  • Stock history: opens the stock movements of the location code in a new tab. Choose it when you need to find out why the stock is negative or incomplete.
  • Location sheet: opens the sheet of the location code.
  • Transfer: opens the transfer document, when goods have to be moved to another location code.
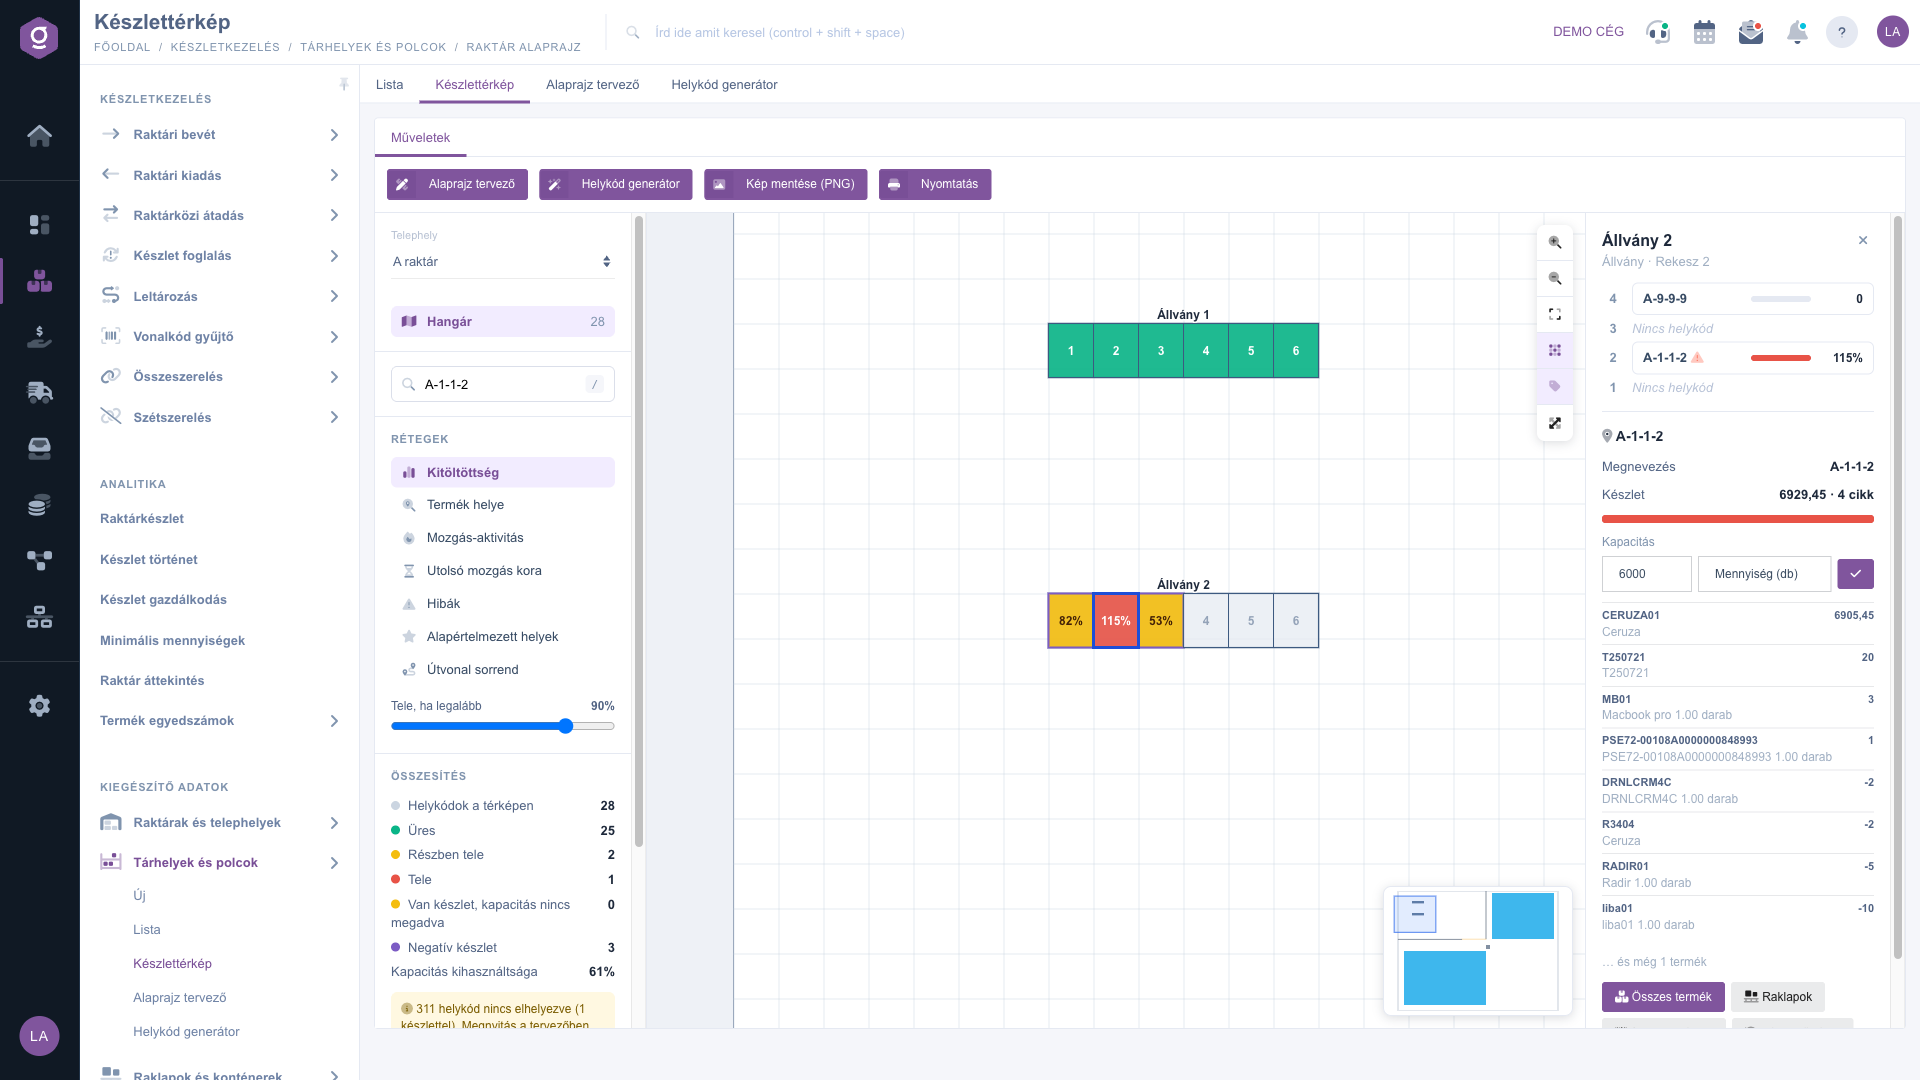
Stock map – levels of a bay and the location card

6. Saving as an image, printing

The Save image (PNG) button downloads the whole floor plan with the legend as an image, and the Print button prints it in landscape. The image always shows the currently selected layer, so you can share, for example, the faulty location codes with a colleague.

You can read about editing the data of the location codes in the Storage location and shelf sheet guide, and about drawing the floor plan in the Storage locations and shelves floor plan designer guide.

Tip


Enter the capacity for your fast-moving (class A) shelves, then check the Utilization layer weekly: it is worth emptying the red bays before replenishment and targeting the green ones on receipt. If you look for the place of a product for picking, type the item number into the search: next to the default location marked with the star you also see the other places where it is stored.


Field descriptions

The elements of the Stock map page and their meaning:

Field / Element Required Description
Site The warehouse or site whose floor plan you are viewing. When you switch, the first floor plan of the site is loaded.
Floor plan name A site can have several floor plans (for example ground floor, upper floor). The number of location codes on it is shown next to the name.
Search location or product Quick search by the name or barcode of a location code, or the item number, name or barcode of a product.
Full from The threshold of the Utilization layer (50–100%). It is remembered in your browser and does not affect other users.
Period (days) The period examined by the Movement activity layer: 7, 30, 90 or 365 days.
Summary The number of location codes on the floor plan by state, the number of those with negative stock and the capacity utilization. It also tells you if there are location codes not placed yet.
Capacity The capacity of the location code. Without it the map cannot tell whether the location code is full.
Capacity type Quantity (pcs): the number of pieces on the location code is measured against the capacity; Number of different items: the number of different products stored on the location code is measured against the capacity.

Frequently asked questions

The map can calculate the utilization only if the location code has a Capacity. Without capacity the location code is striped yellow, which means: there is stock, but it is not known how full it is. You can enter the capacity on the location card, on the Storage location and shelf sheet, or in the Floor plan designer for all location codes of a rack at once.

The location code has negative stock, that is, more products were issued from it than were received. Open its movements with the Stock history button and look for the missing receipt or the wrong issue. The Errors layer highlights all such location codes at once.

In the Product location list the location codes that are not yet placed on a floor plan appear faded. In that case the system shows the message The location is not placed on the map. You can assign the location code to a bay of a rack in the Floor plan designer.

No. The map only displays the stock; quantities are changed by the receipt, issue, transfer and stocktaking documents. The Transfer button only opens the transfer document.

The Storage locations and shelves module appears in the menu only if it is assigned to your user. Ask the administrator to check the module assignment.

Need personalized help?

Don't want to spend hours searching for a solution? Choose the most efficient way: book a personalized, 45-minute online training session dedicated entirely to you. Whether it's a walkthrough of the basics or a detailed setup of a specific module, our expert colleague will guide you through the whole process, step by step.

Don't waste your time - ask for help!
Our goal is to get you using our system as quickly and efficiently as possible. Whether you're completely new to us or stuck on a specific setting, don't hesitate to ask for help!

Logzi warehouse management software

Get in touch with us

Interested in our software? Feel free to write to us!

Need help?

If you can't find the answer and need assistance

Create your account now,
pay later!

Try it free for 3 days, no risk, no obligation!