The Location generator helps when you have to add many location codes with regular names at once (for example all bays and levels of a new rack) and do not want to create each on a separate sheet. You enter a name template and column, row and level ranges, and the system calculates all combinations and shows in the Preview table which location code will be new, which already exists and where there is a conflict. Only after that are the location codes created.
The possible states of the preview rows: New, Already exists, Exists in another store, Duplicate, Invalid, No such position on the rack, Position taken and Placed elsewhere. The meaning of each state is described in the Field descriptions card.
Click Main menu / Stock management / Storage locations and shelves / Location generator (the menu is in the Additional data section) to open the page. Select the Site. If you also want to assign the new location codes to a rack, select the Floor plan and the Rack too: the ranges are then filled in to the size of the rack (the column range with the number of bays, the level range with the number of levels), and the name template starts from the name of the rack. If you only want to create plain location codes, leave the rack on – no assignment –. On the Floor plan designer page, when a saved rack is selected, the Generate locations link brings you here with the rack already selected. The screenshots were taken from the Hungarian interface.
In the Name template field enter the pattern of the location code name, for example A-{row}-{col:2}-{level}. The system replaces {col}, {row} and {level} with the current column, row and level number; the number after the colon pads the number with zeros, so {col:2} turns 1 into 01 (useful so that the codes sort correctly). You can leave the Barcode template field empty, then the barcode is the same as the name. Then enter the Column from / to, Row from / to and Level from / to ranges. For example column 1–5, row 1–1 and level 1–3 gives 15 location codes. At most 5000 location codes can be created in one step; when assigning to a rack, the row range must be a single value.
After changing any field, the Preview at the bottom of the page refreshes automatically: row by row you see the name, the barcode, the column / row / level values, the bay and level of the rack and the state. The Total line shows the number of rows in each state. If everything is fine, click the Create button and confirm the question. Only the New rows become location codes; if you assigned to a rack, existing location codes in the Already exists state that are not yet placed also go to the proper bay. If there is nothing to create or to place, the Create button stays gray.
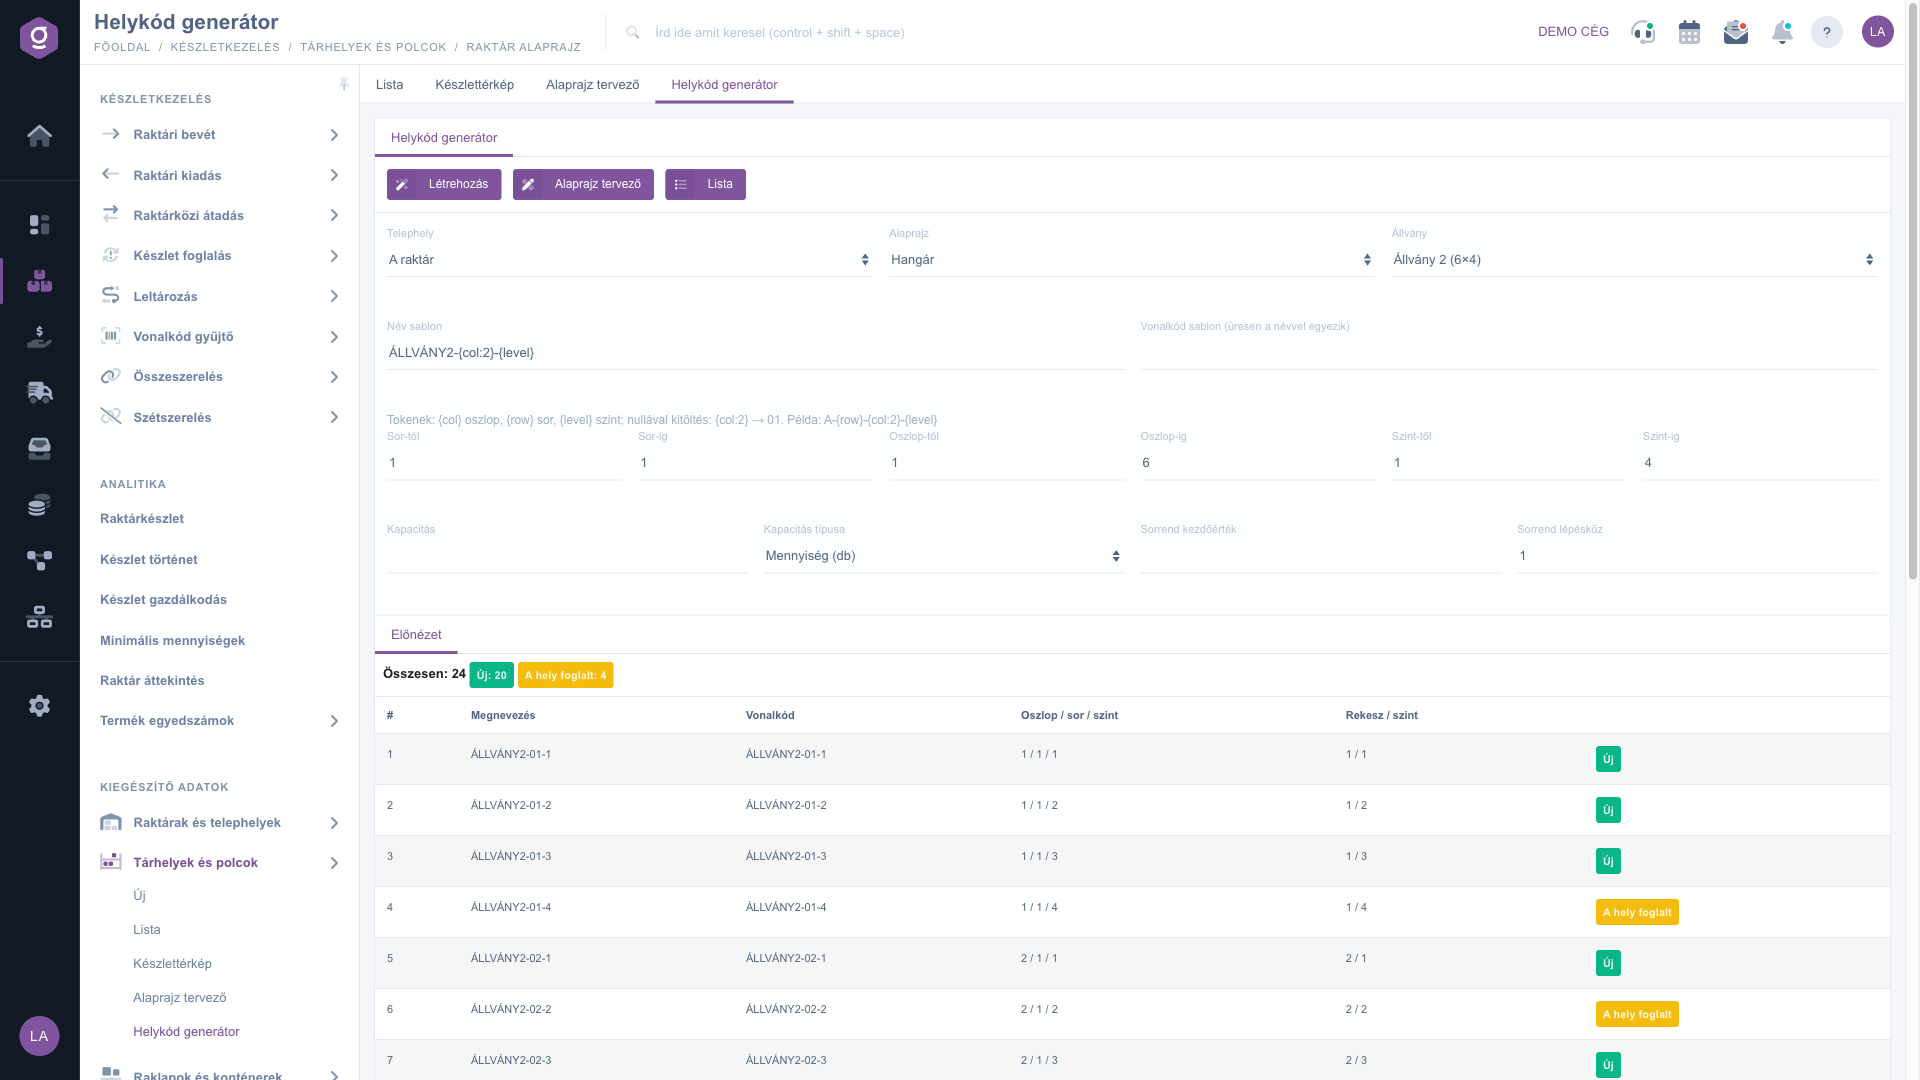
For a new rack, first draw the rack in the Floor plan designer and save it, then select the rack here: the system fills in the ranges from the number of bays and levels. Use a two-digit column ({col:2}) so that bay 10 does not sort before bay 2 in lists.
The fields of the generator:
| Field / Element | Required | Description |
|---|---|---|
| Site | The site where the new location codes are created. | |
| Floor plan, Rack | If you select them, the new location codes go to the bays of the rack. Only a saved rack with bays and levels can be selected. | |
| Name template | The pattern of the location code name with the {col}, {row}, {level} placeholders (at most 150 characters). | |
| Barcode template | The pattern of the barcode; if empty, it is the same as the name. | |
| Row from, Row to, Column from, Column to, Level from, Level to | The ranges to go through (0–9999). The Row, Column and Floor fields of the location code are filled from them. At most 5000 location codes in total. | |
| Capacity, Capacity type | The capacity and type of the new location codes (Quantity (pcs) or Number of different items). | |
| Order start value, Order step | The start value and the increment of the order (distance) field of the new location codes. |
The states of the Preview and their meaning:
| State | Created | Description |
|---|---|---|
| New | The barcode does not exist yet, the location code is created. | |
| Already exists | A location code with this barcode already exists on the same site; it is not created again. When assigning to a rack, the existing location code is placed if it is not placed elsewhere yet. | |
| Exists in another store | The barcode belongs to a location code of another site; it is skipped to avoid a conflict. Change the template. | |
| Duplicate | The template produces the same barcode for several combinations (for example {level} is missing); only the first is created. | |
| Invalid | The name or the barcode is empty. | |
| No such position on the rack | The column or level range is larger than the number of bays or levels of the rack. | |
| Position taken | Another location code is already in that bay of the rack. | |
| Placed elsewhere | The existing location code is already assigned to a bay of another rack, so it is not moved. |
No row of the preview is in the New or Already exists state, so there is nothing to create. Look at the states in the Total line: if every row conflicts, change the template or the ranges.
Yes, no duplicates are created: the existing barcodes get the Already exists state and are not created again. So you can also use the generation, for example, to extend a range.
No, the created location codes have to be deleted on the Storage locations and shelves / List page. So check the preview carefully before Create and try the template first with only a few combinations.
If you have to add one or two location codes, or enter special data (for example a returns or box location setting), use the Storage location and shelf sheet. If you need at least a dozen location codes with regular names, the generator is faster and makes fewer mistakes.
The Storage locations and shelves module appears in the menu only if it is assigned to your user. Ask the administrator to check the module assignment.
Don't want to spend hours searching for a solution? Choose the most efficient way: book a personalized, 45-minute online training session dedicated entirely to you. Whether it's a walkthrough of the basics or a detailed setup of a specific module, our expert colleague will guide you through the whole process, step by step.
Don't waste your time - ask for help!
Our goal is to get you using our system as quickly and efficiently as possible. Whether you're completely new to us or stuck on a specific setting, don't hesitate to ask for help!
Create your account now,
pay later!