Barcode collector document

Creating and editing a barcode collector document: filling in the header data, adding items one by one, with barcodes, by CSV or pallet import, checking, saving, closing and shipping out.

Feature overview

On the Barcode collector document page (a collector for short) you create and edit the data of a single barcode collector document. The collector is the basis for preparing warehouse movements — Goods receipt, Goods issue and Relocation: you record which items (item numbers), in what quantity, and from which site, location code or pallet they have to be moved. A closed collector is then processed further by mobile data collector devices (for example the Logzi Picklist app) and by the Packing and check process.

  • Header data: the document type, the supplier and customer order numbers, and the incoming invoice and delivery note numbers can be edited in one place.
  • Four ways to add items: one by one with the New button, in bulk in the Barcode collector window, from a CSV file with the Import button, or with the full content of a pallet using the Pallet import button.
  • Checking: you can mark the items one by one as Checked, so you can see what has already been verified.
  • Status handling: the Save, Close, Shipped and Delete buttons take the document through the process.
  • Related data: comments, settings, related documents, tasks, files, partner data, packaging material and custom fields are available on separate tabs.

The possible states of the document are: Draft, Closed, Cancellation, Cancelled, Ready to ship, Shipped, Awaiting preparation, Prepared, Ready to pack, Ready for pickup, Picked up and Not ready to ship. A new document always starts in the Draft state. The module appears under Main menu / Stock management / Barcode collector only if it is assigned to your user.

Step by step

1. Creating a new collector and filling in the header data

Click Main menu / Stock management / Barcode collector / New (or the New button on the List page). The empty document opens in the Draft state. Under the Actions tab you find the buttons of the document, and below them the header data:

  • Type: required field — choose whether you are creating a Goods receipt, Goods issue or Relocation collector. After saving, the type can no longer be changed.
  • Supplier order number, Customer order number, Incoming invoice number and Incoming delivery note number: free-text references.
  • Document number, Document date and Status: filled in by the system, not editable.
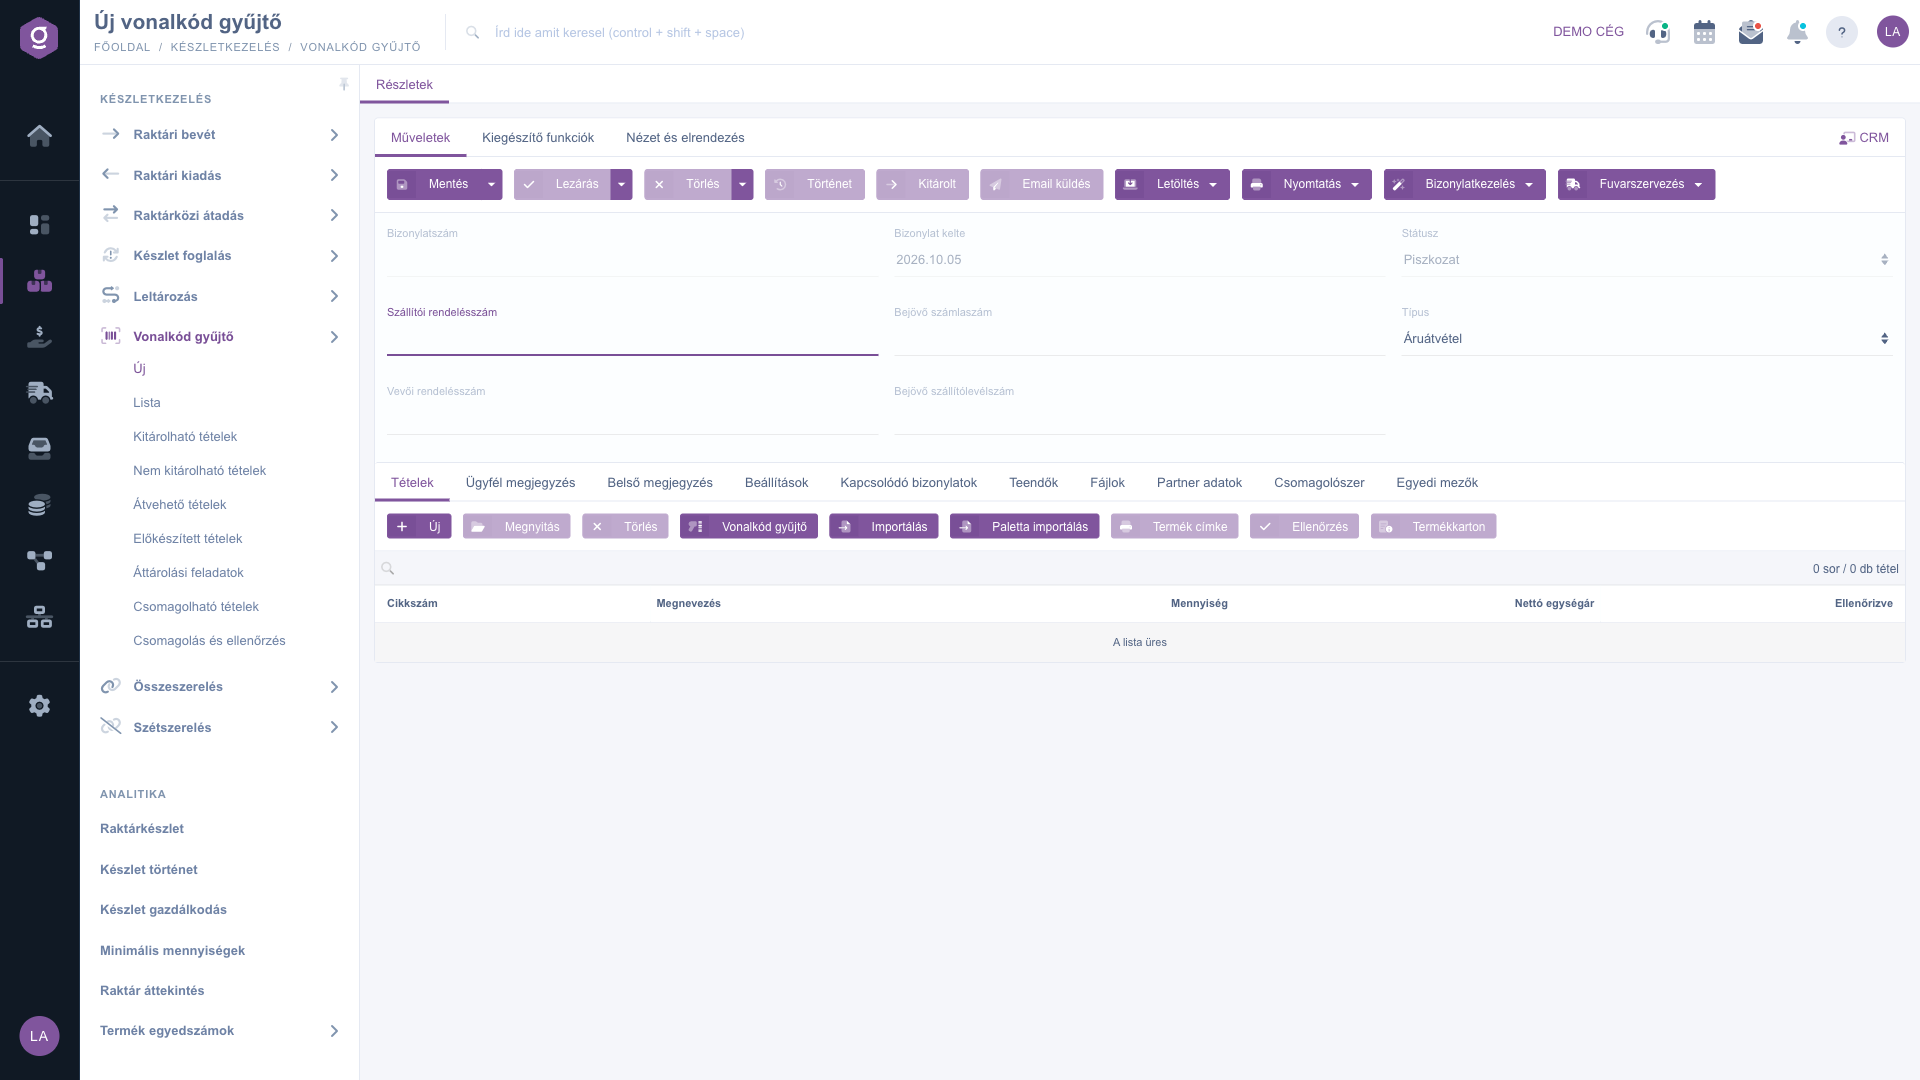
New barcode collector document – actions, header data and items

2. Adding an item one by one

On the Items tab click the New button. The window that opens can have three tabs:

  • Properties: enter the Item number (required) — the field offers matching products as you type — then, if needed, the Name, the Quantity, the Net unit price and the Comment. Save adds the item to the table of the document, Close closes the window.
  • Warehousing master data: here you specify where the product moves from or to. The Site is required; in the Storage locations and shelves field you can enter a location code, in the Pallets and containers field a pallet or container code. The Add button records the item, New product opens a new tab to create a new product, and Close closes the window. The Product at location code and Product on pallet sub-pages at the bottom list the data of the product by location code and by pallet.
  • Serial numbers: appears only for products tracked by serial number.

You can edit an existing item by selecting it in the table and clicking Open, or remove it with Delete. Items are only in the table until you save the document with the Save button.
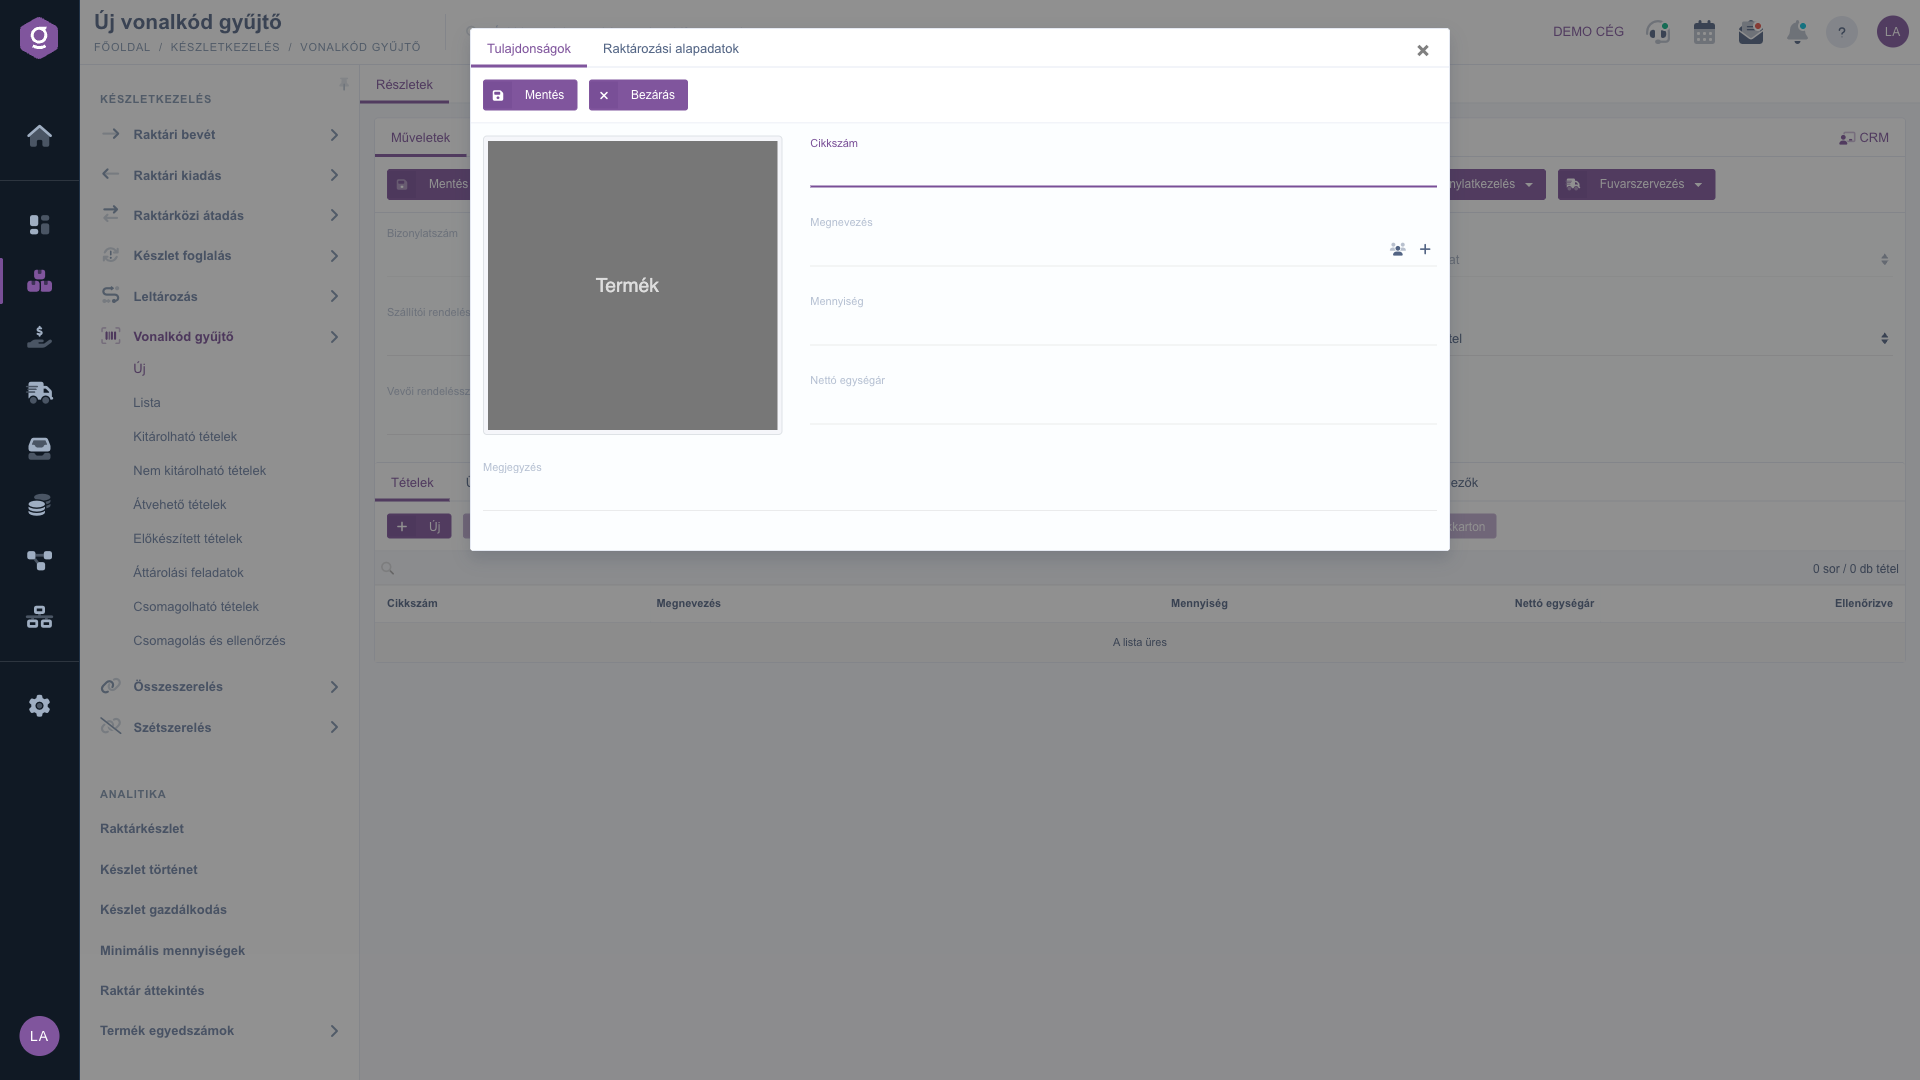
Adding an item – Properties tab

3. Adding items with the Barcode collector window

To enter many items quickly, click the Barcode collector button. In the text field of the window that opens, type or scan one item per line in the [barcode];[quantity] format (for example CERUZA01;5), then click Save. The system looks the code up as an item number; if you leave out the quantity or enter a non-positive number, it counts 1 piece. The items are added to the table with the default site.
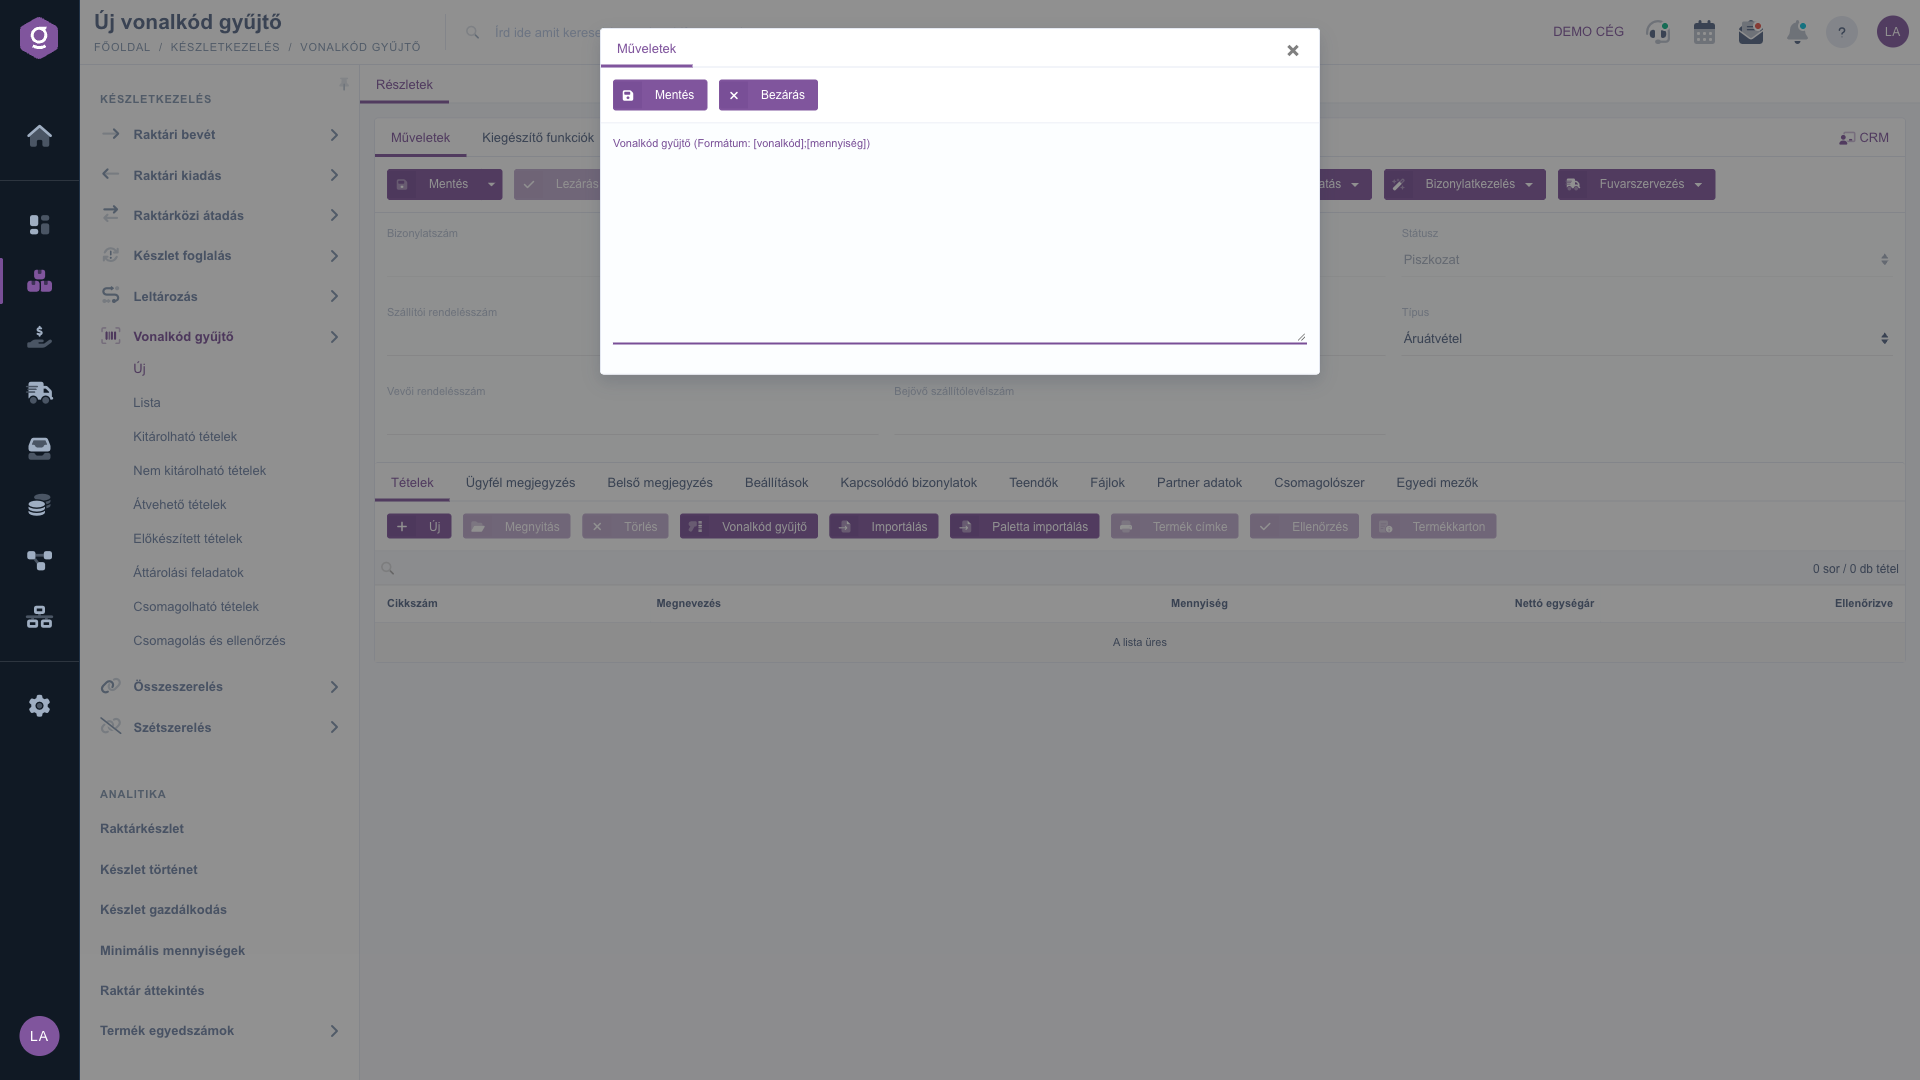
Barcode collector window

4. Importing items from a file

You can choose between two imports. In both windows, select the file with the file chooser (only CSV files can be uploaded), start the processing with Save, and click the Schema file link to download the sample structure.

  • Import: the columns of the template are: product_partnumber;quantity;price;comment_top;store_id;store_locality_barcode;pallet_barcode. If store_id is empty, the default site is put on the item; the system finds the location code and the pallet from the location code barcode and the pallet barcode.
  • Pallet import: the template has a single column: pallet_barcode. The system adds every stock item of the given pallets to the document with the current quantity of the pallet, a price of 0 and the default site.

The imported rows go into the table; check them and save the document.
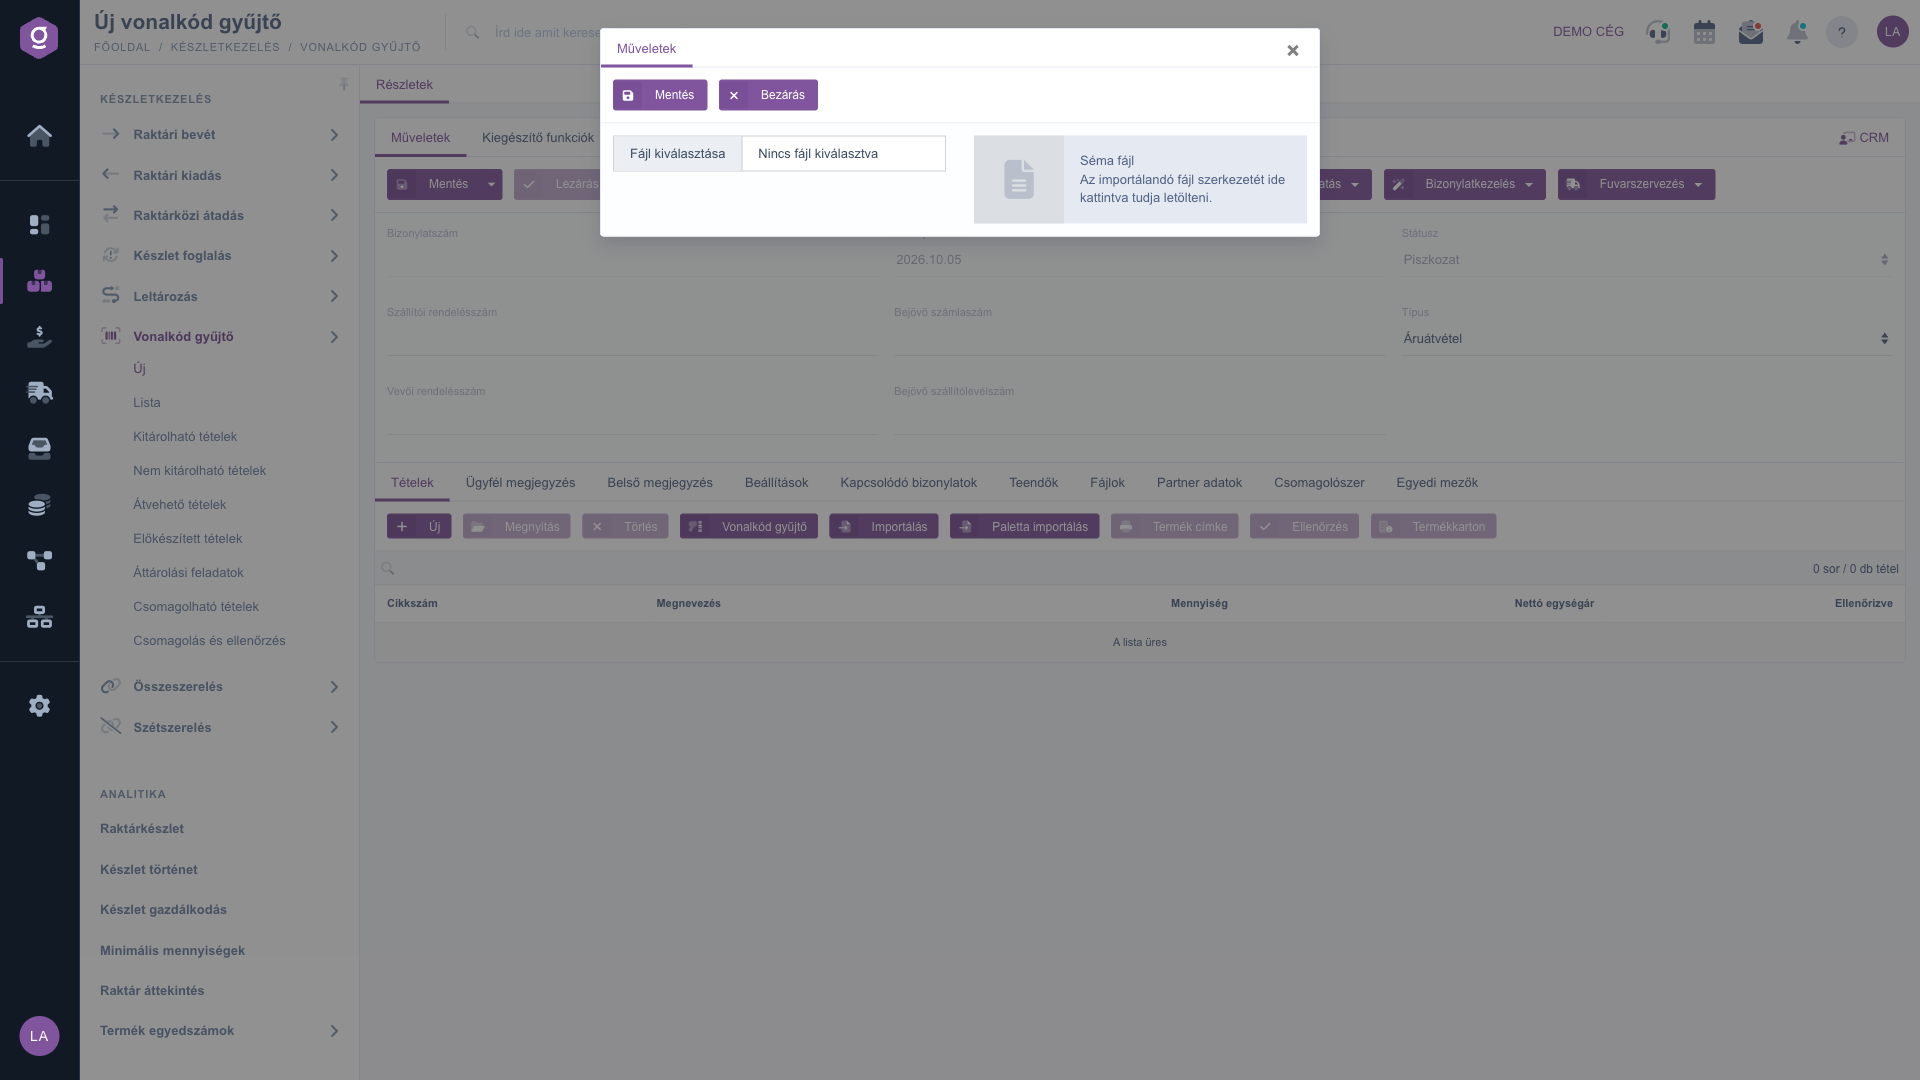
Import window
Import window

5. Checking the items

On a saved document, select an item and click the Check button. The window shows the image of the product, the Item number, the Name and the Piece count. If it matches reality, click Checked; if not, click I have not checked. The result is shown in the Checked column of the table. The Product card button opens the detailed data sheet of the selected product, and the Product label button starts printing the product label.

6. Comments, settings and related data

  • Customer comment and Internal comment tabs: you can write text in an editor; you can also pick a previously saved comment template from the drop-down list. The customer does not see the internal comment.
  • Settings tab: the Billing address (required), the Pallet-based goods issue (No / Yes), and the choice of Project, Job number and Department number. The plus sign next to the fields opens a new master data record.
  • Related documents, Tasks, Files, Packaging material, Custom fields: further data attached to the document.
  • Partner data: read-only data that appears only if the customer order number is filled in.
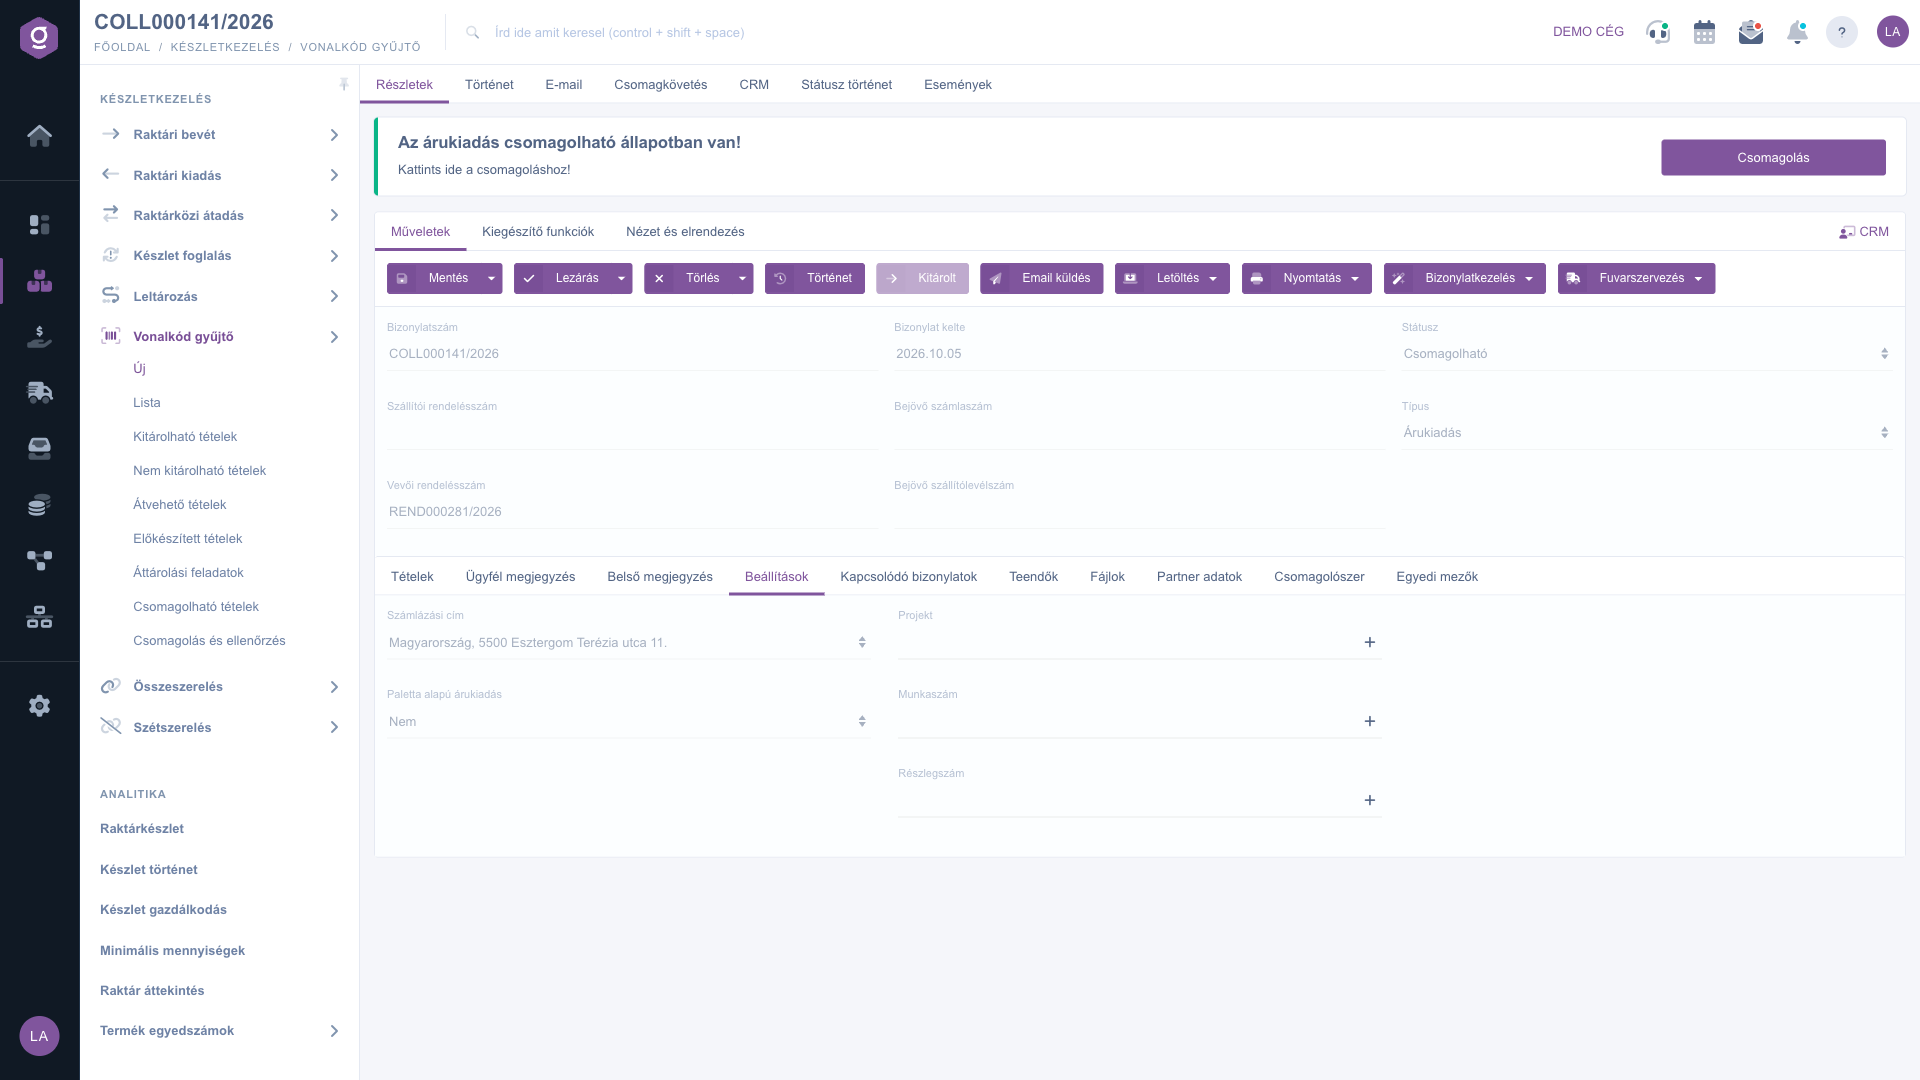
Settings tab
Settings tab

7. Saving, closing and shipping out

  • Save: the data is recorded; finalization happens when you close the document. The arrow next to the button also offers Save and close.
  • Close: finalizes the document; after that it can no longer be modified. A Goods issue collector becomes Ready to ship, while Goods receipt and Relocation collectors become Closed. The arrow also offers Close and print and Close and download.
  • Shipped: the button is active only for a Goods issue collector in the Ready to ship state, and sets the document to Shipped.
  • Delete: the document goes to a deleted or cancelled state and cannot be restored. Delete and copy also creates a copy in addition to deleting.
  • Packing: if the collector is in the Ready to pack state, a green bar with the text "The goods issue is ready to be packed!" appears at the top of the page, and the Packing button leads to the packing process.
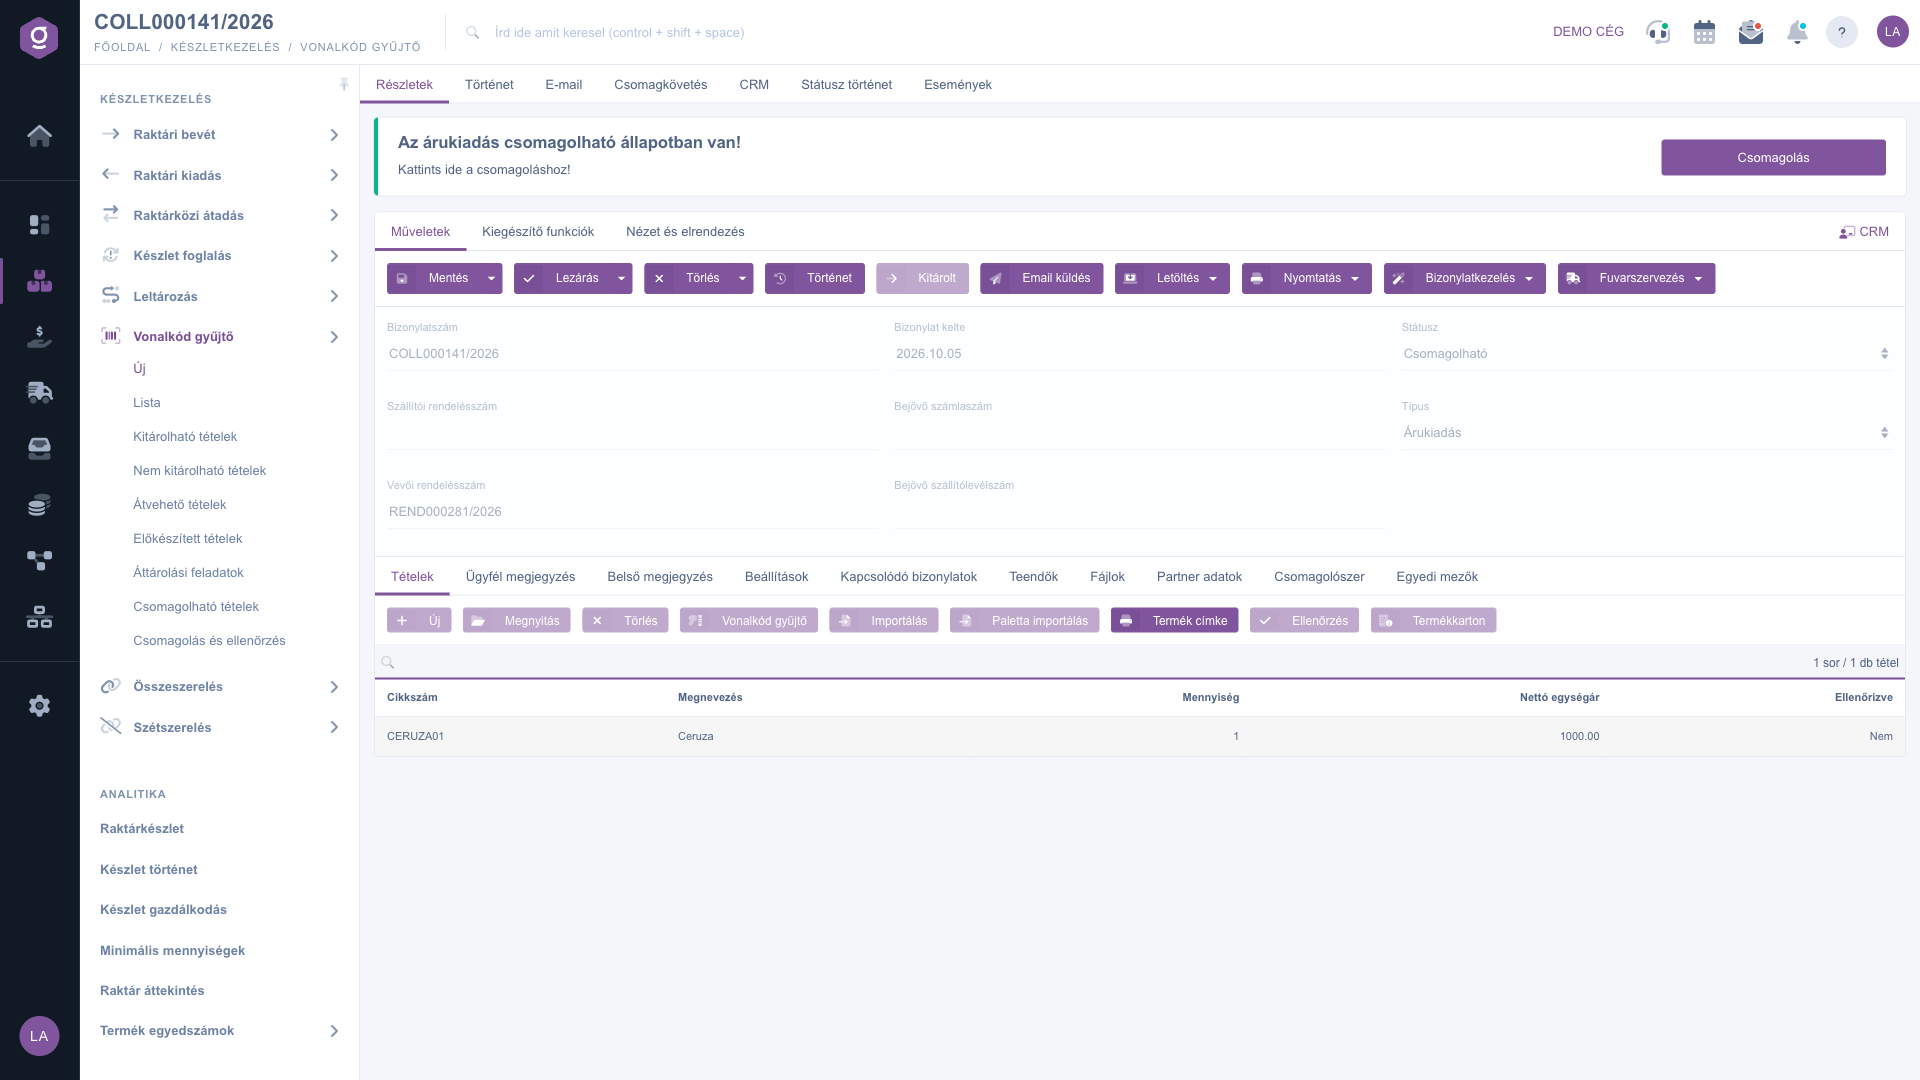
Existing collector – Ready to pack state, side tabs and items

8. Further operations on the document

  • History: view the history related to the document. On a saved document, further tabs appear at the top of the page: Details, History, Email, Parcel tracking, CRM, Status history and Events.
  • Send email: send the document by e-mail.
  • Download: CSV, XLSX, PDF and PDF preview.
  • Print: print the Product label and the Document.
  • Document management: create a new document from the collector: Warehouse receipt, Warehouse issue, Stocktaking, Invoicing, Retail sales, Incoming invoices, Incoming delivery note, Delivery note.
  • Transport organization: New parcel label creates a new label, Parcel labels lists the ones already recorded.
  • Additional functions tab: Sent items, New email (External mail client or Internal mail client), New product, New partner, New task and Partner card. On the View and layout tab you find the Interface and behavior setting.

Tip


If you have to add many items of the same structure, create a CSV template once based on the Schema file and use the Import button. If the whole content of a pallet has to be moved, the Pallet import adds all the items in one step when you enter the pallet code.


You can read about the overview of collectors and the quick status buttons in the Barcode collector list guide, and about the packing process in the Packing and check guide.

Field descriptions

The header data of the document:

Field / Element Required Description
Document numberUnique identifier given by the system (e.g. COLL000141/2026); not editable.
Document dateThe date the document was created; automatic.
StatusThe current state of the document; set by the buttons, not directly editable.
TypeGoods receipt, Goods issue or Relocation. Cannot be changed on a saved document.
Supplier order numberReference number of the order sent to the supplier.
Customer order numberNumber of the customer order; once filled in, the Partner data tab also shows data.
Incoming invoice numberNumber of the incoming invoice belonging to the purchase.
Incoming delivery note numberNumber of the incoming delivery note belonging to the purchase.

Editing the header fields, the item operations and closing depend on the state of the document: after closing, the document can no longer be modified.

Fields of the item window (New / Open):

Field / Element Required Description
Item numberThe item number of the product to be moved; you can search the products as you type.
NameThe name of the product; filled in when you select the item number.
QuantityThe number of pieces to be moved.
Net unit priceThe net unit price of the product.
CommentFree-text comment attached to the item.
SiteThe site selected on the Warehousing master data tab.
Storage locations and shelvesThe location code of the item within the site.
Pallets and containersThe code of the pallet or container belonging to the item.

Fields of the Settings tab:

Field / Element Required Description
Billing addressSelectable from the billing addresses recorded for your own company.
Pallet-based goods issueNo or Yes: shows whether the issue is carried out on a pallet basis.
ProjectAssigns the document to a project.
Job numberAssigns the document to a job number.
Department numberAssigns the document to a department number.

Columns of the Import file:

Field / Column Required Description
product_partnumberThe item number of the product.
quantityThe quantity to be moved.
priceNet unit price.
comment_topComment attached to the item.
store_idThe identifier of the site; if empty, the default site is put on the item.
store_locality_barcodeThe barcode of the location code.
pallet_barcodeThe barcode of the pallet. In the file of the Pallet import this is the only column.

Frequently asked questions

Items can only be added to a document in the Draft state. After closing, the document becomes final and its items can no longer be modified. If you find a mistake, you can delete the closed document, or use the Delete and copy button to delete it and create a copy, and then correct the copy.

In the Barcode collector window you enter only the code and the quantity per line ([barcode];[quantity]); the item is added with the default site, without a location code or pallet. The Import works from a CSV file, and per row you can also specify the price, the comment, the site, the location code and the barcode of the pallet.

Based on the pallet barcodes given in the file, the system loads the current stock of the pallets as items: every product on the pallet goes into a separate row with the quantity of the pallet. The price is 0 in this case and the site is the default one. If you need to change the price or the site, open the item with the Open button.

The window looks up the entered code as the item number of the product, so check that it matches exactly the item number on the product card, and that a semicolon separates the code and the quantity. If you leave out the quantity or enter a non-positive number, the system counts 1 piece.

After Close, a Goods issue collector becomes Ready to ship; this is when the Shipped button becomes active, which sets the document to the Shipped state. Goods receipt and Relocation collectors are Closed after closing, and the Shipped button cannot be used for them. You can set the further statuses (Prepared, Ready to pack, Ready for pickup, Picked up) with the quick buttons of the list or during the packing process.

If the collector is in the Ready to pack state, the green bar with the packing notice and the Packing button appears at the top of the document. You can also start the process from Main menu / Stock management / Barcode collector / Packing and check; the details are in the Packing and check guide.

Need personalized help?

Don't want to spend hours searching for a solution? Choose the most efficient way: book a personalized, 45-minute online training session dedicated entirely to you. Whether it's a walkthrough of the basics or a detailed setup of a specific module, our expert colleague will guide you through the whole process, step by step.

Don't waste your time - ask for help!
Our goal is to get you using our system as quickly and efficiently as possible. Whether you're completely new to us or stuck on a specific setting, don't hesitate to ask for help!

Logzi warehouse management software

Get in touch with us

Interested in our software? Feel free to write to us!

Need help?

If you can't find the answer and need assistance

Create your account now,
pay later!

Try it free for 3 days, no risk, no obligation!
