On the Company data page you manage your own company data and the company-level basic settings of the system. This data appears, for example, on the documents you issue.
Click Main menu / Settings / System settings / Company data. The page is a single form: the Save button at the top, below it the company master data, then the Contacts block, and finally five tabs: Tax authority data reporting, Pricing, Default values, Stock management and Other. The screenshots were taken in the Hungarian interface.
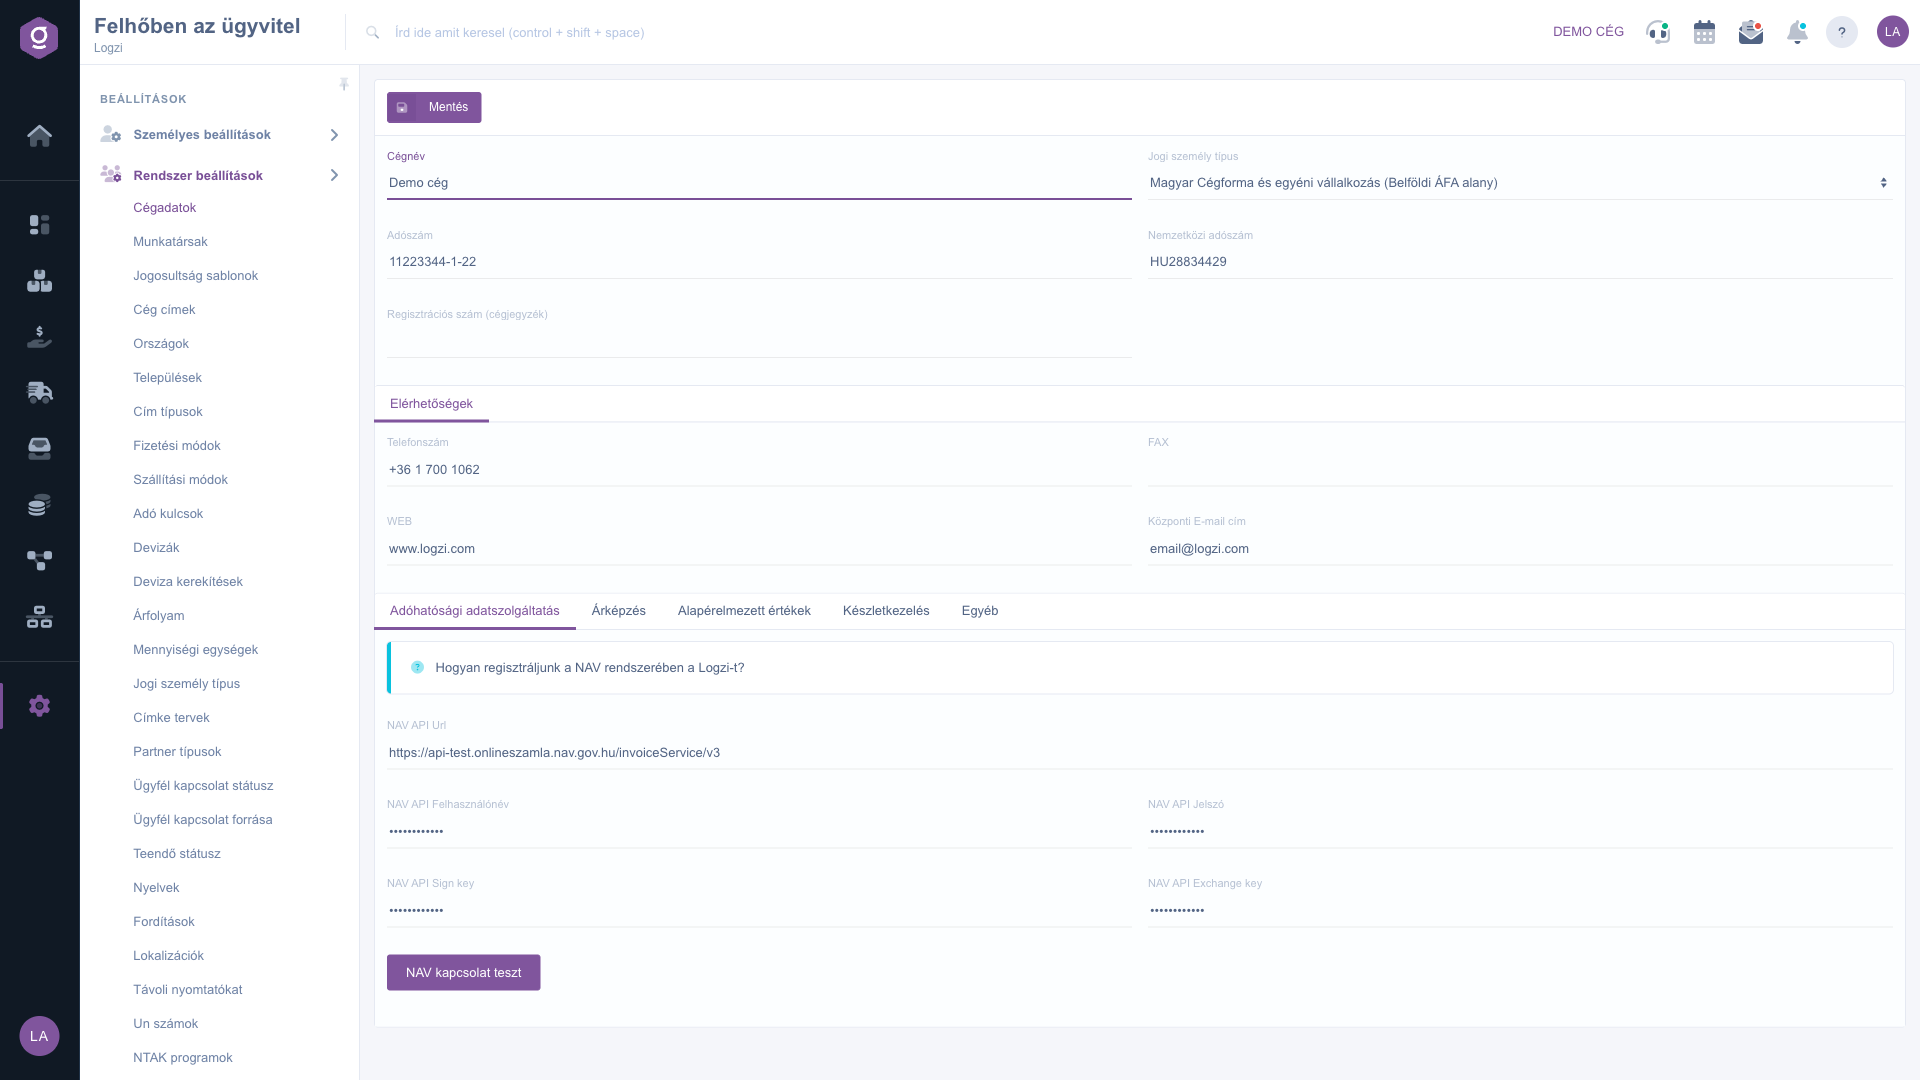
Enter the Company name, Legal entity type, Tax number, International tax number and Registration number (Company registry), then in the Contacts block the Phone number, FAX, WEB and Central email address. To use NAV Online Invoice, fill in the NAV API Url, NAV API Username, NAV API Password, NAV API Sign key and NAV API Exchange key fields on the Tax authority data reporting tab, then click the NAV connection test button. At the top of the tab, the question How to register Logzi in the NAV system? opens a detailed guide.
On the Pricing tab you choose which document types modify the last purchase, purchase, selling and average price, switch on the Late payment interest calculation and enter the Central bank base rate. On the Other tab you set the Incoming invoices email address, the Default invoicing type (paper-based, electronic or EDI) and read the information about electronic invoices. The Default values tab holds the default credit limit, the document item sorting, the shipping rule, the default fulfillment date of cancellation invoices and the default options for new products, and the Stock management tab holds the Strict location code storage setting. After the changes click Save.
Use the NAV connection test button before saving to check that the technical user details are correct, so invoice submission does not fail later.

The main fields of the Company data page.
| Field | Required | Description |
|---|---|---|
| Company name | The name of the company, shown on documents. | |
| Legal entity type | The legal form of the company, chosen from a list. | |
| Tax number | The domestic tax number of the company. | |
| International tax number | The EU tax number (for example HU28834429). | |
| Registration number (Company registry) | The company registry number. | |
| Phone number | The central phone number of the company. | |
| FAX | The fax number of the company. | |
| WEB | The website of the company. | |
| Central email address | The central email address; if a partner has no email address, the message can be sent here when you switch this on. | |
| NAV API Url | The address of the NAV Online Invoice service. | |
| NAV API Username and Password | The login details of the NAV technical user. | |
| NAV API Sign key and Exchange key | The signature and exchange keys of the NAV technical user. | |
| Late payment interest calculation | If Yes, the system calculates late payment interest. | |
| Central bank base rate | The base rate as a percentage. | |
| Incoming invoices email address | The unique email address for uploading incoming invoices. | |
| Default invoicing type | Paper-based, Electronic or EDI. | |
| Default credit limit, receivables limit | The default limit applied to new partners. | |
| Strict location code storage | If Yes, stock can only be stored with a location code. |
You create the technical user on the NAV Online Invoice interface; copy the details you get there to the Tax authority data reporting tab. The guide at the top of the tab shows the registration step by step.
It is a unique, identifier-based address; the PDF files of incoming invoices sent to it are uploaded into the system. If you get a lot of spam you can also set a password, and the address then takes the form password+identifier.
When switched on, the system calculates late payment interest on late-paid invoices based on the central bank base rate you entered.
If you switch it on, stock can only be stored with a location code, so you always see exactly where the goods are.
The menu item is located under Main menu / Settings / System settings. If you do not see it, your user probably does not have the required permission; ask your administrator to check the settings.
Don't want to spend hours searching for a solution? Choose the most efficient way: book a personalized, 45-minute online training session dedicated entirely to you. Whether it's a walkthrough of the basics or a detailed setup of a specific module, our expert colleague will guide you through the whole process, step by step.
Don't waste your time - ask for help!
Our goal is to get you using our system as quickly and efficiently as possible. Whether you're completely new to us or stuck on a specific setting, don't hesitate to ask for help!
Create your account now,
pay later!

