Installing Google Calendar

How to install the Google Calendar extension in Logzi: the installation steps, the description of the fields to fill in, and frequently asked questions.

Function overview

The Google Calendar extension synchronises the Logzi calendar of the selected colleague with Google Calendar in both directions.

  • You can start the extension from the Extensions menu with the Install button on its card.
  • The Save button also saves and installs the extension at the same time; there is no separate installation step.
  • You can check the result of the installation on the Log tab of the extension.

Step by step

1. Open the installation of a new extension

Go to the Main menu / Integrations / Extensions / Install new extension menu item. Among the cards, find the Google Calendar card and click its Install button.

2. Enter the basic data

On the page that opens, under the Actions tab you see three basic fields: the API name field is prefilled (in the form “… integráció”), the Google Calendar type is selected in the Type field, and the Active field is set to Yes. You can rewrite the API name, for example if you install several extensions of the same integration.
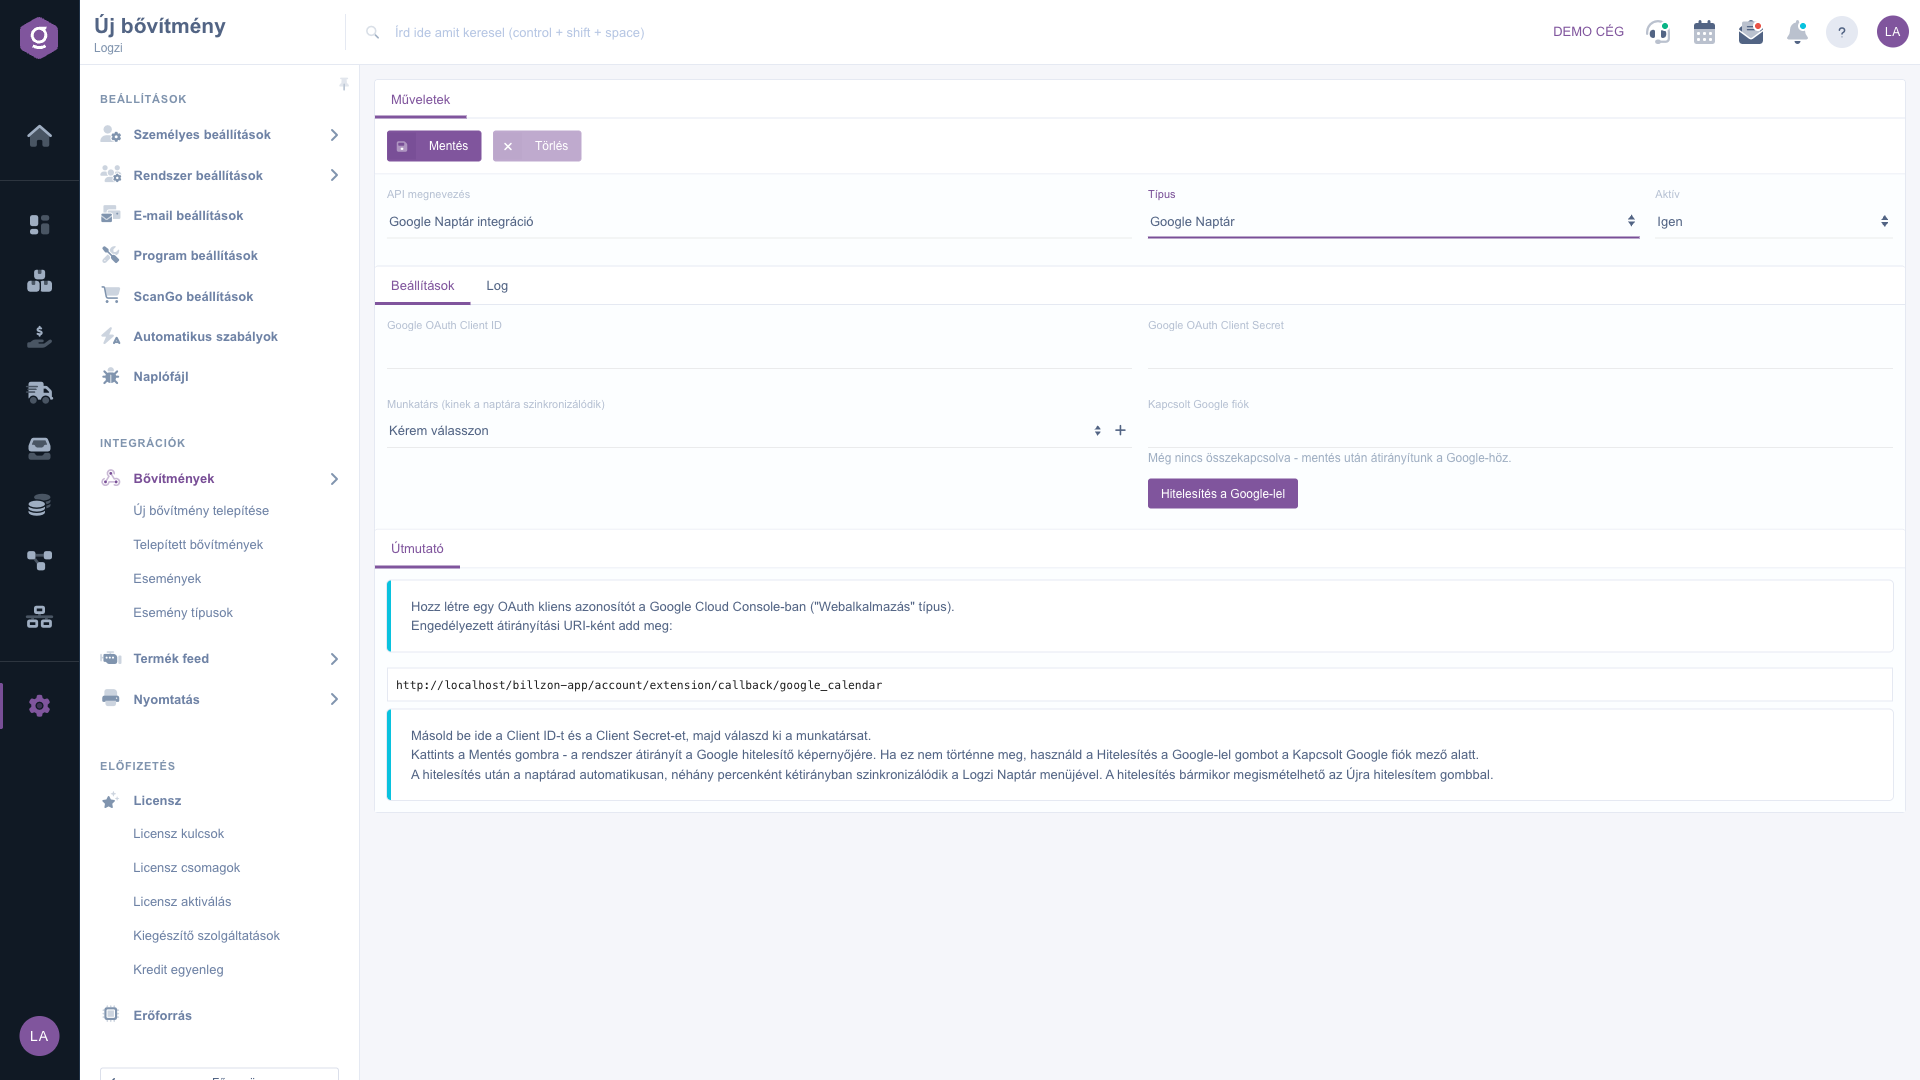
Installation form of the Google Calendar extension

3. Fill in the settings

In the Google Cloud Console, create a Web application type OAuth client ID, add an authorised redirect URI to it, then copy the received Google OAuth Client ID and Google OAuth Client Secret into the fields of the Settings tab. In the Colleague (whose calendar is synced) field, select whose calendar should be synchronised.

4. Save and install

Click the Save button. Saving also performs the installation: after a successful operation the message “A bővítmény telepítése/módosítása sikerült!” (“The extension was installed/modified successfully!”) appears, which you can close with the Rendben (OK) button; this popup text is shown in Hungarian in every language. After saving, the system redirects you to the Google authentication page; authorise the access, after which the Linked Google account field shows the linked account. If the redirect does not happen, use the Authenticate with Google button. The synchronisation then runs in both directions every few minutes.

5. Check the result

If you receive the warning “A bővítmény telepítése nem sikerült vagy már telepítve van!” (“The extension could not be installed or is already installed!”, shown in Hungarian), or you are unsure about the result, open the Log tab of the extension: there you see the status, date and message of the events in chronological order. You can also open the installed extension later from the Installed extensions list.

Tip


The redirect URI entered in the Google Cloud Console must match exactly the one given by Logzi, otherwise the authentication stops with an error.


You can manage your installed extensions on the Installed extensions page. You can read about the card list of extensions on the Install new extension page.

Field description

Field / ElementRequiredDescription
API nameThe name of the extension in the Installed extensions list. Prefilled at installation in the form “… integráció”; you can freely rewrite it, so you can tell apart several extensions of the same type.
TypeThe type of the extension; it is preset based on the selected card (Google Calendar).
ActiveWith Yes the extension works, with No it is paused. The default at installation is Yes.
Google OAuth Client IDThe ID of the Web application type OAuth client created in the Google Cloud Console.
Google OAuth Client SecretThe secret key (Client Secret) of the same OAuth client.
Colleague (whose calendar is synced)The colleague whose Logzi calendar is synchronised with Google Calendar.
Linked Google accountA read-only field: shows the linked Google account after the authentication.
Authenticate with GoogleButton: starts the Google authentication if the redirect did not happen automatically after saving.

Frequently asked questions

The appearance of the menu item depends on your permissions. If you cannot see it, ask the administrator to check your permissions.

This message is shown in Hungarian in every language and means that the extension could not be installed or is already installed. Either the data entered are wrong, or you already have this extension installed with the same settings. Check the Installed extensions list and the Log tab of the extension; if necessary, correct the data and save again.

The Logzi calendar of the colleague selected in the extension is synchronised with the calendar of the authenticated Google account, in both directions.

Open the extension on the Installed extensions page and use the Delete button, or set the Active field to No if you only want to pause it.

Need personalized help?

Don't want to spend hours searching for a solution? Choose the most efficient way: book a personalized, 45-minute online training session dedicated entirely to you. Whether it's a walkthrough of the basics or a detailed setup of a specific module, our expert colleague will guide you through the whole process, step by step.

Don't waste your time - ask for help!
Our goal is to get you using our system as quickly and efficiently as possible. Whether you're completely new to us or stuck on a specific setting, don't hesitate to ask for help!

Logzi warehouse management software

Get in touch with us

Interested in our software? Feel free to write to us!

Need help?

If you can't find the answer and need assistance

Create your account now,
pay later!

Try it free for 3 days, no risk, no obligation!
